How to Shoot Waterfalls at Night with a Silky Effect on Your Phone: Complete Guide
Welcome to How to Shoot Waterfalls at Night with a Silky Effect on Your Phone: Complete Guide. This step-by-step guide helps you take control with manual settings, craft long exposures, use a tripod, explore slow-shutter apps and ND filters, and finish with clean post-processing so your phone captures silky waterfall motion with confidence.
Switch your phone to manual mode
Take control by moving from Auto to Pro or Manual. In manual mode you set shutter, ISO, and focus, not the phone’s automations. Start by choosing a direction: longer shutter to emphasize motion, or lower ISO for cleaner color. You’ll see sliders for shutter speed, ISO, and often white balance. Begin with a rough base—mid-range shutter and ISO—and refine from there. If the scene looks washed out, slow the shutter a touch or lower ISO; if it’s too dark, raise the exposure slightly. Practice builds a repeatable workflow you can rely on for waterfall shoots.
When you switch to manual, note how the screen shows the exposure controls and the focus. A tripod helps you keep the frame stable, so long shutters stay sharp rather than smearing into blur you don’t want.
Set a slow shutter to blur water (long exposure waterfall phone)
Aim for silky water, not a muddy result. Start around 1/2 to 2 seconds. If you’re handheld or seeing excessive blur, increase to 1/4 or 1 second and use a tripod. Longer shutters produce more motion blur, creating that dreamy look. If available, enable a Long Exposure mode and use an ND filter if you have one. Lock a consistent base range to maintain cohesive edits.
After picking a shutter, check ISO. Longer exposures usually need a lower ISO to avoid grain. In dusk or shade, you can push ISO slightly, but keep noise low for clean water color. If the water looks too bright or choppy, shorten the shutter or lower ISO a touch. Practice with different speeds to see how the water responds.
Lower ISO to cut noise in low light
Low light invites noise, so start with the lowest ISO your phone allows. Raise ISO only if the image is too dark. Grain in the shadows can ruin that silky water look. If the scene is dark even with a slow shutter, you can widen the aperture if your phone supports it, or lengthen the exposure while staying on a low ISO. The goal is balanced light that keeps water smooth without muddying color.
Be mindful with ISO near shadow edges; you may need a slight bump to keep water details visible, but don’t overdo it. Each shot teaches your phone’s comfort zone, yielding crisper water and natural color.
Fine-tune shutter and ISO for silky water effect smartphone
With a solid base, make small tweaks. If water isn’t smooth enough, nudge shutter longer in small steps and review. If the image is too bright, lower ISO a touch. If it’s too dark and you can’t raise ISO much, shorten the shutter slightly or choose a lighter scene. The objective: visible motion with minimal noise. Test, review, and repeat until you achieve that glassy water you want.
End each session by recording the settings you used and how they felt. This memory will help you repeat successful results on future waterfall shoots.
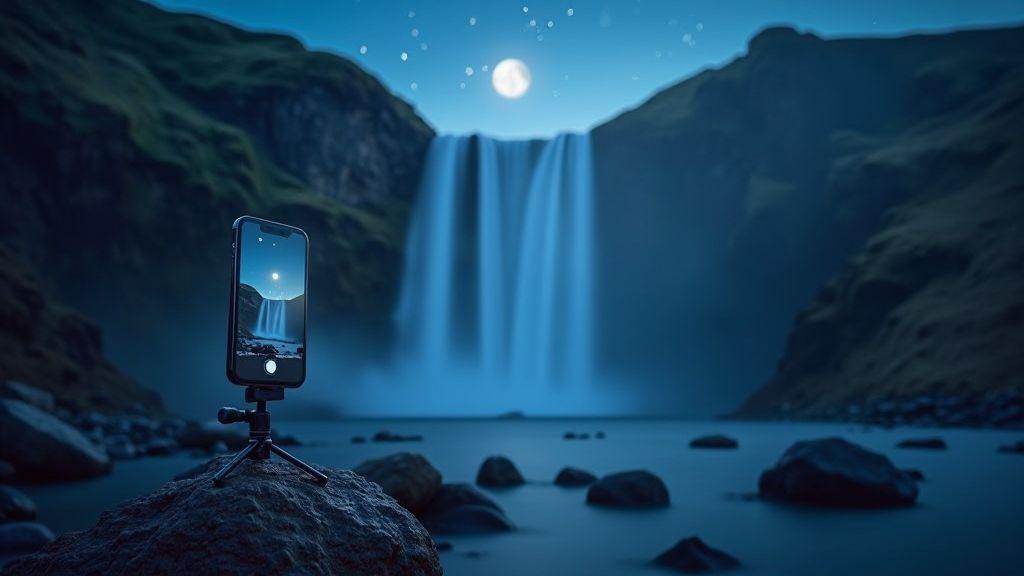
Mount your phone on a tripod for night shots
A sturdy tripod delivers steadier frames during long exposures, reducing blur and shake. Look for a stable base and a quick-release plate for fast setup. If you don’t have a full tripod, a small table tripod or flexible mount can work, but stability is crucial. Before shooting, level the tripod and clamp the phone securely to prevent wobble during exposure.
With the phone mounted, frame deliberately. Use the rule of thirds to place the waterfall off-center for a dynamic image. Wide lenses capture more, but may reduce water detail; subtle zoom helps avoid softness. Keep the horizon level and hold the tripod steady between shots.
Test a short exposure to check for creeping motion in water or background elements. If solid, lock in long-exposure settings and let the waterfall glow with silky motion.
Use a sturdy phone tripod night shots setup
Night shots demand a rigid setup. A solid tripod with a reliable clamp keeps the phone centered and stable. If wind is a factor, add a weight bag to tripod legs. A compact, robust setup minimizes micro-movements when you press the shutter. When you’re confident, you’ll see cleaner water detail in your night photos.
Choose a tripod with adjustable height for eye-level or dramatic low angles. A secure clamp protects your phone’s edges. If you’re using a case, ensure the clamp accommodates it securely.
Use a remote or timer to avoid shake. A wired or Bluetooth remote lets you trigger without touching the phone. If you don’t have a remote, the camera app’s timer works, but press gently and wait a moment before the exposure begins.
Trigger with a timer or remote to avoid shake
A delay helps your hands stay still as the shutter opens. Use a 2–3 second delay to minimize shake. If you’re using a remote, press once to start and again to stop. Experiment with delays to suit the scene. Longer delays help with heavier tripods or windy nights. If you notice vibrations after the shot, try a shorter exposure and shoot again. A remote makes waterfalls even more manageable when every droplet’s motion matters.
Lock your frame for clear long exposure waterfall phone results
Locking your frame means repeatable compositions. Use fixed exposure and lock focus to avoid chasing changing light. In manual mode, set a low ISO and narrow aperture to retain detail across the frame. A longer shutter (1–2 seconds) smooths the water, but you’ll need a tripod and remote to stay still for the duration.
If your phone has a night mode, test it with the tripod. Night modes can brighten shadows but may dull bright highlights. Compare a couple of shots with different shutter speeds to find the silky waterfall look you want. Consistency in framing and exposure yields repeatable results for future shoots.
Use slow shutter apps and ND filter on your phone
You don’t need a fancy camera to get cinematic motion. A slow shutter app and an ND filter help you extend exposure without overexposing. Choose an app that offers full manual control: shutter, ISO, focus. If your phone supports RAW, shoot RAW for more post-processing latitude. Practice with simple scenes first to learn how shutter times affect mood.
When choosing a slow shutter app, look for a live histogram, exposure bracketing, and focus peaking. Set ISO as low as possible (often 100 or 50). Use longer shutter speeds (1–4 seconds or more) to create silky water. If water becomes opaque or scene overexposed, shorten exposure or increase ND strength. Attach the ND filter securely and keep your phone steady with a tripod or solid surface. Calm moments help you avoid wind and micro-movements during long exposures.
With the right app and ND filter, night shots gain motion and softness. Review shots and adjust: if water is too milky, shorten exposure; if not smooth enough, lengthen slightly. Use bursts to pick the best frame and compare long-exposure options. The payoff is a calm, dreamlike look that invites viewers to linger.
Choose a slow shutter app for phone control
Pick an app that provides full manual control over shutter, ISO, and focus. A live histogram helps exposure judgment at a glance. If available, enable long exposure or bulb mode and lock focus to prevent drift. Keep ISO low to reduce noise and select a shutter speed matching scene brightness. Lock focus on key textures (rocks, trees, edges). If RAW is supported, enable it for post-edit flexibility.
Test in varying light: dusk, street lamps, or water reflections. Start with 1–2 seconds for water and 4–8 seconds for smoother scenes. If exposure looks washed out, increase ND or reduce exposure time. Save several variations to compare later. Slow shutter control is a skill you develop with practice.
Attach an ND filter for longer exposures in dusk or moonlight
ND filters cut brightness to allow longer shutter times in lower light. In dusk or moonlight, every additional second helps blur motion into a glossy look. Secure the filter to prevent slips or scratches. If clip-on, ensure edge sits flush to avoid vignetting. Magnetic or threaded filters speed changes when light shifts.
Pair the ND with a stable tripod and slow shutter app. Start with 2–4 seconds at dusk, then extend to 6–15 seconds as light fades. Keep ISO low to minimize grain and adjust shutter to protect highlights. If colors shift, tweak white balance in the app. Patience matters in low light—let scenes reveal themselves.
Combine slow shutter app and ND filter for silky water effect smartphone
Together, they produce silk-like water and softly glowing skies. Frame over a river, fountain, or waterfall. Attach the ND, set a long shutter (2–10 seconds), and keep ISO low. Lock focus on a moving-water edge or textured rock to keep some areas sharp while water blurs. Take a test shot, then tweak exposure by a second or two based on results. If the image feels flat, try a longer exposure or different angle to direct motion. Balance glow with defined details for dreamy water, not muddy results. Practice across several nights to learn how light shifts affect your final look.
Compose for night waterfall photography with your phone
Stunning night waterfalls are possible with steady grip or a small tripod, slower shutter, and mindful lighting. Set your phone to manual or pro mode to control shutter, ISO, and focus. Keep ISO low to minimize noise and use a shutter speed that yields enough water blur for silky motion. Dark skies may require longer exposures or brighter foregrounds. Shoot in test frames, then fine‑tune to let water melt into the dark backdrop. If your phone supports RAW, enable it for better post-processing. Tap focus gently on the flow, but avoid constant hunting by letting the camera settle after changes.
Balance exposure so highlights on wet rocks or the waterfall aren’t blown out. If possible, shoot RAW for post-processing latitude. Use bursts with slightly different settings to compare later. Patience and steady setup often yield the best results.
Pick a strong foreground and leading lines
Choose a foreground anchor (a mossy rock, fallen log, or distinctive plant) to ground the image. Leading lines like streams, trails, or rock edges guide viewers toward the waterfall. Place lines so they disappear behind water or pull the gaze toward the flow. Use nearby stairs or paths to add depth.
Get close enough to feel scale but not so close you block the scene or miss the broader water trail. Try low angles to emphasize texture or slightly elevated views for path visibility. Each angle shifts light and motion; aim for a clear path from foreground to water.
Position to show flow and motion for silky results
You want motion blur in the water with sharp rocks and trees. Use a longer shutter (roughly 1/4 to 2 seconds if possible). If it’s very dark, you may need even longer—rely on a tripod and a timer to avoid shake. A small delay helps reduce camera shake on shutter release. If your phone has stabilization, experiment with longer exposures to see if the water remains smooth without foreground blur.
Consider wind and mist, which can blur the shot. Visualize water as a soft glaze to guide composition from top to bottom. For feathered, dreamy water, favor longer exposures and a steadier base. Adjust settings based on light and waterfall strength, keeping the core principle: longer shutter for movement, sharp edges where detail matters.
Frame to highlight the waterfall and dark sky when you shoot waterfalls at night with your phone
Frame the waterfall against a dark sky, leaving negative space above the fall to avoid crowding. Use the rule of thirds to place the waterfall off-center, letting the sky balance the composition. A dark backdrop makes the water feel brighter and more dramatic. If possible, include silhouetted trees or branches to frame the scene and add depth. Keep the horizon low to emphasize the fall’s height. If the sky is clear, stars can add mood; if overcast, treat the sky as a quiet backdrop. Keep the water as the hero, with the sky and surroundings supporting the mood. Take a few frames and compare crops to find the right balance.
Light paint the falls and keep yourself safe
Safety comes first when shooting at night. Choose a safe spot away from loose gravel and fast water, with a clear path for your feet. Carry a small, bright light to mark your stance and the bank edge, but don’t point it at the lens. Move the light slowly, like sketching the scene with a soft pencil. If you can, bring a friend to watch your back and remind you to stay grounded. Your safety is part of the shot.
Decide how much light to paint versus keeping shadows. A gentle sweep across rocks adds texture while keeping the waterfall as the focus. If you’re using your phone, keep the light steady and avoid harsh hot spots. A dim headlamp helps you see footing, then switch to quick, measured bursts to sculpt rock texture. Light painting should feel like a whisper—truthful glow with natural shadows. If ground is slick, slow down and recheck footing before adjusting exposure.
Use a torch to light rocks and create texture (light painting waterfalls phone)
Lighting rocks adds depth and texture. Use a small torch to skim surfaces, catching ridges and damp patches with quick, deliberate strokes to avoid flat reflections. On a phone, staged, short passes preserve texture without washing it out. Paint rocks in the foreground and midground separately from the water to keep the waterfall readable. If glare appears, adjust angle or dim the torch slightly. Give the phone a moment to autofocus in low light, then shoot. Repeating small touches builds texture without overexposure, ensuring rocks feel tactile while water maintains silky motion.
Switch hands if the torch tires your grip. A slightly longer exposure on the water can blend motion into a soft glow, while rocks stay crisp with short lighting bursts. This balance—texture in rocks, glow in water, steady pace—becomes your signature.
Wear grippy shoes and watch wet rocks at night
Night hiking brings slick surfaces and uneven ground. Wear shoes with good tread and a snug fit to stay stable on slippery rocks. Test rocks with a toe press; if slick or unstable, choose another route. Use a lightweight headlamp to illuminate your path without blinding the camera. If you encounter loose stones, pause and switch to a safer path. Your safety gear protects you and your shot.
Respect nearby people and keep the noise down. Quiet steps and careful lighting keep the scene inviting and safe. If someone asks what you’re doing, you can say you’re practicing light painting and long exposure techniques with your phone.
Balance light painting with low light exposure phone settings
Balancing light painting with a low-light base is the sweet spot for a silky waterfall on your phone. Start with a longer base exposure to blur water, then use short light-paint bursts to lift texture without overdoing it. If your phone supports manual ISO, keep it low to minimize grain. A mid-range ISO with a modest aperture provides a clean base while the torch adds targeted glow.
Set the base shutter to a few seconds, then time torch passes to highlight texture in the gaps of the water’s motion. If you see noise in darker areas, drop ISO a notch; if you need more brightness, extend the exposure rather than cranking ISO. Practice to discover the rhythm that reveals detail, motion, and safety in every frame.
Edit and export your silky long exposure shots
After capturing silky water, edit to keep the glow and motion natural. Open RAW or high-quality JPEG and work at a comfortable viewing size to assess motion. Check white balance; a shift can make water look blue or green. In edits, reduce noise, boost contrast, and sharpen motion selectively—focus on the water trails while keeping rocks and trees softer to preserve depth. Subtle color adjustments help keep the scene natural.
Save a working version and export a final version for sharing. Keep a high-quality RAW or TIFF as a backup for future edits. When exporting for the web, use sRGB with appropriate compression to preserve detail and loading speed. Review at 100% zoom to catch any anomalies before sharing.
Reduce noise, boost contrast, and sharpen the flow
Treat noise like a fog you lift. Apply gentle luminance noise reduction to shadows and sky while preserving water’s fine lines. If texture fades, ease back slightly. Increase contrast just enough to guide the eye along the flowing water without making highlights brittle. Sharpen the water’s motion selectively—apply to the glow of the trails and ignore soft background textures. Fine-tune color balance to keep the scene from feeling cool or washed out, especially in night shots where color drift is common.
Save high quality or raw files before sharing
Preserve your work with a high-quality save (TIFF) or keep the RAW alongside edited JPEGs. This gives you flexibility for post-processing tweaks later. When sharing, export web-optimized versions unless you’re preparing for print or a gallery. Keep clearly labeled versions to track edits and keep your workflow calm and organized.
Export full resolution for long exposure waterfall phone photos
If you want a phone-friendly yet full-resolution result, export at the highest quality JPEG or a trusted HEIC that preserves silky motion and fine texture. Use a consistent color space (usually sRGB for online sharing). Avoid aggressive cropping to preserve the sweeping motion of the scene. Share directly from your device or via your preferred platform with minimal, clean edits.
If you want to master the art in your pocket, follow How to Shoot Waterfalls at Night with a Silky Effect on Your Phone: Complete Guide as your reference. With steady technique, mindful exposure, and careful post-processing, your phone becomes a powerful tool for dramatic, silky waterfall photography.

Smartphone Night Photography Enthusiast & Founder of IncrivelX
Vinicius Sanches is a passionate smartphone photographer who has spent years proving that you don’t need an expensive camera to capture breathtaking images after dark. Born with a natural curiosity for technology and a deep love for visual storytelling, Vinicius discovered his passion for night photography almost by accident — one evening, standing on a city street, phone in hand, completely mesmerized by the way artificial lights danced across wet pavement.
That moment changed everything.
What started as a personal obsession quickly became a mission. Vinicius realized that millions of people were carrying powerful cameras in their pockets every single day, yet had no idea how to unlock their true potential after the sun went down. Blurry shots, grainy images, and washed-out colors were robbing everyday people of memories and moments that deserved to be captured beautifully.
So he decided to do something about it.
With years of hands-on experience shooting city streets, starry skies, neon-lit alleyways, and creative night portraits — all with nothing but a smartphone — Vinicius built IncrivelX as the resource he wished had existed when he was just starting out. A place with no confusing jargon, no assumptions, and no gatekeeping. Just honest, practical, beginner-friendly guidance that actually gets results.
Vinicius has tested dozens of smartphones from every major brand, explored dark sky locations across multiple states, and spent countless nights experimenting with settings, compositions, and editing techniques so that his readers don’t have to start from scratch. Every article on IncrivelX comes from real experience, real mistakes, and real lessons learned in the field.
When he’s not out shooting at midnight or writing in-depth guides for the IncrivelX community, Vinicius can be found exploring new cities with his phone always within reach, looking for the perfect shot hiding in the shadows.
His philosophy is simple: the best camera is the one you already have — you just need to learn how to use it in the dark.