How to Create Professional Bokeh Background in Night Portrait Photography
This guide distills practical camera settings, lens choices, and editing tips to craft creamy, dreamlike bokeh in night portraits. Use these ideas as a starting point, then adapt in the moment to keep your subject sharp while the city lights melt into soft circles.
Camera settings for night bokeh
You’re chasing that creamy, twinkling background to make your night portraits pop. Here are practical settings that balance sharp subjects with dreamy bokeh.
Set a wide aperture for blur
A wide aperture pushes the background into smooth blur. Start at f/1.8–f/2.8 if your lens allows, and push to the widest your glass can handle. The wider the aperture, the shallower the depth of field and the more the lights become soft circles. In dim conditions, a wide aperture helps keep shutter speeds fast enough to avoid motion blur. At ultra-wide openings, edge sharpness may dip slightly, but the glow behind your subject remains the goal. Focus on the eyes first, then let the background blur into those pleasing bokeh orbs. If you’re using a slower lens, move closer to the subject or back them from the background to shape the bokeh texture, not just adjust aperture.
Balance ISO and shutter speed
Keep ISO low to reduce noise, raising it only if you need brightness without sacrificing shutter speed. A practical target is ISO under 1600 for clean skin tones and crisper details with a wide aperture. Use a shutter speed that freezes movement—roughly 1/125s to 1/200s is a good baseline for handheld shoots; adjust for subject motion or tripod use. If you’re shooting in a busy city at night, light usage can be increased slightly to balance exposure. If noise appears, raise shutter speed a touch and increase ISO only as needed to preserve the glow in the background.
Quick settings checklist
Keep this quick checklist in mind for fast setup: wide aperture (as open as possible), low to moderate ISO, and a shutter speed that prevents motion blur while preserving the glow behind your subject. If lights are too busy, try a smaller aperture to gain sharpness and use a longer telephoto to compress the background bokeh. Autofocus should prioritize the eyes; manual focus can help if lights create halos around your subject.
- Aperture: as wide as possible
- ISO: as low as cleanly possible
- Shutter speed: fast enough to freeze movement
- Focus: eyes first
- White balance: natural skin tones
- Stabilization: tripod or steady hands for slower shutter speeds
Lens choice for bokeh portraits
When you shoot portraits at night, lens choice shapes how lights render and how smooth the background blur looks. Start with a lens that can open wide and stay sharp wide open. A fast maximum aperture gives better subject separation and helps keep your subject in focus in busy environments. A bright lens also lends flexibility in tight spaces, allowing you to keep the subject large in frame while the background blooms.
Choosing the right lens is about balance. Too-long telephotos can compress space and reduce sense of place; too-wide a lens may exaggerate perspective. For night portraits, aim for a middle ground or a touch longer so your subject stands out without turning the street into a flat backdrop. Think about the mood you want: swirling urban lights behind the subject or a clean glow around their head. Weight and handling matter too—an easy-to-hold lens aids steadiness during long shoots.
Pick fast prime lenses
Fast primes are your best friend for night portraits. Large maximum apertures like f/1.4–f/1.8 let you keep shutter speeds high while delivering strong background separation. Primes often deliver sharper image quality at wide apertures than zooms, especially toward the edges. If budget allows, a 50mm or 85mm prime offers quick, pro-looking results. In cramped spaces, a fast 35mm can be a lifesaver, giving room to frame without stepping into traffic.
Practice moves: step a touch closer or farther and notice how the background blur changes with the aperture. When you nail a shot, the subject glows against soft night bokeh circles.
Use longer focal lengths for compression
Longer focal lengths pull the background closer to the subject, making the lights appear as larger bokeh orbs. This compression creates an intimate feel even in a bustling setting. A 85mm or 135mm on full-frame is a sweet spot for portraits in crowds—you can frame the subject while the background melts into pleasing shapes. Longer lenses also help prevent distortion common with wide angles, keeping facial features natural while the city lights swirl behind.
Remember to keep the shutter speed up to avoid motion blur if the subject moves. A steadier grip or a small tripod helps, especially with longer exposures. The goal is clean, creamy bokeh that frames the subject without overwhelming the scene.
Lens notes for sharp bokeh
To achieve sharp bokeh that remains intentional, manage subject distance and background distance carefully. A bigger separation yields smoother rings. Use a fast lens at wide apertures just enough to blur without losing eye detail; if you push the aperture too wide, you may soften hair and eyes. Test shots at f/1.8, f/2, and f/2.8 to see what your camera and lens pair best.
Keep autofocus on a single eye point if possible; night AF can hunt, so manual focus might be needed. If hand-holding, practice steady breathing and pause between shots to let the lens settle. Watch bright light sources; glare can create distracting halos, so angle yourself to let the bokeh do the heavy lifting.
Aperture and bokeh control
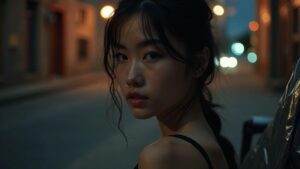
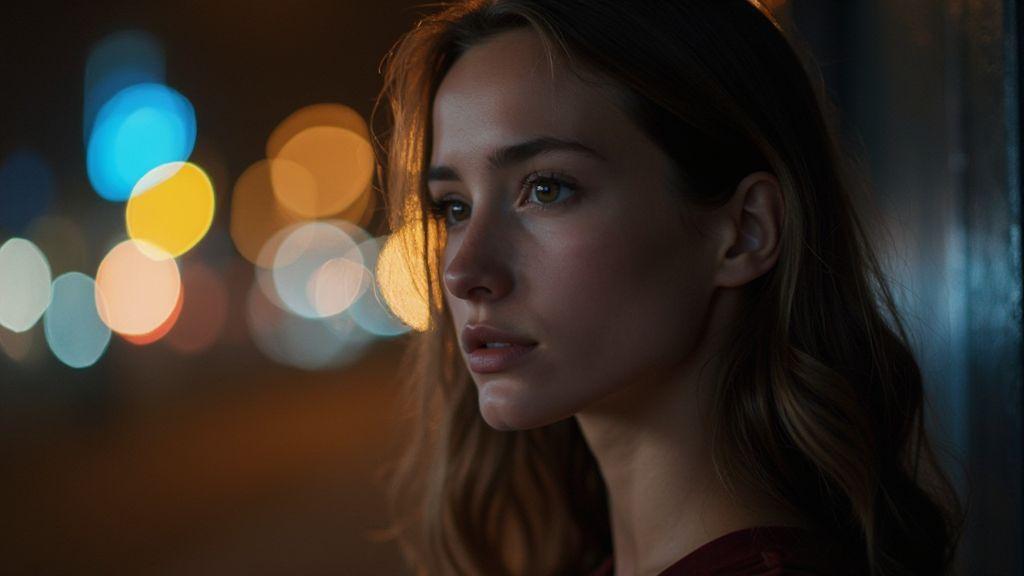
Aperture controls mood in night portraits. A wide opening lets in more light and creates creamy background blur, helping the subject pop against the city lights. Stopping down brings more of the scene into focus and can suit group shots or detailed street scenes. The texture and shape of the bokeh vary by lens; some render round blobs, while others show polygonal shapes at smaller apertures. For a romantic look, aim for round bokeh with a wide aperture.
How aperture shapes the blur
A larger opening (smaller f-number) creates more blur and bigger circles of confusion, turning lights into soft orbs. If you want a classic dreamy night portrait, a wide aperture is ideal. Stopping down preserves more detail in the background and around the subject, which helps if you want the environment to tell part of the story. The aperture shape matters: many lenses render round bokeh with wide openings, while some produce polygonal shapes at smaller apertures. For a gentle, romantic feel, stick with round bokeh at a wide aperture.
Wide aperture portrait photography night tips
Choose a location with bright light sources behind your subject—street lamps or storefronts work well. Use a wide aperture (f/1.8–f/2.8) to create strong separation and a soft glow behind the subject. Start at f/2.8, then try wider openings as you gain comfort. A wider aperture reduces depth of field, so focus carefully on the eyes. In handheld city shooting, stabilize your camera and use a faster shutter speed (1/80–1/100s) to balance exposure with a lively scene and sharp eyes.
Aperture rules of thumb
For one or two people, use a wide aperture to create a dreamy background and emphasize the subject. For small groups, narrow the aperture slightly to keep everyone in focus. If ambient city lights dominate the scene, stop down a notch to retain background detail without pulling attention away from the subject. Remember: How to Create Professional Bokeh Background in Night Portrait Photography starts with choosing the right aperture. Practice with different f-stops and compare results to see how mood shifts with blur.
Lighting tips for bokeh backgrounds
Treat background lights as part of the scene, not distractions. Background lights should shimmer without overpowering the subject. Use distance, color, and texture to shape mood. Start simple and increase complexity as you gain confidence. Pushing the aperture creates creamier bokeh; if you need sharper separation, nudge ISO or shutter speed to preserve exposure without dulling the glow. The aim is balanced contrast, not a photo where the subject looks pasted onto lights. A classic two-light setup—a soft key on the subject and a subtle background glow—keeps the subject crisp while the bokeh adds texture and atmosphere.
Place background lights far from the subject
Distance makes background lights turn into gentle specks rather than bright, distracting points. A longer lens helps compress space and intensify the bokeh; if a long lens isn’t available, back up a bit and use a wider aperture to preserve softness.
Using fairy lights bokeh portraits effectively
Fairy lights provide star-like orbs that add charm without overpowering the subject. Place strands behind or to the side, not directly in frame. Keep the camera at a distance so the blur forms circles or soft rings. Vary color: cool whites with warm ambers create mood without chaos. A few warm lights near the subject can create a gentle halo that draws the eye.
Safe lighting setup
Prioritize safety at night: use battery-powered or low-heat LEDs and secure cords. Test your setup in a quiet space before a session to avoid interruptions and ensure steady posing and framing.
Distance and depth of field bokeh
Distance changes the look of your night portraits. Placing the subject farther from the background yields creamier bokeh and a more pronounced subject separation. Experiment with focal length and subject distance to find the balance between sharp subject and softly blurred lights.
Increase subject-to-background distance
Moving the subject away from the background grows creamier bokeh and smoother lights. If the background becomes too soft, fine-tune with a longer exposure or a slightly wider aperture to keep the subject sharp. A lens between 50mm and 85mm often provides natural-looking separation for many night scenes.
Control focus plane for smoother bokeh
Focus plane matters as much as distance. Lock focus on the subject’s eyes or face, then open up just enough to blur the background. For manual focus, tiny adjustments and rechecking on the LCD help. If using autofocus, choose a single point and avoid continuous AF chasing moving lights. A shallow depth of field helps keep the subject crisp while the background blooms.
Depth and distance guide
Think in steps: distance, focus, and aperture. Place the subject slightly away from the background to let lights soften. Lock focus on the eyes, then adjust aperture to taste. The more distance you give, the more the lights blur into stars or soft glows. You’ll learn depth by feel, not just numbers.
Edit and polish how to create bokeh at night
A polished night portrait shapes the light you already have. Start with proper exposure so background lights glow without washing out the subject. Use a wide aperture to keep the dreamy blur, and adjust shutter speed to freeze or blur movement as needed. If you’re hand-holding, a fast lens and steady breathing help; a small tripod assists longer exposures. Review for harsh bokeh specks and ensure the glow looks natural.
Color casts from streetlights may need correction in editing. A quick balance preserves skin tones while maintaining the city mood. Separate the subject from the background with a subtle contrast boost and keep the background glow consistent to preserve recognizable bokeh shapes. Save a non-destructive version for comparison, and export variants optimized for web with balanced histograms. The final edit should feel cohesive: soft, cinematic, and true to the night.
Reduce noise and boost contrast
Identify flat, noisy areas behind the subject and apply light noise reduction to the background to keep the bokeh smooth. Preserve skin and clothing detail on the subject. A selective brush helps apply NR only where needed. Then boost contrast to separate the subject from the glow. If background lights look dull, brighten them slightly to preserve the bokeh’s glow. When working with RAW files, sharpen only the subject and keep the background soft for a natural night mood.
Soften highlights and enhance glow
Softening highlights prevents hot spots from distracting the eye. Use gentle highlight recovery for overexposed background lights to render round, creamy glows. If halos appear, reduce local contrast or feather the adjustment. A careful glow boost on background lights can enhance mood without altering skin tones.
Final export tips
Export with a balanced profile to preserve the night mood. Save a high-quality master for your portfolio and create a web-optimized version with similar color balance so the bokeh remains characterful online. Label versions clearly (for example, bokeh-night-strong and bokeh-night-soft). For prints, aim for 300 dpi and consider a wider color gamut like Adobe RGB with soft-proofing. The final export should feel like you captured a moment—soft, cinematic, and true to the night.
If you found this guide helpful, you can explore more on How to Create Professional Bokeh Background in Night Portrait Photography to refine aperture choices, focal lengths, and post-processing for professional results.

Smartphone Night Photography Enthusiast & Founder of IncrivelX
Vinicius Sanches is a passionate smartphone photographer who has spent years proving that you don’t need an expensive camera to capture breathtaking images after dark. Born with a natural curiosity for technology and a deep love for visual storytelling, Vinicius discovered his passion for night photography almost by accident — one evening, standing on a city street, phone in hand, completely mesmerized by the way artificial lights danced across wet pavement.
That moment changed everything.
What started as a personal obsession quickly became a mission. Vinicius realized that millions of people were carrying powerful cameras in their pockets every single day, yet had no idea how to unlock their true potential after the sun went down. Blurry shots, grainy images, and washed-out colors were robbing everyday people of memories and moments that deserved to be captured beautifully.
So he decided to do something about it.
With years of hands-on experience shooting city streets, starry skies, neon-lit alleyways, and creative night portraits — all with nothing but a smartphone — Vinicius built IncrivelX as the resource he wished had existed when he was just starting out. A place with no confusing jargon, no assumptions, and no gatekeeping. Just honest, practical, beginner-friendly guidance that actually gets results.
Vinicius has tested dozens of smartphones from every major brand, explored dark sky locations across multiple states, and spent countless nights experimenting with settings, compositions, and editing techniques so that his readers don’t have to start from scratch. Every article on IncrivelX comes from real experience, real mistakes, and real lessons learned in the field.
When he’s not out shooting at midnight or writing in-depth guides for the IncrivelX community, Vinicius can be found exploring new cities with his phone always within reach, looking for the perfect shot hiding in the shadows.
His philosophy is simple: the best camera is the one you already have — you just need to learn how to use it in the dark.