Compare image quality on your phone
You’ll judge image quality on your phone by looking at how clean and true colors appear, how details hold up in shadows and highlights, and how the camera handles motion. Your goal is to compare how different settings affect clarity, color accuracy, and noise. You’ll notice that small changes in exposure, ISO, and shutter speed can make a big difference in your everyday photos. When you switch between modes, you’ll feel the difference in sharpness and texture, and you’ll learn what works best for your style.
You should test with real scenes you use daily—a park, a street, or your kitchen. Watch how white walls look under bright sun and under shade. If you zoom in on a photo, you’ll see how fine details like leaves, fabric weave, or handwriting hold up. This comparison helps you decide when to use auto and when to take manual control for crisper results. Your phone’s screen also matters; compare how the same shot looks on your phone and on a larger display.
To make it actionable, set up a quick checklist: focus accuracy, color consistency, shadow detail, and noise floor. You’ll build a mental map of which settings give you the most pleasing results for each scene. This way, you’ll know what to change next time without rehauling the entire shoot. Your goal is reliable, high-quality images you’re proud to share.
Check resolution and dynamic range
When you check resolution, you’re looking at how many pixels your camera uses to render a scene. A higher resolution means more detail, but it can also create bigger file sizes and more noise if the ISO is high. You’ll want to test a landscape and a close-up to see how fine textures render at 12 MP, 48 MP, or whatever your phone offers. You’ll notice that some modes push more detail in shadows and highlights, while others smooth over texture.
Dynamic range tells you how your phone handles bright and dark areas in the same frame. You’ll test a backlit subject and a shaded foreground in one shot. If your phone clips highlights or crushes shadows, you’ll see muddy skies or blocky dark areas. You’ll compare auto with manual exposure to gauge where you gain the most balance. Keep an eye on skin tones too—true color is more important than a tiny boost in contrast.
To compare effectively, shoot the same scene in different modes and compare the results on a larger screen. You’ll notice that the same image can look dramatic in one mode and flat in another. Your aim is to choose a setting that preserves detail across the frame while keeping colors natural. Remember, higher resolution helps you crop later, but it won’t fix poor exposure.
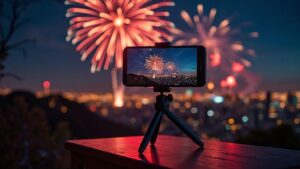
Test smartphone long exposure image quality 2026
Long exposure is when you want light trails, silky water, or motion blur for creative effect. You’ll test how your phone holds up with a longer shutter time, like 1/2 second or several seconds, depending on your model. You’ll find that stability matters as much as speed; a steady hand or a tripod makes a big difference. If you shake, the image will smear and lose sharpness, so keep still.
Noise and color shift can show up in long exposures, especially in darker scenes. You’ll compare how different apps handle noise reduction and color smearing. Some phones use computational tricks to smooth noise, which can soften edges. You’ll decide whether you prefer a natural look with a touch of grain or a cleaner but slightly flat image. You’ll also test how well your phone recovers highlights when lights streak across the frame.
To make it practical, pick a scene with moving lights or gentle water flow. Shoot with manual shutter and ISO settings, then compare results across modes. Your goal is to find a sweet spot where you get smooth light trails without halos, while keeping important details intact. Use a small tripod or steady surface to maximize sharpness.
Measure noise reduction and sharpness
You’ll measure noise reduction by looking at flat color areas like skies or walls and seeing if speckling appears at higher ISO. Compare two shots with different ISO settings at the same exposure. If noise reduction is strong, you’ll notice smoother textures but less detail in fine lines. If it’s light, you’ll keep more texture but see some grain. Decide which look you prefer for each photo situation.
Sharpness is about edge clarity. You’ll zoom in on textures like leaves, fabric, or brick. A sharper image shows crisp edges and distinct lines, while too much sharpening creates halos. Test with and without in-camera sharpening and with post-processing options if you use editing apps. Your aim is to choose a setting that preserves natural edges without overdoing it.
To apply this quickly, shoot a simple scene with strong edges and fine textures. Compare how different presets render those features. You’ll learn to tune focus, shutter, and ISO to maximize real-world sharpness in varied lighting.
Monitor battery and CPU on your device
You’re in control of how your camera works, and that starts with watching what your device is doing. Your phone or tablet has heat, battery, and background tasks that can slow you down if you don’t keep an eye on them. When you’re using camera apps, you’ll notice a big difference if you keep your eye on battery and CPU. You’ll learn where the drains come from and how to keep things running smooth. Think of it like a car dashboard: if the gauge shows trouble, you fix it before you stall.
Your goal is to stay ahead of problems rather than chase them. If you notice your device getting warm while you’re shooting, it’s a sign to pause and cool down. If your battery dips fast, you’ll want to save energy by tweaking settings or closing unnecessary apps. This isn’t about being paranoid; it’s about giving yourself the best chance to capture the moment without the device quitting on you.
You’ll find that small changes add up. Turning off features you don’t use, lowering screen brightness, or limiting multitasking can extend your session. You’ll feel the difference in the time you have to shoot and in the consistency of your images. With every session, you’ll gain better intuition about how your device behaves under load.
Check slow shutter app battery performance 2026
When you run Slow Shutter apps, you’re pushing the device harder than normal. Start by checking battery usage in your settings right after a session. If the app is a top consumer, you’ll likely see it listed there. Note how long you’ve used the app and how much battery it drains in that period. If you spot a rapid drain, consider shorter sessions or enabling a power-saving mode if your device offers it.
Compare that to other apps you use for long exposures or video. If Slow Shutter App drains more than native options, you’ll want to plan your shoot differently. You can still get great shots by batching low-drain tasks, like turning off live filters during long captures and only enabling them when you review a shot. You’ll learn to balance the need for features with the cost to battery life.
If you’re testing, do a quick loop: start a session, monitor battery, then close the app and wait a minute to see if the drain stops. This helps you separate real app load from background noise. You’ll walk away with a practical rule: keep exposure sessions short if the app is a heavy hitter, or pair it with a power pack for longer nights.
Watch CPU use, heat, and multitasking
CPU usage is your quiet signaler. High CPU plus heat means your device is working hard, and that can affect image quality and timing. Use a built-in CPU monitor or a third-party tool to check real-time load during a long exposure. If you see spikes whenever you enable certain features (like high-dynamic-range processing or live stacking), you know where to adjust.
Heat is not just uncomfortable; it can degrade performance. If your device warms up quickly, pause the shoot and give it a cool-down break. You don’t want thermal throttling to kick in, which slows your processing and can blur your frames. Multitasking compounds the issue: too many apps running in the background steals CPU cycles and battery. Close unnecessary apps, disable notifications, and keep the camera app as the star.
You’ll become better at predicting when you need to pause. If you’re planning a long night of astrophotography, plan battery swaps or a cooling break every so often. Your camera will thank you with steadier frames and steadier timing.
Optimize settings to save battery
To squeeze more life out of your session, start with the basics: lower screen brightness, shorten auto-lock time, and disable haptic feedback when you don’t need it. You can also reduce multitasking by turning off background refresh for non-essential apps. If your device supports it, enable a low-power mode during long shots.
In the camera app itself, choose a simpler workflow: use manual exposure with RAW capture only when needed, and avoid heavy post-processing in the field. If you don’t need live stacking or real-time HDR, turn those options off. Every extra feature costs you battery, heat, and CPU headroom.
Finally, you’ll want to use a power source when possible. A small portable battery pack can turn a short session into a longer one without stressing the device. You’ll shoot more confidently knowing you have a plan for energy.
Control stabilization and noise in your shots
When you’re chasing clean, steady photos or videos, you control stabilization from the moment you press the shutter. You’ll notice that even small hand movements can blur a image, especially in low light or with long exposure. Your goal is to minimize that blur by using the right tools and techniques. Think of stabilization as a three-legged stool: hardware, software, and technique all have to work together. If one leg is weak, the shot wobbles.
Your first move is to lock in a steady base. A sturdy tripod gives you a rock-solid platform for long exposures and night shots. If you don’t have a tripod handy, enable in-camera stabilization (OIS or EIS) and use a stable surface. When you shoot handheld, you’ll feel the difference with small steps and a controlled breathing rhythm; press the shutter during a natural pause instead of during a wobble. In software, stabilization options can compensate for minor shakes, but they can’t fix a badly framed or over-motioned clip. Use them as a safety net, not a substitute for a solid base.
Finally, you’ll want to think about noise. Long exposures introduce heat and sensor noise. After you shoot, you’ll benefit from choosing the right ISO and exposure time to balance light and grain. You’ll also see noise reductions in your camera or post-processing software that can smooth grain without losing detail. The trick is to test a few frames at different ISO and shutter speeds so you know what long exposure noise looks like on your gear. With practice, you’ll know when to push for brightness and when to back off to keep noise in check.
Use a tripod, OIS, and software stabilizers
You’ll start with a tripod for the crispest base. If you can’t place your camera on a tripod, use a stable surface and lean your body into the shot. Turn on optical image stabilization (OIS) if your lens supports it; this helps dampen small shakes during handheld shots. Enable any available electronic stabilization (EIS) in your camera or app for an extra layer of safety, but don’t rely on it alone for critical frames.
Next, practice software stabilizers. In post, you can apply gentle stabilization that reduces jerkiness without warping the scene. If you’re shooting video, stabilize in small amounts to avoid a rubbery look. For stills, stabilization software can correct minor shakes from wrapping up a long exposure, but the best results still come from a solid tripod and well-calibrated shutter speeds. Remember: software fixes come after you capture, not before.
Understand long exposure noise reduction and stabilization 2026
Long exposure noise reduction (LENR) is your friend when you push for bright night scenes or light trails. LENR works by taking a second dark frame to measure the noise and subtract it from your shot. You’ll want to enable LENR when you’re shooting long exposures at high ISO or with very slow shutter speeds. It adds time to your workflow because you’ll wait for the dark frame, but the payoff is cleaner shadows and crisper highlights.
Stabilization in 2026 has improved a lot. Modern cameras and phones combine hardware stabilization with smart software to smooth out shakes. If you shoot in low light or with telephoto lenses, turn on both OIS and LENR when possible. But be mindful: too much stabilization or aggressive LENR can soften detail. It’s about balance—test a few frames, compare results, and keep the settings you like best.
Combine hardware and software for steady shots
The strongest approach is to mix hardware stability with smart software. Put your camera on a tripod or solid surface, enable OIS, and then use software stabilization to fine-tune. For long exposures, use LENR and a modest exposure time to protect details. In practice, you’ll test a few combos: tripod OIS LENR on, tripod LENR off, handheld with EIS on. You’ll quickly see which setup delivers the sharpest, cleanest result for your style.
For a quick takeaway, always start with a stable base, then layer stabilization in software only as needed. If you’re shooting night scenes with light trails, a small tripod with a longer shutter can outperform a handheld shot that relies solely on software stabilization.
Set manual exposure with Camera Settings
You’ll control how bright or dark your shot looks by locking in the basics before you press the shutter. In manual exposure, you’re the boss of how your image is lit, not the camera guessing for you. Start with the big three: shutter speed, ISO, and exposure compensation if your camera uses it. This is where you decide how much light your sensor collects and how you want motion to read in the final image. If you’re shooting a fast-moving scene, you’ll want a quick shutter. If you’re after a dreamy blur, you’ll push for a slower one. Adjusting exposure early gives you predictable results you can build on.
Choose shutter speed, ISO, and exposure lock
Your shutter speed is the timer for how long light hits the sensor. A fast speed freezes action, but it can darken your photo if you don’t lift other settings. A slow speed blends movement—great for water or light trails, not for handheld stability. Find a balance by testing a few frames; you’ll start to see what works for your scene. ISO is your sensor’s sensitivity. Lower ISO keeps noise down, but you’ll need more light or a longer exposure. Raise ISO to brighten in low light, but you risk grain. Exposure lock helps you keep a consistent brightness across multiple shots. Lock a shot where the brightness looks right, then recompose without changing the light. This keeps your series uniform, especially in changing scenes.
Note computational photography long exposure 2026
Computational tricks can extend what you can do with long exposure, even when your shutter is limited. In 2026, many phones blend multiple frames to simulate longer exposure, smoothing motion or adding ghosting effects. You can stack frames to reduce noise or to brighten shadows without pushing ISO too high. But interpret these tools as a way to augment your manual controls, not replace them. If you want crisp motion blur, you still need a solid shutter speed in your set. Treat computational options as a safety net: they fill gaps you couldn’t cover with hardware alone. If you’re comparing methods, try a real long exposure (with a tripod) versus a computational approach to see which fits your style.
Fine tune manual controls before shooting
Before you shoot, take a quick test frame to check exposure and focus. Tweak your shutter speed first if motion is your target. Then adjust ISO to clean up noise while keeping brightness sane. If your subject has bright highlights, reduce exposure a touch to avoid clipping. If you’re shooting a landscape at dusk, you might prefer a slightly slower shutter and lower ISO so you retain color and keep noise down. Always preview a couple of frames, and lock in the combination that gives you the result you want. You’ll save time on the day and feel more confident when you press the shutter.
Pick between iPhone and Android options
You want clear guidance, not fluff. You’ll see how each ecosystem handles long exposure and manual controls, so you can pick what fits your style. If you shoot with iPhone, you’ll lean on built‑in tools and select apps that complement them. If you’re on Android, you’ll weigh native options against more capable third‑party apps that expand control. Either path starts with knowing your device’s strengths and your patience for tweaking settings.
Your choice should hinge on two things: how comfortable you are with manual controls, and how much you value simplicity versus ultimate flexibility. On iPhone, the default camera can surprise you with solid long exposure results, especially when you pair it with a good app for timing and stabilization. On Android, you often get more granular control out of the box, but you may need to experiment with app settings to unlock full potential. In both ecosystems, gear like a tripod and a remote shutter can make or break the shot, so plan for stability regardless of your phone.
If you’re just starting, consider which workflow you’ll actually use on a regular basis. You’ll save time if you commit to one approach per device: iPhone users might rely on a couple of trusted apps to fine‑tune light trails, while Android users may toggle between native modes and apps depending on the scene. Either way, you’ll end up with cleaner blur and better detail when you keep your hands steady and your exposure length reasonable.
Read iPhone long exposure app comparison 2026
You’ll find iPhone apps that extend what the built‑in camera can do, and you’ll want to compare them carefully. Look for apps that offer manual exposure control, presentable interval shooting, and reliable shutter timing. In 2026, some apps deliver smoother video‑like trails and easier focus peaking, which helps you lock onto subjects in low light. The best picks give you a straightforward interface and quick presets so you don’t fight the app during a city night shoot.
When you test apps, pay attention to how they handle stabilization and processing. Some apps add little motion blur to simulate a more natural look, while others keep trails crisp but risk noise. You’ll also want to check how well they work with Apple’s ProRAW and RAW workflows, if you shoot RAW. If you mainly capture light trails from cars or stars, favor apps that let you set long exposure durations, intervals, and retries without losing your place.
If you’re choosing, start with one trusted app that offers real manual exposure control and live preview. Then try a couple more to compare quiet interfaces and responsiveness. Remember to read recent reviews for iOS compatibility, as updates often change how well long‑exposure modes perform.
Compare Android native long exposure vs app 2026
On Android, you often have a strong native long exposure option, but another app can give you tighter control. The native modes are usually fast to start and well integrated with your camera sensor, which means less setup time. Apps, however, can unlock more precise shutter timing, longer exposure choices, and sometimes better noise handling. Your decision comes down to how much you value control versus speed.
If you go native, you’ll enjoy consistent behavior across apps because you’re using the system’s built‑in capabilities. This can lead to more reliable results in tricky lighting. If you go with an app, you’ll gain access to finer shuttling, interval shooting, and advanced braking of motion blur. In 2026, several top apps support RAW capture, multi‑frame stacking, and post‑processing features that can edge out a stock mode, especially in low light.
Try both paths on a familiar scene—like a busy street at dusk. Use the native mode to set a baseline, then switch to an app to see if you can sharpen trails or extend exposure without overexposing highlights. Your verdict should weigh not just final aesthetics, but how predictable the setup is during your shoot.
Match choice to your device features
Match your pick to your device features by listing your phone’s strengths. If your iPhone has excellent image signal processing and reliable stabilization, a few well‑chosen apps will help you push accuracy without slowing you down. If your Android phone offers a robust RAW workflow and flexible shutter control, you’ll want an app that lets you dial in long exposures and interval settings precisely.
Think about portability. If you travel light, a streamlined iPhone workflow with a couple of trusted apps beats juggling multiple settings. If you shoot in varied scenes—motion blur, car trails, night skies—Android’s flexibility with native modes plus a powerful app can give you the edge. Whatever you pick, practice makes the look. You’ll see the difference when you lock your tripod and set a stable baseline before you start tweaking.
Choose apps and workflow for night long exposures
Long nights, clear skies, and a steady hand are your basics. You’ll want a simple workflow that keeps your camera centered on the goal: smooth, bright night scenes without weird blur. Start by picking a smartphone setup you’ll actually use. If you love tinkering, a dedicated slow shutter app can give you more control over shutter, ISO, and interval timing. If you want something that just works, your native long exposure mode might be enough, especially if you’re new to night photography. Either path, keep your tripod steady and your scene simple—stars, city lights, or light trails with steady movement.
Your workflow should be predictable. Decide in advance how long you’ll shoot, how many frames you’ll stack, and where you’ll do postprocessing. Use a remote or timer to avoid shaking the phone when you start and stop. If you’re stacking, plan for a batch of 20–60 frames to balance noise reduction with file size. Label your files so you know which shot belongs to which scene. And keep your camera settings consistent: same ISO, same aperture, same interval. With a steady routine, the night feels less chaotic and your results get more consistent.
Finally, test a quick mini-session before a big shoot. Try two quick 10-second frames back-to-back to gauge how your app handles live view, exposure, and focus. If the result feels too noisy or too dim, adjust slowly—one notch at a time. You’ll learn what each app or mode does best, and your night work becomes smooth rather than stressful.
Find the best slow shutter app for smartphones 2026
You want control, reliability, and a simple interface. Look for an app that lets you set shutter duration, ISO, focus, and interval timing in clear steps. A top pick should also let you lock exposure so you don’t drift as you breathe. If you shoot star trails, you’ll love an app that can auto-stack frames or export a finished trail with one tap. A clean preview helps you judge brightness and motion without waiting for long renders. Avoid apps with cluttered menus or laggy live view; you’ll thank yourself later on a chilly night.
Another key feature is accessibility. You’ll benefit from a fast launch, quick access to the most-used controls, and the option to shoot in RAW. A good slow shutter app should also play well with your phone’s hot corners and gesture controls so you don’t have to fumble in the dark. If you travel, prefer an app that saves presets so you can recreate a favorite night setup in moments. In the end, pick the one that feels intuitive to you and doesn’t demand a tech degree to operate.
Weigh slow shutter app vs native long exposure 2026
Using Slow Shutter App vs Native Long Exposure Mode: Which Is Better in 2026? The answer depends on your goals. If you want deep control over frame-by-frame exposure, interval timing, and stacking options, a slow shutter app wins. It gives you explicit shutter, ISO, and focus control, plus often better live view and more robust postprocessing options. If you value speed and simplicity, the native long exposure mode is fast to start and usually more stable with minimal setup. It’s great for quick light trails or simple light-on-dark shots when you’re scouting a new location.
Consider future-proofing your kit. A slow shutter app can future-proof you by supporting newer features and more advanced stacking methods as software evolves. On the other hand, the native mode is less prone to compatibility hiccups after OS updates and takes up no extra space on your phone. Your choice comes down to how much you want to tinker versus how much you want to rely on a built-in, straightforward workflow.
Conclusion: Using Slow Shutter App vs Native Long Exposure Mode: Which Is Better in 2026?
Across 2026’s landscape, the decision between a slow shutter app and native long exposure boils down to control versus convenience. If you crave precise frame-by-frame control, programmable intervals, stacking, and live adjustments, Using Slow Shutter App vs Native Long Exposure Mode: Which Is Better in 2026? is the guiding question you’ll answer through real-world testing. If you prioritize quick setup, minimal fuss, and consistent results with less tweaking, the native long exposure mode remains compelling. Pair either approach with a solid tripod, steady technique, and mindful exposure management, and you’ll achieve clean light trails, sharp details, and balanced colors no matter the phone you use.
In practice, most shooters will benefit from a hybrid approach: use native long exposure for quick, on-the-go shots, and bring in a slow shutter app when you need deeper control for night scenes, long trails, or stacking. The keyword to remember is balance—between exposure, ISO, and shutter; between hardware stability and software stabilization; and between power efficiency and image quality. With thoughtful workflow and consistent practice, you’ll consistently capture stunning night scenes in 2026.

Smartphone Night Photography Enthusiast & Founder of IncrivelX
Vinicius Sanches is a passionate smartphone photographer who has spent years proving that you don’t need an expensive camera to capture breathtaking images after dark. Born with a natural curiosity for technology and a deep love for visual storytelling, Vinicius discovered his passion for night photography almost by accident — one evening, standing on a city street, phone in hand, completely mesmerized by the way artificial lights danced across wet pavement.
That moment changed everything.
What started as a personal obsession quickly became a mission. Vinicius realized that millions of people were carrying powerful cameras in their pockets every single day, yet had no idea how to unlock their true potential after the sun went down. Blurry shots, grainy images, and washed-out colors were robbing everyday people of memories and moments that deserved to be captured beautifully.
So he decided to do something about it.
With years of hands-on experience shooting city streets, starry skies, neon-lit alleyways, and creative night portraits — all with nothing but a smartphone — Vinicius built IncrivelX as the resource he wished had existed when he was just starting out. A place with no confusing jargon, no assumptions, and no gatekeeping. Just honest, practical, beginner-friendly guidance that actually gets results.
Vinicius has tested dozens of smartphones from every major brand, explored dark sky locations across multiple states, and spent countless nights experimenting with settings, compositions, and editing techniques so that his readers don’t have to start from scratch. Every article on IncrivelX comes from real experience, real mistakes, and real lessons learned in the field.
When he’s not out shooting at midnight or writing in-depth guides for the IncrivelX community, Vinicius can be found exploring new cities with his phone always within reach, looking for the perfect shot hiding in the shadows.
His philosophy is simple: the best camera is the one you already have — you just need to learn how to use it in the dark.