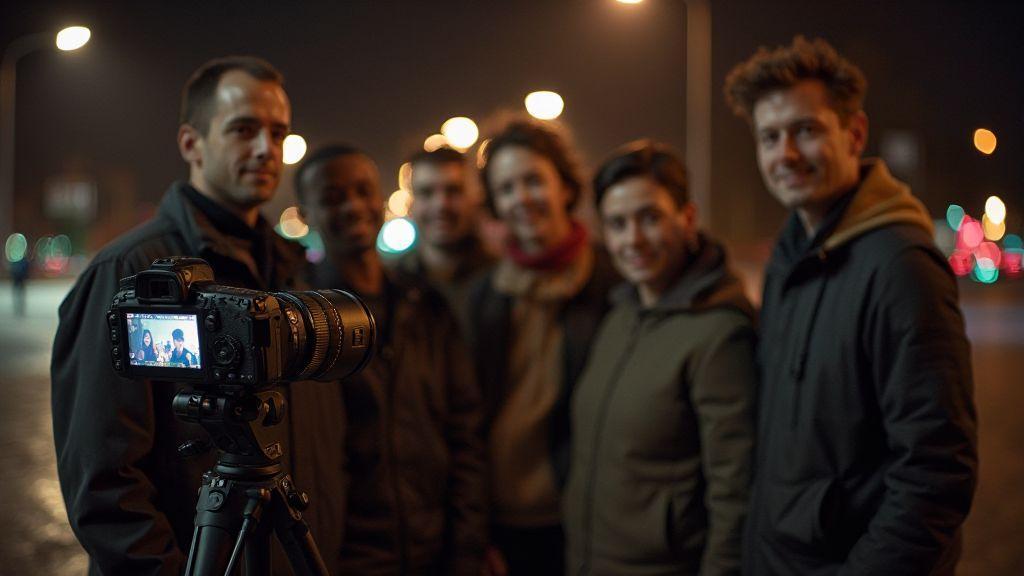
Photographing Groups of People at Night: Settings for Sharp Results
This guide to Photographing Groups of People at Night: Settings for Sharp Results covers practical camera settings, focus techniques, lighting strategies, and tripod tips to keep every face crisp. Night portraits demand thoughtful choices—from aperture and ISO to lighting and stability—to balance sharp faces with a clean background. Think of it as keeping a dozen friends in a single frame: steady hands, the right lens, and a light plan for light and motion.
Essential camera settings for sharp group photos at night
Take control beyond auto mode to achieve consistent night group portraits. Start with a mid-range aperture that keeps people in focus while preserving ambient glow. Tune ISO to preserve skin tones without excessive grain. With practice, small tweaks yield noticeable gains in sharpness and clarity.
Your goal is predictable, repeatable results in a busy environment, not pixel-perfect perfection. As you shoot, you’ll learn how long you can hold poses, where light sits, and how your camera handles shadows, helping subjects relax and stay composed.
Aperture, shutter speed, ISO basics for night group photography
- Aperture: A moderate to wide range (around f/4 to f/5.6) keeps faces clear while letting the scene breathe. For longer lenses, f/5.6–f/6.3 helps keep everyone in frame without losing depth.
- Shutter speed: Freeze motion without stiffness. Start around 1/125s for a lively group and move to 1/200–1/250s for faster movement. Use a tripod in dim venues to stabilize the frame while you lower gains.
- ISO: Aim for the lowest ISO that preserves exposure. In dark rooms, expect ISO 800–3200. Raise ISO in small steps if needed, balancing noise and brightness. If you have noise reduction, use it for stills but not for burst-driven processing.
Balancing depth of field with motion blur in low light
Depth of field helps keep faces in focus as the group shifts. Stop down from the widest setting—typically f/5.6 to f/8 with larger groups or longer lenses. From farther away, a slightly smaller aperture aids focus consistency.
Motion blur is a major risk. Keep shutter speed at 1/125s or faster, brace yourself, and consider off-camera flash or continuous light if exposure is too dim. The aim is readable faces and a lively group feel without sacrificing sharpness.
Quick camera settings checklist
- Set aperture in the f/4–f/8 range.
- Use shutter speeds around 1/125s–1/250s for steady faces.
- Keep ISO as low as possible without losing exposure; watch for noise and skin tones.
- Use a tripod or stable surface if possible.
- If faces look soft, nudge the aperture wider and test a frame or two.
- If motion creeps in, increase shutter speed or add light.
Using flash and continuous lighting for groups at night
Light thoughtfully to balance ambient mood with facial clarity. Flash freezes motion and adds pop; continuous lighting helps you see skin tones and composition in real time. Use both to add depth: flash for brightness, continuous light for real-time balance. A sturdy tripod helps when stacking lights to maintain sharp exposures.
Mood matters: rely more on ambient light with subtle flash for a natural look, or add continuous lights at eye level for even illumination and reduced shadows. Start with ambient exposure, then add a low-power flash at a distance to keep skin tones consistent. Expect skin tones to shift with different light sources; balance early to avoid chasing shadows later.
When to use flash for group shots at night
Flash is ideal in dark venues or when you need precise facial details and separation from the background. For large groups, use off-camera flash to spread light evenly rather than blasting from a built-in unit. Outdoors, a gentle flash can brighten faces without washing out the scene; indoors, a quiet flash preserves ambiance while reducing red-eye.
Adding continuous lighting for even exposure
Place at least two lights at shoulder height and diffuse them with softboxes or umbrellas to avoid hotspots. Back lighting can separate subjects from the background, adding depth. With continuous lighting, adjust for even facial illumination across the group, moving lights as needed to avoid harsh lines.
Flash power and placement tips
Position the flash slightly above and to the side of the group for natural dimension. Bounce off a wall or ceiling to soften light. Start with low power and adjust in small steps. If someone is close to the light, brighter patches may appear; tweak angle or power to balance faces. Test a few frames to ensure faces look natural and not chalky.
Focus techniques to keep everyone sharp in low light
The first goal is keeping all faces in focus. Choose a balance between adequate light and depth of field to avoid soft backs. Set ISO to preserve detail without excessive noise, and keep shutter speeds fast enough to prevent motion blur.
Autofocus can struggle in dim scenes, so use a focus assist method that matches group size. If your lens has Face or Eye Detection, enable it, then switch to Zone AF or Group AF for larger groups. A wide focus area helps cover more faces; refine as needed.
Manual focus and confirm methods for dim scenes
Manual focus shines when autofocus misbehaves. Use magnified live view or a loupe to nail focus on a central face, then confirm with a quick shot and zoom. If you must, focus on a bright edge at a similar distance and shoot with confidence. Recheck if someone moves; even a small re-tweak can save a shot. A brief highlight can help lock focus before finishing the scene.
Focusing distance rule of thumb
A practical rule: place primary subjects about two to three meters from the camera with a moderate wide angle. This helps keep most faces within depth of field. If the group is spread out, focus on the closest face and allow depth of field to cover the rest.
Tripod stabilization and camera support for night groups
Stability is the foundation of sharp night group portraits. Use a sturdy tripod, add weight if windy, and lock legs wide with minimal center-column use. On crowded locations, keep the setup low to reduce height and risk of movement. A ball head or quick-release plate helps maintain precise angles. Test pan and tilt before shooting, and tighten hardware to prevent drift. On balconies or stairs, a support arm or monopod can reduce movement during shutter press. In tight spaces, a compact tripod or monopod with a wrist strap keeps you steady without crowding subjects. If windows behind you cause reflections, angle the tripod accordingly. A timer or cable release minimizes camera shake.
Tripod setup, leveling, and stability tips
Level the tripod on any surface using built-in or app-based bubble levels. A level frame keeps eyes aligned and reduces distortion. Lock legs firmly and spread them wide for maximum stability. If surfaces are uneven, adjust leg height to maintain a level head.
Remote release, mirror lockup, and long exposures
Use a remote release to avoid camera shake. If your camera offers mirror lockup, enable it for longer exposures. Start with 1/60–1/125s for groups, then adjust for stillness and ambient light. Keep ISO low and widen aperture if needed. Practice a few frames before gathering to ensure sharp results.
Stabilization quick rules
- Confirm stability before pressing the shutter.
- Keep the tripod low and sturdy.
- Use a remote or timer.
- Level the frame.
- Recheck after movement or wind shifts.
Lens selection and composition for group portraits at night
Choose a lens that performs well in low light and offers distance flexibility. A fast prime or mid-range zoom helps maintain light and reduce blur from movement. Consider your group’s size, space, and how close you can stand without crowding the scene. Aim for a simple two-row arrangement to preserve expression and avoid faces turning away.
Best focal lengths for group portraits and spacing
- Full-frame: 24–70mm; crop sensors: 15–50mm. This range supports close frames and wider contexts.
- In tight spaces, 24–40mm keeps everyone visible without crowding; outdoors, 50–85mm isolates faces with background texture.
Spacing matters: avoid shoulder-to-shoulder lines. Stagger heights, use a slight arc or V-shape to draw eyes toward the center, and mix distances for a natural rhythm.
Framing and placement to reduce blur and keep faces sharp
Allow enough distance for faster shutter speeds. If movement occurs, aim for 1/125s or higher, balancing with ISO and aperture. Include slight overlap between rows and keep eyes on a similar plane to maintain sharpness. Use ambient light to wrap faces softly; avoid backlight that silhouettes features. A reflector or phone light can fill shadows under the eyes. Maintain rhythm in the group to keep expressions lively.
Lens and aperture combo guide
Choose a lens that remains sharp wide open, such as f/2.8–f/4, and set zoom around 35–70mm. For small groups, f/3.5–f/4 often provides enough depth for faces while letting in ambient light. If needed, push to f/2.8 in very dim spaces, but beware of shallow depth that may blur far faces. A 50mm or 85mm prime offers clean faces with reduced distortion; keep ISO practical and adjust distance rather than chasing grain.
Noise reduction and sharpening for low light group shots
Balance detail preservation with noise control. Use a wide aperture to gather light and avoid extreme ISO. Enable mild noise reduction in-camera for stills, and apply sharpening selectively to faces during post-processing. Shoot RAW and apply consistent settings across frames. If color shifts appear after noise reduction, tweak white balance to keep skin tones natural.
When processing, sharpen faces only and protect backgrounds. Use masks to prevent over-sharpening edges. If noise remains in shadows, apply selective noise reduction while preserving texture in skin. The goal is natural skin tones with crisp expressions.
Expose to protect highlights and reduce ISO noise
Expose for bright faces without clipping highlights. Slightly underexpose if backgrounds are bright, then recover midtones in post. If you must push ISO, combine with modest noise reduction and careful sharpening. The aim is to keep faces clear without a plastic look.
Raw processing and noise reduction settings for sharp results
Start with white balance and mild luminance noise reduction. Increase detail preservation to maintain facial textures, then apply low to medium sharpening. Use gentle color noise reduction to preserve warm skin tones. Process a representative frame first, then apply settings to the rest with masks to protect skin from over-sharpening. Adjust white balance if skin tones shift after noise reduction.
Post-processing checklist
- Check exposure on each face and adjust highlights.
- Apply light luminance noise reduction to shadows.
- Sharpen faces only; avoid background noise.
- Mask halos and soften edges as needed.
- Preserve natural skin tones; avoid casts.
- Save both print-friendly and web-optimized versions.
This guide emphasizes practical steps for Photographing Groups of People at Night: Settings for Sharp Results, helping you balance light, motion, and stability to deliver crisp, natural night portraits.

Smartphone Night Photography Enthusiast & Founder of IncrivelX
Vinicius Sanches is a passionate smartphone photographer who has spent years proving that you don’t need an expensive camera to capture breathtaking images after dark. Born with a natural curiosity for technology and a deep love for visual storytelling, Vinicius discovered his passion for night photography almost by accident — one evening, standing on a city street, phone in hand, completely mesmerized by the way artificial lights danced across wet pavement.
That moment changed everything.
What started as a personal obsession quickly became a mission. Vinicius realized that millions of people were carrying powerful cameras in their pockets every single day, yet had no idea how to unlock their true potential after the sun went down. Blurry shots, grainy images, and washed-out colors were robbing everyday people of memories and moments that deserved to be captured beautifully.
So he decided to do something about it.
With years of hands-on experience shooting city streets, starry skies, neon-lit alleyways, and creative night portraits — all with nothing but a smartphone — Vinicius built IncrivelX as the resource he wished had existed when he was just starting out. A place with no confusing jargon, no assumptions, and no gatekeeping. Just honest, practical, beginner-friendly guidance that actually gets results.
Vinicius has tested dozens of smartphones from every major brand, explored dark sky locations across multiple states, and spent countless nights experimenting with settings, compositions, and editing techniques so that his readers don’t have to start from scratch. Every article on IncrivelX comes from real experience, real mistakes, and real lessons learned in the field.
When he’s not out shooting at midnight or writing in-depth guides for the IncrivelX community, Vinicius can be found exploring new cities with his phone always within reach, looking for the perfect shot hiding in the shadows.
His philosophy is simple: the best camera is the one you already have — you just need to learn how to use it in the dark.