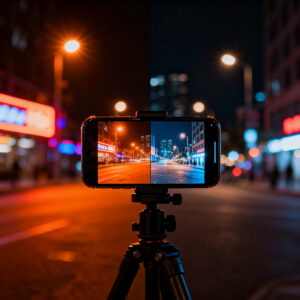
Why Are My Night Photos Always Blurry? 7 Real Causes and Easy Fixes for iPhone 17 & Galaxy S25
This guide compiles the real causes of blurry night photos and easy fixes tailored for iPhone 17 and Galaxy S25. It covers seven common issues and practical steps to get crisper shots after dark.
Prevent camera shake in low light
In low light, camera shake blurs shots. Stop movement when you press the shutter: hold the phone steady, breathe calmly, and give the sensor a moment to settle. Brace your arms, tuck your elbows in, and plant your feet. If possible, lean against a solid surface like a wall or railing. A stable base makes a big difference in sharpness.
Autofocus failure in low light phones
In dim scenes, autofocus can hunt for contrast, yielding soft or shifting frames. The focus indicator may spin or jump between near and far. This happens when there isn’t enough light for quick, precise focusing.
- Best fix: provide a clear target with strong edges and adequate light. Focus on a bright, textured spot (brick pattern, visible threads). Then hold steady. If subjects move, shoot when things calm or switch to manual focus.
- Settings checks: some apps have scene optimization or auto-enhance features that can interfere with focus. Turn those off if autofocus misbehaves.
Why autofocus misses in dark scenes
Dark scenes lack distinct edges; contrast-detection AF may hunt, jump, or lock onto a spot that looks sharp on screen but isn’t in real life. Motion also disrupts focusing momentarily, turning a sharp target into blur.
Tap to focus or use manual focus
Tap to focus quickly on the area you want sharp. If needed, tap again after the scene settles. Manual focus offers more control, especially in tricky lighting. Use focus peaking or a manual control in a third‑party camera app if your stock app lacks it.
Use AF assist lamp or focus lock
An AF assist lamp briefly projects light to help locate edges for quicker focusing. If your phone offers focus lock, enable it after locking on a point to keep focus steady while you reframe or adjust exposure.
Image stabilization issues on Galaxy S25 and iPhone 17
Night shots can be soft or wobbling when stabilization isn’t matched to the scene. The root cause often lies in how the lens moves, how motion is sensed, and how long you hold still. Shaking can be compensated, but fast motion may still blur.
- OIS vs EIS: Optical Image Stabilization moves lens elements to counter small shakes; Electronic Image Stabilization crops and shifts frames digitally. A mix is common on these phones, with OIS doing the heavy lifting and EIS refining the rest.
- When stabilization can’t fix blur: fast-moving subjects, gusts of wind, or rapidly changing light can outpace stabilization. In such cases, shorten exposure or raise ISO to freeze motion, accepting some noise.
Difference between OIS and EIS
OIS reduces blur from tiny motions; EIS smooths motion digitally but can crop detail. Knowing which mode is active helps you choose settings for dim scenes.
When stabilization cannot fix blur
If motion is unmanageable, stabilization won’t save the shot. Try a shorter shutter, higher shutter speed, or a tripod to keep the scene steady.
Turn on stabilization modes
Use stabilization modes suited to the scene. For still night scenes, keep OIS on and avoid heavy zoom. For moving subjects or panning, pick a mode that tracks motion and preserves light without sacrificing too much sharpness.
Night mode settings iPhone 17 tips
Night mode lets the camera collect more light. Let the phone decide exposure, or manually adjust exposure time. Steady hands and a stable surface reduce blur. Night mode adds a soft glow around lights, preserving mood and color.
- Quick tips: keep the phone steady, brace against a surface, and let the camera lock focus before capture.
How Night mode boosts exposure
Night mode lengthens sensor exposure to capture more detail in shadows, reducing flatness. It balances highlights to avoid burning bright areas, while preserving texture in darker regions. The result is a natural, softer glow and truer skin tones in low light.
Let the phone pick longer exposure
Longer exposure gathers more light, revealing details in dim scenes. It works best with static subjects; moving subjects will blur into trails. A steady stance lets the phone keep the exposure longer without introducing shake.
Manually adjust Night mode timer
Manual timers let you choose exposure length (e.g., 1s, 2s, 3s). Longer timers capture more detail in still scenes; shorter timers are better when subjects are moving or you’re unsure you’ll stay still. Test a couple of options to learn what suits your scene.
Causes of blurry night photos from low light
Slow shutter and subject motion
Longer shutter speeds let in more light but amplify hand shake and subject motion. Stabilize yourself and the phone; a tripod or sturdy surface helps. For moving subjects, consider shorter exposures to freeze motion.
High ISO noise softens detail
Raising ISO to boost brightness introduces grain and softens edges. Seek brighter spots to lower ISO, avoid excessive zoom, and rely on longer exposure instead of pushing ISO.
Use longer exposure with support
If possible, use a tripod or solid surface to enable longer exposures. Some night modes merge multiple frames for cleaner results, but still require you to stay still.
Use longer exposure with support
A tripod or stable surface allows longer exposures, revealing more light and color. For static scenes, this yields natural detail; for moving subjects, switch to faster modes to minimize blur.
How to stop blurry night pictures: tripod and shutter speed
Steady a tripod or solid surface to minimize shake. Then balance shutter speed with your ability to stay still. Test 1/15 and 1/30 second on a tripod to find the sweet spot. Framing matters: compose with subject placement that keeps foreground and background sharp.
Why slow shutter needs a tripod
Longer shutters reveal more light but invite tremor. A tripod stabilizes the camera so longer exposures render edges and textures clearly. It also enables creative effects like light trails while preserving sharp foregrounds.
Use Pro mode or third-party apps
Pro mode offers control over exposure, ISO, and white balance. Lock exposure and focus, then increase shutter speed for longer shots without overexposure. Start with low ISO and test any shutter speeds (e.g., 1/15, 1/30 for stills; faster for motion). Third‑party apps often provide focus peaking and longer shutter speeds for better night performance.
Set low ISO and long shutter
Low ISO minimizes grain; pair it with a longer shutter to capture more light without noise. Typical starting point: ISO 100–200 with a 1/15–1/30 second shutter on a tripod. Adjust shutter speed if the scene has movement.
Smudged lens, condensation, and dust
A dirty lens softens edges and washes out details. Condensation and dust create hazy, speckled effects. Start with a clean lens before shooting.
Wipe the lens before each shoot
Use a microfiber cloth to wipe in a circular motion from the center outward. If smudges persist, use a fresh cloth section. Keeping a lens wipe handy helps maintain crisp night shots.
Watch for fog after temperature change
Moving from cold to warm, or humid air, can cause condensation on the lens. Wipe and wait a moment before shooting. In extreme humidity, relocate to a drier spot if possible.
Clean with microfiber or lens wipe
Always use a microfiber cloth or proper lens wipe. Avoid rough tissues; a soft, even touch keeps glass scratch-free and reduces halos around lights.
Software bugs, updates, and fixes
Software glitches can cause blur by misaligning exposure, focus, or noise reduction. Check for known bugs and keep camera apps and OS up to date. Updates act like tune-ups, reducing miscommunications between sensors, HDR processing, and stabilization.
Check camera app and OS updates
Update both the camera app and the OS. After updating, test in the same settings to confirm improvements. If blur persists, note when it happens and adjust accordingly.
iPhone 17 night photos blurry fix and Galaxy S25 night photo blur solutions
iPhone 17: ensure Night mode is on, hold steady after shutter, and use a tripod or stable surface to reduce motion.
Galaxy S25: disable overly aggressive post-processing; try Pro mode to lock focus and exposure. If needed, reset camera settings to default.
Reinstall or reset camera settings
As a last resort, reinstalling the camera app or resetting settings can remove corrupted files or odd tweaks causing blur. A clean slate often improves sharpness.
Best smartphone settings for night photography
Choose modes that offer real control. Night or Pro mode lets you adjust exposure, shutter, ISO, and white balance. Let the camera collect light for a moment before tapping the shutter, and stay still.
- Use a sturdy grip, lean on a wall, or use a tripod.
- Shoot in RAW if available for greater post-processing flexibility.
- Beware bright background lighting that can cause halo or flare; opt for slightly longer exposure without moving subjects.
Use Pro or Night modes for control
Pro mode provides direct control over ISO, shutter, and white balance. Start with ISO 100–400 and test 1/15–1/60 second shutter speeds depending on movement. Night mode blends multiple frames for brighter results; keep the device steady for best results. Tap the screen to focus on a bright point to help depth accuracy.
Best smartphone settings for night photography (quick summary)
- Start with Night mode or Pro mode. Adjust exposure to prevent blown highlights.
- Use a tripod or stable surface; enable a timer (2 seconds) to reduce shake.
- Keep ISO in the low-to-mid range to minimize grain; increase shutter only as needed.
- White balance: tweak for street lighting to prevent color casts; shoot RAW when possible.
Final note: Why Are My Night Photos Always Blurry? 7 Real Causes and Easy Fixes for iPhone 17 & Galaxy S25
- Cause 1: Camera shake in low light -> Fix: stabilize, brace, and wait after pressing shutter.
- Cause 2: Autofocus failure in darkness -> Fix: tap to focus, use focus lock, or switch to manual focus.
- Cause 3: Stabilization limitations (OIS vs EIS) -> Fix: choose appropriate mode; use tripod for long exposures.
- Cause 4: Smudged lens, condensation, or dust -> Fix: clean lens before shooting.
- Cause 5: High ISO noise softens detail -> Fix: lower ISO, longer exposure with support.
- Cause 6: Long shutter with moving subjects -> Fix: shorten shutter or use tracking modes; stabilize.
- Cause 7: Software bugs and outdated apps -> Fix: update camera app and OS; reset if needed.
With these real causes and easy fixes, you can consistently turn blurry night photos into crisp, vibrant memories on both iPhone 17 and Galaxy S25.

Smartphone Night Photography Enthusiast & Founder of IncrivelX
Vinicius Sanches is a passionate smartphone photographer who has spent years proving that you don’t need an expensive camera to capture breathtaking images after dark. Born with a natural curiosity for technology and a deep love for visual storytelling, Vinicius discovered his passion for night photography almost by accident — one evening, standing on a city street, phone in hand, completely mesmerized by the way artificial lights danced across wet pavement.
That moment changed everything.
What started as a personal obsession quickly became a mission. Vinicius realized that millions of people were carrying powerful cameras in their pockets every single day, yet had no idea how to unlock their true potential after the sun went down. Blurry shots, grainy images, and washed-out colors were robbing everyday people of memories and moments that deserved to be captured beautifully.
So he decided to do something about it.
With years of hands-on experience shooting city streets, starry skies, neon-lit alleyways, and creative night portraits — all with nothing but a smartphone — Vinicius built IncrivelX as the resource he wished had existed when he was just starting out. A place with no confusing jargon, no assumptions, and no gatekeeping. Just honest, practical, beginner-friendly guidance that actually gets results.
Vinicius has tested dozens of smartphones from every major brand, explored dark sky locations across multiple states, and spent countless nights experimenting with settings, compositions, and editing techniques so that his readers don’t have to start from scratch. Every article on IncrivelX comes from real experience, real mistakes, and real lessons learned in the field.
When he’s not out shooting at midnight or writing in-depth guides for the IncrivelX community, Vinicius can be found exploring new cities with his phone always within reach, looking for the perfect shot hiding in the shadows.
His philosophy is simple: the best camera is the one you already have — you just need to learn how to use it in the dark.