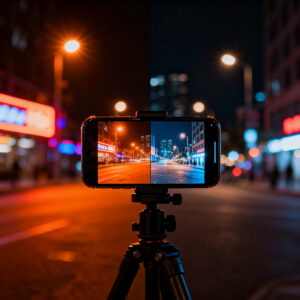
Why Your Night Photos Look Orange or Yellow (And How to Fix It on Any Phone)
If you’re asking Why Your Night Photos Look Orange or Yellow (And How to Fix It on Any Phone), you’re not alone. The warm glow of indoor lamps, sodium streetlights, and low-light conditions can push your camera’s color balance toward orange or yellow. This guide explains why that happens and gives practical, device-agnostic fixes you can try on any phone.
What causes night photos to skew warm
Night scenes often come with lots of warm light: incandescent, tungsten, warm LEDs, and streetlights. Your phone’s auto white balance (AWB) tries to guess white values but leans toward warmer tones in dim settings to prevent gray-looking images. The result is a cozy, but not always true-to-life, orange or yellow cast. Understanding this helps you choose the right fix upfront.
Warm light sources don’t emit pure white; they include yellow, orange, and red tones. In low light, the camera also clips highlights differently, so it biases toward warmth. You can counter this by choosing different lighting, adjusting camera settings, or post-processing a bit. Awareness of the light source helps you decide what to fix first.
Think of color balance like seasoning a dish: in night scenes there’s less cool blue information, so the camera defaults to warmer tones. If you shoot near a cool blue light but don’t balance it, you’ll still see warmth in your photos. Planning ahead saves shots from chasing the right color.
Color temperature and white balance: what you need to know
Color temperature describes how warm or cool light feels. More warm light yields a yellow/orange cast; more cool light yields a blue-cool cast. Auto white balance guesses, but in dim situations it often favors warmth to avoid gray, muddy colors. Fixing this usually means telling your camera to expect cooler tones or giving it more information to work with (exposure, ISO, or RAW data).
Practical fixes:
- Switch to a cooler white balance preset (aim for roughly 5000–6500K) to neutralize yellow casts.
- If your phone offers Kelvin values, use a precise setting; if not, try presets like Daylight or Cloudy and compare.
- Shoot in RAW if available; RAW preserves color data for more flexible white-balance edits later.
- In mixed lighting, balance the scene with a cooler fill light or a mid-point WB.
When lighting is mixed (warm lamp plus cool window light), a mid-point WB often yields a more natural result, especially for portraits where skin tones should stay accurate.
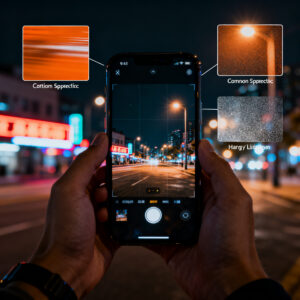
Common light sources and their typical tint
- Incandescent and warm tungsten bulbs: strong yellow/orange cast.
- Halogen bulbs: warm, but milder than incandescent.
- Warm LEDs (low quality or underpowered): can appear yellow to the camera even if you see white.
- Fluorescent lamps: sometimes greenish cast; can complicate WB.
- Sodium streetlights: classic orange glow, a frequent culprit at night.
- Cool LEDs: can yield blue-cool tints if too dominant.
- Mixed sources (neon, screens): unpredictable color mixing that AWB can struggle with.
If most of your indoor night photos look yellow, warm lighting is likely the main cause. Outside, sodium streetlights often create the same effect.
Quick checks to identify warm light sources
- Look for an amber glow from lamps; yellow or orange bulbs push warm tones.
- Fluorescent lighting can introduce greenish shifts.
- Sodium streetlights glow orange—common on city streets at night.
- If your scene feels cozy but your photo looks off, the light source is likely the culprit.
- A quick test: shoot with WB set to Daylight or a cooler preset and compare results to your default shot.
Auto white balance limits in low light
AWB is convenient but imperfect in the dark. It can bias toward warmer tones under orange street lamps or toward cooler tones under white LEDs. It also shifts as you move, which can cause frame-to-frame color jumps in sequences. In uneven or mixed lighting, AWB may average out colors awkwardly.
Fixes:
- Override AWB with a manual WB preset or a custom WB by targeting a neutral gray area.
- If your app lacks a WB lock, use a consistent WB preset across a burst of shots to minimize drift.
- For video, lock WB after you frame your shot to avoid color jumps.
Auto white balance warmth bias and how to counter it
AWB often leans warm when the scene has lots of orange or amber light. This can render skin tones too warm or dim other colors. If you need color accuracy, switch to a cooler WB preset or dial in manual WB. If you can, shoot a neutral gray card for reference and compare later.
On the go, you can counter warm AWB by adding a gentle cooler light or by balancing the scene with your own light source. In post, you can cool the image slightly and reduce magenta or green tones to restore natural hues.
Locking white balance to avoid shifts
Locking white balance keeps colors steady as you reframe or move. To lock WB:
- Tap a neutral area in the frame (gray card, white paper, neutral surface) and set WB from that spot.
- Use the same WB preset for a sequence of shots if your app lacks a dedicated lock.
Locked WB makes editing easier and prevents color drift across your night shoot. It’s especially helpful when you’re shooting a gallery with a consistent mood.
Using white balance presets and Kelvin tweaks
Presets help you map to the dominant light source:
- Tungsten for indoor warm bulbs
- Fluorescent for office or shop lights
- Daylight for mixed or outdoor night scenes
Small Kelvin tweaks (when available) can dramatically improve color. Even a few hundred degrees can move a photo from orange to natural. Live previews are helpful if your phone supports them. Remember: the goal is natural-looking whites and believable skin tones, not a sterile grayscale.
RAW or Pro mode: best for correcting orange night photos on any phone
RAW and Pro mode give you more control and latitude:
- RAW preserves unprocessed sensor data, giving you flexibility to reclaim color in post.
- Pro mode lets you adjust ISO, shutter, and white balance with more precision, letting you establish a neutral baseline you can refine later.
Editing raw or Pro-mode images enables better recovery of blue tones in the sky and more accurate skin tones, reducing the orange wash from night lighting.
Simple edits to remove yellow color cast
- Temperature: slide toward cooler tones to reduce orange bias.
- Tint: adjust to reduce green or magenta casts that show up after cooling.
- Selective color: target oranges/yellows in specific areas (signs, lights, skin) without altering the whole image.
- Histogram/waveform: use these guides to avoid clipping shadows or highlights.
- Side checks: zoom in on faces or whites to ensure color holds across the frame.
- Before/after: compare to confirm changes look natural and preserve detail.
Best apps for fixing night photo color
Choose apps that offer:
- RAW support or non-destructive editing
- Manual white balance with real-time previews
- Fine controls for temperature, tint, exposure, and color sliders
- Presets you can reuse for consistency
The goal is a balance between quick fixes and precise control, so your night photos stay true to life across a gallery.
Apps with manual white balance and precise color controls
Look for:
- Live white balance previews
- Manual Kelvin/tint controls
- Non-destructive RAW editing
- Presets plus adjustable kelvin for accuracy
Saving WB settings as presets helps you apply a consistent look quickly to future night shots.
Saving edits as presets for future shots
Presets turn your tweaks into a repeatable workflow. Save a Night Cool WB preset with WB, temperature, tint, and selective color settings. This helps you approach similar scenes with a close-to-perfect starting point and refine as needed.
Smart shooting habits to prevent orange tint
- Lower ISO to reduce color noise and warm bias.
- Steady the camera to avoid motion blur and color smearing.
- Use a neutral fill light or adjust angle to balance warm highlights.
- Test shots: quick checks help you adjust WB, exposure, and lighting before committing to a full shoot.
- Consistency: aim for a uniform WB across a series of shots for a cohesive gallery.
Quick step-by-step to correct orange night photos on your phone
- Plan and lock WB or shoot RAW if possible.
- If not RAW, pick a cooler WB preset and keep it consistent.
- In editing, start with temperature to cool the image; then adjust tint as needed.
- Use selective color to address orange areas without harming the whole image.
- Save successful edits as presets for similar scenes.
Capture RAW or lock white balance, then shoot correctly
RAW offers the most flexibility; locking WB helps you keep colors steady across shots. If you must shoot in auto, be prepared to adjust in post and minimize color drift.
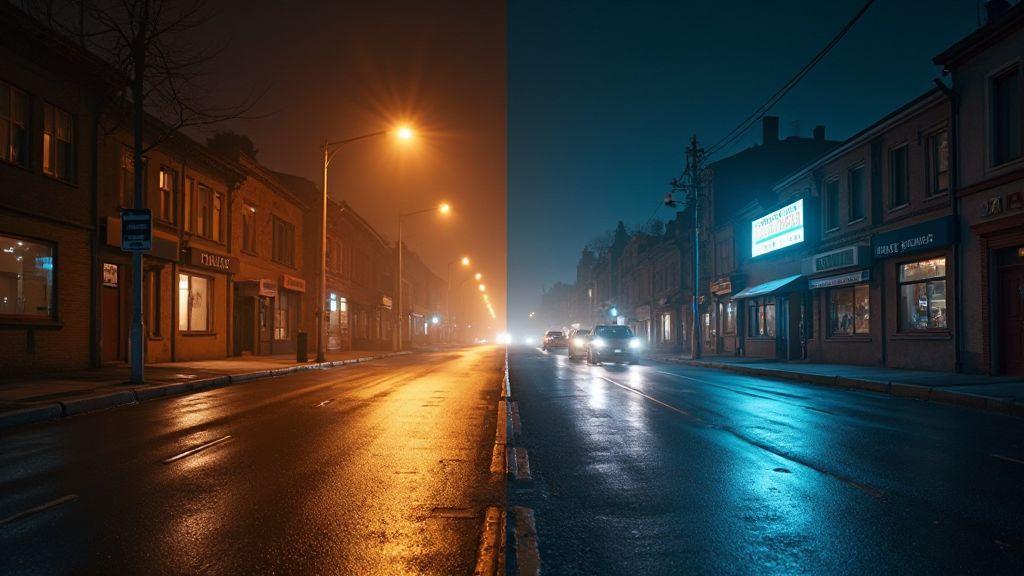
Suggested WB targets:
- Indoor tungsten ambiance: about 3600K when you can
- Night street lighting: around 4000–4500K for a balanced look
- Mixed lighting: mid-range WB near 4000K with a subtle blue fill
Consistency matters. A set of night photos with uniform WB reads more professionally and preserves color integrity.
Why Your Night Photos Look Orange or Yellow (And How to Fix It On Any Phone) in practice
With the right approach, you can conquer orange and yellow casts across devices. Start by understanding the light, then use a mix of WB presets, Kelvin tweaks, and RAW or Pro mode when available. Simple edits—temperature, tint, and selective color—can reclaim natural tones, while locking WB and saving presets keeps your future night shots consistently true to life. By applying the strategies in Why Your Night Photos Look Orange or Yellow (And How to Fix It on Any Phone), you’ll see more accurate colors and more cohesive night galleries.

Smartphone Night Photography Enthusiast & Founder of IncrivelX
Vinicius Sanches is a passionate smartphone photographer who has spent years proving that you don’t need an expensive camera to capture breathtaking images after dark. Born with a natural curiosity for technology and a deep love for visual storytelling, Vinicius discovered his passion for night photography almost by accident — one evening, standing on a city street, phone in hand, completely mesmerized by the way artificial lights danced across wet pavement.
That moment changed everything.
What started as a personal obsession quickly became a mission. Vinicius realized that millions of people were carrying powerful cameras in their pockets every single day, yet had no idea how to unlock their true potential after the sun went down. Blurry shots, grainy images, and washed-out colors were robbing everyday people of memories and moments that deserved to be captured beautifully.
So he decided to do something about it.
With years of hands-on experience shooting city streets, starry skies, neon-lit alleyways, and creative night portraits — all with nothing but a smartphone — Vinicius built IncrivelX as the resource he wished had existed when he was just starting out. A place with no confusing jargon, no assumptions, and no gatekeeping. Just honest, practical, beginner-friendly guidance that actually gets results.
Vinicius has tested dozens of smartphones from every major brand, explored dark sky locations across multiple states, and spent countless nights experimenting with settings, compositions, and editing techniques so that his readers don’t have to start from scratch. Every article on IncrivelX comes from real experience, real mistakes, and real lessons learned in the field.
When he’s not out shooting at midnight or writing in-depth guides for the IncrivelX community, Vinicius can be found exploring new cities with his phone always within reach, looking for the perfect shot hiding in the shadows.
His philosophy is simple: the best camera is the one you already have — you just need to learn how to use it in the dark.