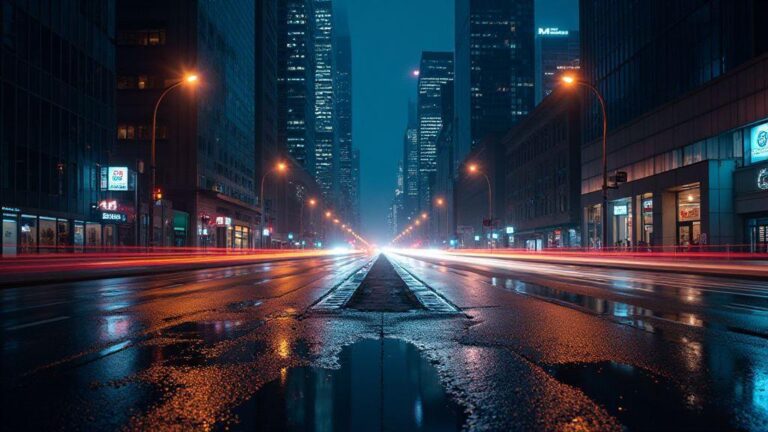
Best Time of Night to Photograph City Streets: Blue Hour vs Full Dark
When to Shoot: Blue Hour or Full Dark
Blue hour brings a soft, even glow that smooths reflections and makes city lights pop without harsh glare. You’ll notice cooler tones and a calm mood that feels cinematic. This is your chance to capture clean silhouettes, long exposures, and streets that look inviting rather than noisy. If you want your images to feel approachable and readable, blue hour is your best friend. Your camera will handle the fading light better, and you’ll still have details in the shadows to hold your scene together.
Full dark, on the other hand, is where the night really comes alive. You’ll get bold contrast, dramatic highlights, and lights that punch through the scene. This is the time to push your ISO a touch and embrace motion blur on moving subjects for energy. If you crave high drama, full dark lets you isolate shapes, emphasize neon, and craft a mood that screams city after hours. Your eye will react to the rhythm of bright windows against black masonry, and you’ll feel the pulse of the street.
Ultimately, your decision hinges on mood and subject. If you want clarity and gentleness, shoot blue hour. If you want impact and contrast, shoot full dark. You can even combine both in one night by planning a short blue hour shoot, then a longer stay for full dark. Your best results come from knowing exactly what feeling you’re chasing before you press the shutter.
Best Time of Night to Photograph City Streets: Blue Hour vs Full Dark
Your choice shapes color and mood. Blue hour offers softer light, cooler skies, and gentle reflections; full dark delivers bold shadows and brighter artificial highlights for a more graphic look. Decide based on your mood and the message you want to convey. Either approach benefits from editing that reinforces that choice with balanced contrast, clean color, and controlled noise.
Why blue hour city street photography lifts your images
Blue hour softens edges, keeping lines clean and colors balanced. You’ll notice fewer blown storefront highlights and quieter shadows, making edits easier and images more readable. The cool tones invite reflections on wet streets, adding depth without shouting. A streetlamp halo at corners guides the eye, helping you lead lines toward a focal point like a cafe window or distant sign while keeping composition strong.
When full dark street photography adds bold contrast
Full dark pushes colors to the edge, making neon signs and streetlights feel tactile. You’ll see silhouettes against bright windows, using contrast to frame drama or mystery. This is ideal for moving subjects or minimalist scenes with a single bright anchor. Shadows become design tools that shape geometry and balance.
Dark streets invite longer exposures to smear light trails from cars or bikes, adding motion and energy. If you like isolating shapes or creating moody portraits against lit storefronts, full dark is your playground. Be mindful of noise and choose shutter and ISO to keep the scene readable. With bold contrast, your night can feel cinematic.
Timing tips you can use
Plan a night with blue hour first, then stay for full dark. For blue hour, shoot about 20 to 30 minutes after sunset when the sky holds color and city lights begin to glow. For full dark, stay until streets are quiet but livable—about 30 minutes after civil twilight or later, depending on location. Bring a tripod and a remote or timer to keep long exposures crisp.
Check the weather and street activity. Wet streets amplify colors and reflections, so be ready after a light rain or along neon-heavy strips after drizzle. Do quick test shots on arrival and adjust white balance toward the mood you want—warmer for cozy, cooler for a modern edge. Your timing becomes second nature once you recognize when the city shines in blue hour and sharpens in full dark.
Blue Hour Lighting for City Photos
Blue hour makes city photos look magical. You get cool tones, soft shadows, and lights that pop without harsh contrast. The sky turns deep blue while streetlights glow warm, creating a calm yet lively mood. Reflections on glass and puddles add depth and motion even when streets are quiet. It’s the moment when the city feels alive, but not loud.
Blue hour aims for balance. Exposures should preserve sky detail without washing out city lights, keeping colors true without clipping. For a clean, cinematic look, expect cool blues in the sky and warm yellows in the lights, as if the city is exhaling after sunset. If you’re new to blue hour, start with tripod shots and low ISO to keep lines crisp. Shoot RAW to fine-tune white balance later, and compare frames with slightly different white balances to find the sweet spot where blues stay blue and lights glow without clipping. As confidence grows, experiment with longer exposures to capture light trails and moving cars for subtle energy.
What blue hour lighting for city photos looks like for your camera
Blue hour lighting yields a soft, even glow with cool blues in the sky and warm lights. Your camera will capture a balanced mix of shadows and highlights, avoiding harsh clipping. Glass reflections add depth, especially from a low angle.
To optimize colors, set white balance around 3200K to 4200K or shoot RAW and adjust later. Keep ISO low and aperture small for architectural detail; open the aperture slightly for a softer mood. Watch the histogram to avoid clipping highlights in bright windows or headlamps. A tripod keeps frames steady as light changes, allowing bracketing and post-exposure selection.
How to spot the short blue hour window near sunset
Blue hour passes quickly. Look for the moment when the sky turns dusky blue but city lights haven’t overwhelmed the scene. If you see a sky turning blue with streetlights still soft, you’re in the pocket. Shoot about 20 to 30 minutes after sunset and stay until lights dominate but the sky remains visible.
Practice helps. Review a few minutes of footage or frames from previous nights to identify the sweet spot. If the sky stays blue but lights glow softly, you’ve found balance. If signs near you overly warm the frame, you’ve waited too long. Seek streets with glass facades and lamps to capture both elements clearly.
Full Dark Street Photography Benefits
You unlock a new world when the sun goes down. Full dark streets become your canvas, and every light source offers a fresh mood. Night gives you texture, reflections, and silhouettes that daytime hides, delivering a cinematic punch. The quiet reduces distractions, helping your subject stand out with easier focus and more creative control over lighting shapes, colors, and contrast.
Dark streets also let you control exposure in ways daytime cannot. You can push shadows for mystery or boost highlights to emphasize neon. The longer you stay out, the more you learn how street elements interact—glass, metal, and rain-wet pavement respond differently to light. This translates into faster decisions on location, framing, and timing.
Night photography teaches you to work with people’s pace. You’ll wait for moments when a bus passes, a taxi lights up, or a cyclist glides by. These pauses inject life into your images and the timing deepens your manual settings, motion blur, and color balance—skills you can reuse in daytime work too.
How neon and headlights shape your photo after dark
Neon signs bathe streets in bold, saturated color that daylight can’t match. Let glow spill onto wet pavement to create long reflections that guide the eye to your subject. Place bright signs off to the side so their light wraps around objects, adding depth.
Headlights carve edges and add atmosphere; a touch of flare can work as a design element. Frame reflections or silhouettes with moving traffic to create a cinematic sense of motion. The contrast between glowing signs and dark backgrounds is your advantage, delivering strong color pops and clear focal points.
When photographing city streets after dark gives drama to your shots
After dark, ordinary streets become stages. Shadows last longer, allowing you to craft shapes and textures with intention. A single light source—streetlamp or storefront window—can create dramatic contrast to isolate your subject and tell a simple, powerful story.
Scenes with rain or mist become more dramatic at night. Wet surfaces reflect lights to guide composition. With patience, you’ll catch moments when people pause under umbrellas or a cyclist glides by, turning streets into photos with mood and narrative, not just a pretty scene.
Night shooting checklist you can trust
- Tripod ready so you can keep exposure steady in low light.
- Manual mode to lock ISO, shutter, and aperture.
- Low ISO to reduce noise, paired with longer shutter.
- Wide aperture to capture more light without sacrificing sharpness.
- Composition on the move: reflections, silhouettes, and light trails.
- White balance test: neon can skew colors; tweak until skin tones look natural.
- Foreground silhouettes for depth.
- Spare batteries—night drains power fast, especially with long exposures.
- Respect people and space: grab moments quickly and considerately.
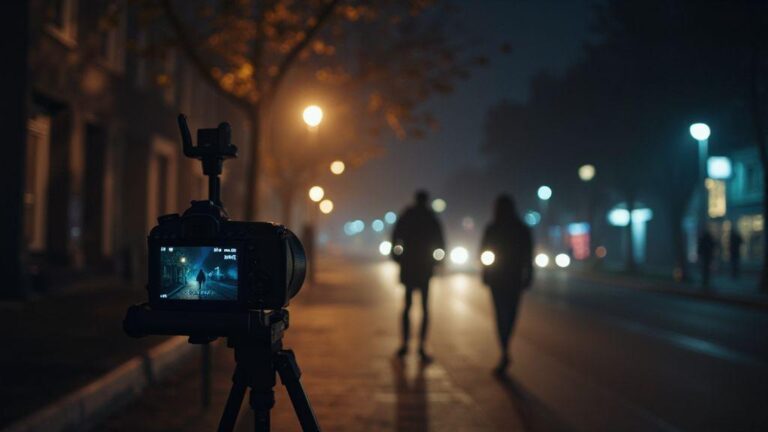
Night Street Photography Exposure Settings
You’re getting out after dark, lenses ready, and the streets glow with neon and streetlights. Your goal is clean, usable frames without endless trial and error. First, pick a base ISO that keeps noise low but lets you handhold or shoot quickly. For most urban scenes, try ISO 400 to start. If your shutter speed slips because your subject moves or you’re handholding, nudge ISO to 800 or 1600, but watch the grain. Your shutter speed should be fast enough to freeze minor motion or camera shake; think 1/60s to 1/125s for steady hands, or slower if you’re intentionally making light trails or you’re using a tripod. Balance is the name of the game: set ISO high enough to keep a solid exposure, then adjust your shutter to taste. Your aperture will usually be between f/4 and f/8—wide enough to keep streets sharp but still give you enough depth of field for storefronts and reflections.
A tripod changes everything, but you’ll still tweak exposure the same way. If you’re on a tripod, you can drop ISO to 100 or 200 to keep noise very low, and let your shutter do the heavy lifting. For handheld shots in the city, you might compromise with 1/125s to 1/60s at f/5.6 or f/4 if your lens is fast. Your metering mode usually works best on matrix/evaluative metering, which reads the whole scene so you don’t overexpose a bright sign or underexpose a dark alley. If a storefront window is screaming bright, you may need to dial in a touch of exposure compensation (/-) to keep the balance. Keep a second card or your back-up in your pocket so you’re never stuck chasing a single shot.
Your histogram is your friend. After you lock in your exposure, glance at it quickly to confirm you’re not clipping highlights in neon or silhouettes. If neon signs burn out, lower ISO or shutter a touch; if shadows swallow detail, raise ISO a notch or extend shutter. You’ll learn the rhythm of your camera as you practice, but the core idea stays: expose for midtones, not just the brightest sign or the darkest alley. That discipline will give you photos that feel bright and crisp without looking blown out.
Night street photography exposure settings to balance ISO and shutter for you
Your balance is the heart of this, and you’ll learn it by testing. Start with ISO 400, shutter around 1/125s, and an aperture near f/5.6. If a scene looks too dark, bump ISO to 800 or 1600 rather than widening the aperture too much, which can flatten depth. If you want sharp street detail across a scene, hover near f/8 and let the ISO climb a bit. A scene with moving pedestrians benefits from a faster shutter, while a quiet storefront at night sings with a slightly slower one. You’ll end up adjusting in seconds, not minutes.
When you’re on the move, you’ll often rely on auto ISO in a controlled way: set a max ISO you’re comfortable with and let your camera handle the light changes. Use a slight exposure compensation if a bright sign pulls the exposure down more than you want. And if you’re shooting with a lens that focuses really well wide open, you can push a touch more shutter to avoid subject blur. It’s all about knowing your gear and being ready to adapt.
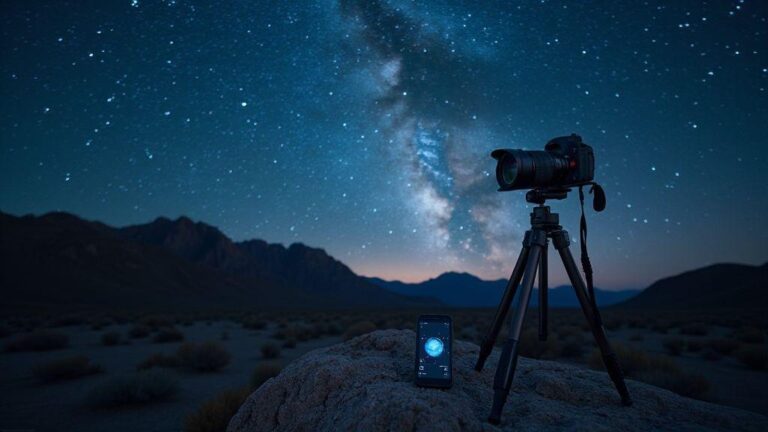
How long exposure city street photography creates smooth light trails
Longer exposures let you ride the rhythm of the city. You’ll capture cars as light trails, pedestrians as ghostly streaks, and storefronts as blended color fields. Use a sturdy tripod, a remote release or self-timer, and a low ISO (100–200) to keep noise down. Start with 5–15 seconds at f/8 to get a solid trail length without losing all detail. If you want longer trails, extend the shutter to 20–30 seconds, but be mindful of overall brightness—neon signs and windows can blow out in longer shots. A small aperture helps keep both near and far elements in reasonable focus, giving your images a cohesive, city-wide glow.
If you’re not using a tripod, 1–4 second bursts can still yield pleasing light trails when you’re moving with the scene. In those cases, you’ll push ISO a touch higher to keep your sensitivity up, but keep the shutter under 1/8s to avoid smearing. The key is to think about where the light is coming from and how long you want the trails to stay on screen. Realize the city has its own tempo, and your exposure should reflect that pace.
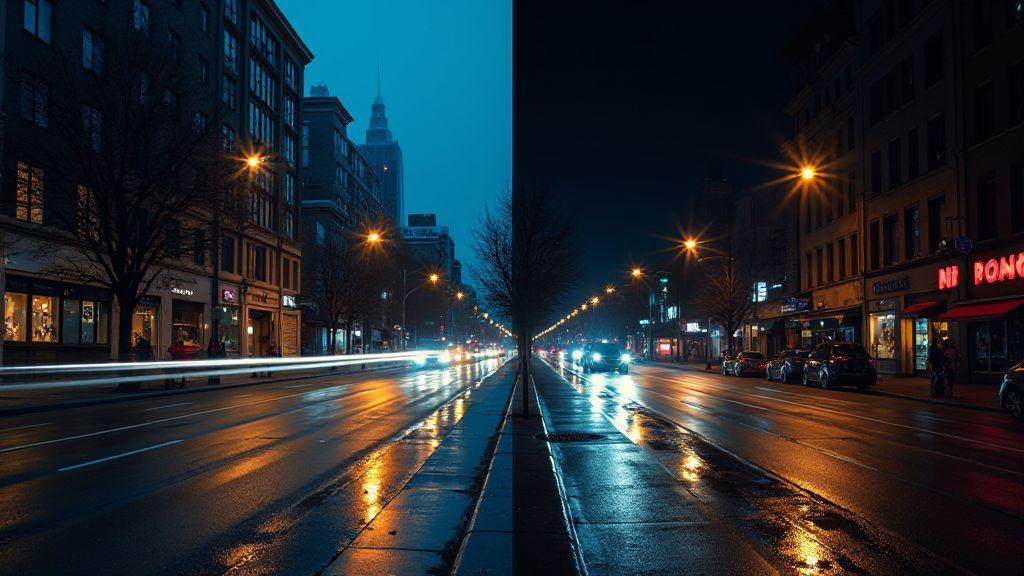
Color Temperature Blue Hour vs Night
Blue hour and night present two different color moods. During blue hour, the sky casts a cool blue wash across everything, and artificial lights glow but haven’t fully overtaken the scene. At night, artificial colors—neon, tungsten, and LEDs—create strong contrast you can use to separate subjects from the background. You’ll notice the balance between natural and artificial light shifts from nearly even during blue hour to dominated by man-made colors after dark. Your camera will respond differently to each, so plan accordingly. The key is to recognize when white balance drifts toward blue or toward warm amber tones and adjust settings accordingly.
Blue hour offers a calm canvas where whites stay true and blues stay blue, while night pushes bold color shifts that can look dramatic or muddy if you don’t react quickly. Think of blue hour as a chance to capture quiet mood and clean silhouettes, while night emphasizes energy and motion with color. Your lens choice and exposure will feel different too: you might shoot longer exposures to preserve the blue cast or stop down to keep reflections and light trails sharp. Keep a steady hand on color, contrast, and how your subject feels within streetlight glow.
When comparing the two, white balance is your main lever. Blue hour nudges cooler tones, night leans toward warmer or more saturated artificial hues. If you want natural-looking scenes with accurate skin tones, lean into cooler balance during blue hour and nudge toward neutral or slightly warm after dark. If you love the punch of city lights, embrace warmer settings after dusk and use creative balance to keep skies readable. Practice on familiar spots to recognize how the scene shifts with time.
Cool blue tones in blue hour and what they mean for your white balance
During blue hour, your scene leans cooler and whites can drift toward blue. Set white balance to a cooler, lower Kelvin to keep the sky true and avoid muddy grays in shadows. A value around 3200–4200K often works, but test and adjust as you go. If skin tones look off, warm it a touch. The goal is to preserve the blue mood without turning everything into a cyan mess.
Because blue hour is gentle, street lamps glow without overpowering the scene. Color temperature can stay cooler, and you won’t miss the sky. Keep exposure reasonable so highlights from lights don’t clip, leaving you with crisp star-like points and smooth transitions. If shooting water or glass, the cool balance helps reflections feel crisp. Start cool, refine in small steps, and review often.
When behind the camera, start with a cool white balance and fine-tune. If your camera offers a WB shift or a twilight preset, use it as a baseline and compare with manual Kelvin adjustments. Your aim is to preserve the blue mood without making everything look cold and lifeless. A slight magenta tint can counterbalance deep blues in the sky for a more natural overall look.
Warmer artificial lights after dark and how to adapt your settings
After dark, artificial lights dominate. You’ll see warm yellows and oranges from streetlights and shop windows, plus cooler LEDs from signs. To keep colors honest, tilt white balance warmer or toward a neutral setting and adjust using color temperature. A starting point is around 3200–3800K for tungsten-like lighting, but LEDs vary, so test quickly. If faces look muddy, try a touch cooler or add a hint of magenta to offset greenish tints from some LEDs.
Night scenes reward deliberate exposure choices. Raise ISO slightly to retain shadow detail without excessive noise, or use a tripod for longer exposures to capture trails and lights. When shooting neon or LED signs, neutralize color casts by nudging warmth or coolness in small steps until colors read as expected. Let artificial light set the mood but keep skin tones believable. Test a few shots in the same frame to see how balance shifts across the scene.
As you fine-tune, you’ll notice the night world is a color puzzle. Keep lights integrated with the scene, not overpowering it. Use exposure compensation to protect highlights from blown color, and adjust WB mid-shot if a sign throws you off. The goal is vibrant city glow without a plastic neon glaze.
White balance tips you can use
- Start with a baseline around 3800K for mixed lighting, then adjust in 200–400K steps based on the dominant color in your frame. The key is to keep skin tones believable while preserving mood.
Low Light Urban Photography Tips
Low light urban scenes require quick adaptation. Edges glow under street lamps, reflections dance in puddles, and your goal is steady gear, the right settings, and storytelling frames. Walk with eyes up and hands ready—notice silhouettes, glow from shop windows, and rain-slicked pavement. Balance exposure, noise, and motion to keep photos lively, not flat.
Plan routes with steady light sources—neon, storefronts, or bus lights—to time shots for color and contrast without underexposing details. The city changes fast; a moment can become perfect with a quick camera move. Build a steady rhythm: one careful frame, then another, rather than a dozen rushed tries.
Evaluate results to improve. If a scene feels busy, isolate a subject like a lone cyclist or a bright doorway. Keep the camera ready but don’t force a shot. Sometimes stepping back for negative space helps the image breathe. You’ll develop a library of spots that routinely yield clean lines and clear silhouettes.
Gear and stance tips that make low light urban photography easier for you
Your stance matters as much as your gear. Stand with feet shoulder-width apart, one foot slightly ahead, and elbows tucked in to stabilize the camera. If possible, lean on a solid surface to shave shake. A compact tripod or monopod helps with longer exposures. For lenses, a fast 35–50mm range on a full-frame body pairs well with an aperture around f/1.8–f/2.8 to maximize light intake. Spare batteries and memory cards are essential.
Grip matters: use a wrist strap to reduce jostling, enable image stabilization if available, and keep your finger off the shutter until ready. Frame carefully for a clean, decisive moment.
Quick tricks to reduce noise and steady your camera
Outpace noise by shooting at the lowest tolerable ISO and extending shutter or widening aperture as needed. Shoot in RAW for post-processing flexibility. Bracket exposures to ensure you capture a clean frame. For steadiness, breathe, half-press to focus, then shutter release smoothly. In low light, brace against a wall or place the camera on a stable surface when possible.
A practical trick is RAW JPEG: RAW for edits, JPEG for quick sharing. If wind is an issue, use a remote trigger or timer to avoid camera shake. Routine practice leads to crisper lights and smoother tones.
Practical kit list you can pack
- Camera body with strong low-light performance
- Fast lens in the 35–50mm range (f/1.8–f/2.8)
- Extra battery and memory cards
- Small tripod or monopod for longer shots
- Remote shutter release or timer
- Microfiber cloth for clean lens and stars in lights
- Lightweight gloves and a hat for colder nights
Composition and Motion for Night Streets
On a quiet night street, stillness can become drama. Control tempo by framing and timing. The city breathes—the glow from lamps, reflections on wet pavement, and the blur of passing cars. Create a story in one frame where motion and stillness coexist. Keep the camera low or at eye level to capture rhythm, then decide if you want the scene fast or calm. Patience pays off: wait for a lull in traffic or a gap in pedestrians, then press the shutter at the right moment.
Balance sharp elements with moving ones. Use a tripod to keep foreground crisp while distant lights smear into trails. If you want more activity, let cars streak; for quiet drama, shoot with shorter exposures. Your choice shapes mood. Shoot RAW to recover details in highlights and shadows later.
Keep composition readable. Too many lights confuse the eye. Guide attention with clear shapes like a lone passerby, a doorway glow, or a bright sign. Let the city’s geometry lead the eye to your subject, and practice spotting lines before you set up.
Use moving cars and people to add motion you control
Movers become the night’s tempo. Adjust shutter speed to control blur: 1/8 to 1/2 second creates light trails; 1/60 to 1/125 second keeps moving figures crisper. Time shots to catch a car’s light or a pedestrian’s pause. Panning with a subject adds crisp foreground against a blurred background. Color guides attention—hot colors (reds/blues) draw the eye; warm amber tones offer a calmer mood. Shoot at low ISO to keep trails clean. Experiment with speeds and distances to see how motion shapes the scene.
People and cars are storytelling tools. A pedestrian under a streetlight anchors the frame, while passing cars push the frame into narrative motion. Place subjects on leading lines to direct gaze toward them. Anticipate moments—watch for a car’s pass or a pedestrian’s step—and press the shutter at the right instant.
Find leading lines and reflections that guide viewers to your subject
Leading lines pull the eye toward your subject. Look for diagonals in curbs, rails, and storefronts. Reflections on wet pavement, glass, or puddles multiply lines that frame your subject with cinematic glow. Place your subject at line intersections to create natural tension and focus. The city’s geometry guides the gaze, making your subject the natural resting point.
Reflections multiply drama without adding clutter. Position yourself to have a streetlight bounce off surfaces to halo the subject, then adjust to soften or widen the reflection as needed. Reflections connect foreground and background, guiding viewers through the frame as you intended.
Choose lines to change mood: diagonals imply motion, straight avenues feel expansive, and concentric storefront reflections pull the eye inward. Practice across neighborhoods to spot lines before you shoot.
Composition moves you can apply
Shift your frame to alter story: low-angle for heroic subject, or high-angle to reveal a network of streets. Move your feet to adjust converging lines and light fall. In-camera cropping can emphasize one line or reflection. If crowded, wait for a cleaner moment and reframe.
Use negative space to give your subject room. A lone streetlamp or empty crosswalk can make the subject pop and add mood. Play with asymmetry by placing the subject off-center to let the background tell more of the story. Time your shot for a quiet moment—when a bus window catches neon or a passerby pauses to tie a shoe. Small framing moves can change the entire feel.
Safety, Permissions, and Night Etiquette
Safety first ensures you can focus on shots. Stay aware, secure your gear, and remain confident in unfamiliar areas. A simple routine reduces surprises and increases great photos.
Respect for rules and people helps your night work stay smooth. Permissions aren’t just legal boxes; they’re about caring for places you shoot. By knowing who to ask and when, you avoid hassles and fines and often gain angles others miss by staying courteous.
Night etiquette is about consideration. You’ll share streets with strangers, shopkeepers, and fellow photographers. A quick nod, quiet steps, and a brief explanation of what you’re doing can turn tense moments into friendly exchanges. Sometimes, a chat with someone nearby yields your best shot.
Stay visible and aware so you keep yourself and your gear safe
Stay visible as a safety measure. Wear bright or reflective clothing in dark spots and keep straps secured in busy areas. When setting up, place your tripod where you won’t block foot traffic. You’ll feel calmer when you’re seen and heard.
Stay aware by checking your surroundings every few minutes. Notice changing light, moving crowds, and hazards early. If you’re in a tunnel or under a bridge, test lights and battery life early to avoid scrambling later. This habit keeps you steady and ready when the moment clicks.
Check local rules to avoid fines when photographing public streets
Public streets usually permit photography, but some places have restrictions. Check city websites or ask local businesses about filming or tripod use after hours. In parks, alleys, or near storefronts, a quick check can prevent confrontations and fines.
If unsure, keep it simple: shoot during non-peak hours, avoid blocking entrances, and respect signage. You’ll build goodwill with locals and often gain angles others miss by staying courteous.
Simple safety steps you should follow
- Plan your route before sunset and tell someone your location.
- Check your gear: spare batteries, memory cards, and a reliable light.
- Keep your camera low-key when moving through crowds to avoid drawing attention.
- Light your scene safely: use small, portable lights only when needed and never blind passersby.
- Leave no trace: pack out what you bring in and tidy your setup after you shoot.
Edit and Color Grade Your Night Shots
Your night photos deserve a finish that makes the city glow. Start by reducing noise without losing edge detail, then push colors to reflect the moment you photographed. Edit with shadows deep but not crushed and highlights that pop without clipping. Balance is key to making lights sparkle while preserving rich darks.
Use a two-track approach: noise reduction on luminance and selective sharpening on edges. Begin with mild luminance reduction to maintain texture in buildings and skies. Mask smoother areas like skies and reflections to avoid over-softening. Then sharpen mid and high frequencies to keep metal and glass crisp, while avoiding over-sharpening light trails. Adjust white balance to preserve blue hour mood or full-dark warmth without unnatural tints.
Color grading shapes mood. For blue hour, push cooler blues and subtle magentas in shadows and highlights. For full dark, deepen blues, add teal in midtones, and warm streetlights slightly to keep life in the frame. Use local adjustments to brighten windows or accents without lifting the whole image. The goal is depth and contrast that guide the eye through the photograph.
How to edit for less noise and better shadow detail in your photos
Begin with gentle luminance noise reduction to maintain texture. Preserve the natural grain that gives night photos character. Selectively recover shadow detail in dark areas like doorways or under bridges. A fine-tuned curve lifts shadows without washing the image. Keep blacks faithful to night’s mood, not muddy.
Edge detail matters as much as smooth shadows. After noise reduction, apply a touch of sharpening to mid/high frequencies with masking so only edges get sharpened. Avoid over-sharpening light trails to prevent brittleness. Check color noise in blues and purples; if present, apply slight hue reduction to those channels for cleaner color.
Color grading tips to match blue hour vs full dark photography styles
Blue hour color grading aims for calm, cinematic vibes: cooler shadows, a hint of magenta in highlights, and neutral skin tones if people appear. A soft gradient from cool to warmer near the horizon can mimic the last glow of sunset and maintain consistency across shots.
Full dark grading seeks depth and drama: deepen shadows, add teal to midtones, and allow warm amber for streetlights. Brighten select highlights from storefronts or neon to guide the eye, but avoid overdoing it. If you shoot in rain or on wet pavement, enhance reflections with a touch more vibrance while keeping saturation controlled. Aim for a cohesive, immersive gallery feel.
Editing workflow you can repeat
Start with a straight, well-exposed base. Apply mild noise reduction, then adjust exposure and white balance to your intended mood. Use tone curves to recover shadows and tame highlights. Add a global color grade suited to blue hour or full dark, then refine with local adjustments on windows, lights, and reflections. Finish with gentle sharpening and noise reduction, and save presets for blue hour and full dark to speed future edits.
Color and Light: Consistent Looks Across Night Scenarios
Your edits should translate across similar scenes. Use presets as a starting point, then adjust for each shot’s unique light. If a scene is rainy, tweak contrast and highlight recovery to keep reflections lively. If a scene has strong artificial lighting, ensure white balance doesn’t produce unnatural casts. A solid workflow lets you switch from blue hour calm to full dark drama with a few fine-tuned sliders.
Best Time of Night to Photograph City Streets: Blue Hour vs Full Dark
Your choice shapes color and mood. Blue hour brings softer light, cooler skies, and gentle reflections. Full dark delivers bold shadows, brighter artificial highlights, and a more graphic look. Decide based on your mood and the message you want to convey. Either way, editing should reinforce that choice with balanced contrast, clean color, and careful noise control.

Smartphone Night Photography Enthusiast & Founder of IncrivelX
Vinicius Sanches is a passionate smartphone photographer who has spent years proving that you don’t need an expensive camera to capture breathtaking images after dark. Born with a natural curiosity for technology and a deep love for visual storytelling, Vinicius discovered his passion for night photography almost by accident — one evening, standing on a city street, phone in hand, completely mesmerized by the way artificial lights danced across wet pavement.
That moment changed everything.
What started as a personal obsession quickly became a mission. Vinicius realized that millions of people were carrying powerful cameras in their pockets every single day, yet had no idea how to unlock their true potential after the sun went down. Blurry shots, grainy images, and washed-out colors were robbing everyday people of memories and moments that deserved to be captured beautifully.
So he decided to do something about it.
With years of hands-on experience shooting city streets, starry skies, neon-lit alleyways, and creative night portraits — all with nothing but a smartphone — Vinicius built IncrivelX as the resource he wished had existed when he was just starting out. A place with no confusing jargon, no assumptions, and no gatekeeping. Just honest, practical, beginner-friendly guidance that actually gets results.
Vinicius has tested dozens of smartphones from every major brand, explored dark sky locations across multiple states, and spent countless nights experimenting with settings, compositions, and editing techniques so that his readers don’t have to start from scratch. Every article on IncrivelX comes from real experience, real mistakes, and real lessons learned in the field.
When he’s not out shooting at midnight or writing in-depth guides for the IncrivelX community, Vinicius can be found exploring new cities with his phone always within reach, looking for the perfect shot hiding in the shadows.
His philosophy is simple: the best camera is the one you already have — you just need to learn how to use it in the dark.