Astrophotography in 2026: A Beginner’s Guide to Capturing the Cosmos with Your Smartphone
Choose the Best Phone and Gear
You’re about to pick gear that makes night shots feel easy. This section helps you choose a phone that shines in low light and the basics you actually need. Think of it as laying a solid foundation before you chase stars. Bold choices here save time later and help you get cleaner, brighter night photos.
Astrophotography in 2026: A Beginner’s Guide to Capturing the Cosmos with Your Smartphone sits here as a practical goal. You’ll want a phone with strong night modes, long exposure options, and a good sensor. If you already own a recent flagship, you’re likely close. If not, focus on models that advertise dedicated night photography modes, RAW capture, and manual exposure controls. Your goal is to minimize noise and maximize detail when you point at the Milky Way or a dark sky full of stars.
In addition to the phone, think about a few basics that matter. A sturdy phone tripod adapter is worth its weight in gold, since a stable base makes long exposures possible. A compact tripod with adjustable legs helps you frame shots on uneven ground. If you carry extra lenses or a tiny dedicated camera, consider how you’ll manage weight and balance. Your setup should feel like a natural extension of your hand, not a burden you fear every time you switch to night mode.
Best Phones for Astrophotography in 2026
You want phones that keep bright stars crisp and colors true. Look for models with large sensors, good dynamic range, and strong stabilization. A phone with a dedicated astrophotography mode lets you stack frames, reduce noise, and pull more detail from dark skies. If you’re deciding, compare the camera app’s long exposure options, RAW support, and how well it handles color under stars.
Your best bet is a recent flagship or a premium mid-range model that explicitly notes night or astrophotography improvements. Pay attention to sensor size, lens aperture, and whether the phone can shoot RAW in night modes. You’ll thank yourself when you can pull star trails or a sharp Milky Way shot without wrestling with ISO and shutter speed for minutes. Choose a phone that fits your hand and your budget, but don’t settle for mediocrity in dark settings.
Smartphone Astrophotography 2026 Tips
In 2026, you’ll get the most from phones that combine software tricks with solid hardware. Start with a steady tripod and a remote shutter or timer to avoid shake. Shoot in RAW if possible, so you can adjust exposure and white balance later without pixels exploding into noise. Use a longer exposure for star trails, but stack several shorter exposures if your phone supports it, to keep stars round and bright.
Experiment with stacking and bracketing. If your phone supports multiple frames or a dedicated night stack, use it. Don’t fear noise—noise reduction is your friend, not your foe. Keep your ISO modest, and lean on longer exposures or stacking to reveal faint stars. And remember, composition matters: include a foreground element like a tree or rock to ground your shot and give your night scene depth. You’ll feel the difference when you review a well-balanced image instead of a flat star field.
Phone Tripod and Adapter Basics
Stability is your night photography ally. A simple phone tripod with a flexible or telescoping leg design makes it easy to level your shot on uneven ground. Pair it with a sturdy adapter that clamps onto your phone securely and lets you rotate between landscape and portrait quickly. A good adapter also keeps your phone from slipping when you apply wind or a small bump.
Keep your setup light and portable. You’ll move from place to place chasing clearer skies, so a compact tripod plus a reliable phone mount is a smart combo. If you shoot from a car or a ledge, a small stabilizer or a table tripod can save you from shaky shots. Your best results come when your phone is rock steady for the whole exposure, not after you sprint back to fix a blurry star.
Master Phone Camera Settings
When you’re chasing night shots, your phone is your trusty sidekick. You’ll get sharper, brighter skies if you tailor your settings before you shoot. Start by locking exposure so the sky doesn’t wash out whenever a cloud or a car lights up the frame. If your phone lets you, enable Pro or Manual mode. This gives you direct control over ISO, shutter, and focus. Keep the ISO low to avoid grain, and use a longer shutter to gather more starlight without blowing out the foreground. Your goal is a clean sky with just enough glow from any foreground features, like a tree silhouette or distant lights, to ground the scene. Practice with a few quick test shots, then pick the setup you like best and stick with it for consistency.
In practice, find a balance between brightness and noise. Use a tripod or stable surface to stop camera shake during long exposures. If you don’t have a tripod, brace your elbows against your body or a solid object, and use a self-timer or a remote shutter to avoid jostling. Enable any scene modes that help night shooting, like Night or Star modes, but don’t rely on them entirely. They’re helpful as a starting point, yet you’ll often get cleaner results by dialing in your own settings. Remember to switch off any in-phone digital stabilization that crops or moves pixels, which can blur fine star details. Your goal is crisp, steady frames you can stack later if needed.
Here’s a quick workflow you can repeat: set Pro or Manual mode, set ISO low (around 800 or lower if possible), use a long shutter (15–30 seconds), and manual focus to infinity. Take a quick shot, zoom in on the stars, and adjust as needed. If the foreground needs more light, add a slow, separate light source or a gentle light painting with a flashlight during a second exposure. With practice, you’ll start seeing more stars without a noisy sky. This method keeps your nightscape clean so your astrophotography improvements show up in every shot.
Phone Long Exposure Settings Night Sky
Long exposure is your friend for night skies. You’ll capture the movement of faint satellites and the Milky Way’s glow. Start by locking the phone on a stable stand. Set the shutter to 15–30 seconds and keep ISO as low as you can while still getting enough light. If your phone supports it, try a RAW capture so you have more control in editing later. Use manual focus, set to infinity, and fine-tune with a live view. If you notice star trails you didn’t expect, it means your exposure is too long for how bright the sky is that night; shorten the shutter a notch and retry.
Stacking several shorter exposures can beat a single long shot. If your phone allows, take multiple 10–15 second frames at a modest ISO, then merge them in post-processing to reduce noise and bring out fainter stars. Stay patient: a single frame may look modest, but a stack will reveal more depth. Keep your foreground interesting, but not overpowering; a lone tree or a distant city glow can anchor the image without stealing the spotlight from the stars.
How to Capture Stars with Smartphone
Capturing stars with your smartphone is about letting the camera see what your eye can’t in a single glance. Use a tripod, frame with a clear horizon, and use manual focus to reach infinity. Start with a 20–25 second exposure at a low ISO, then review. If the sky looks grainy or washed out, lower ISO and lengthen exposure only a bit more, or grab an additional shorter shot to blend later. Don’t chase the brightest stars alone; the dimmer stars add texture and depth to your sky.
Try to avoid light pollution by darkening your screen and switching on Night mode only when necessary. If the foreground is too dark, a tiny light or a distant town glow can balance the composition without overpowering the stars. Each night is different, so keep a few baseline settings in mind and adjust based on the sky’s mood. You’ll be surprised how quickly your smartphone starts delivering dramatic, photo-worthy skies.
ISO, Shutter, and Focus
Your three core controls are your main tools. Set ISO low to keep noise down, choose a long shutter to collect enough starlight, and lock focus to infinity so you don’t drift into close-up blur. If your phone supports RAW, shoot in RAW for maximum flexibility later. Use manual focus to dial in sharp stars, then take a test shot and tweak as needed. The better you calibrate these, the cleaner your night sky will look in every shot.
Use Apps and AI to Improve Shots
You’ll see a big boost in your night photos when you mix the right apps with smart AI tricks. These tools help you frame better shots, keep stars sharp, and clean up noise without turning your phone into a dream-killer. You’ll learn what to look for, how to compare options, and where to save time on editing so you can spend more on actually shooting.
Astrophotography in 2026: A Beginner’s Guide to Capturing the Cosmos with Your Smartphone remains a practical goal as you choose apps that fit your device and goals. Some apps add quick presets to match scenes you love, while others give granular control over exposure, focus, and white balance. Pick ones that feel intuitive, so you don’t waste minutes tapping menus when you could be capturing the night sky. Your phone’s camera is powerful; the apps just unlock more of its potential.
Don’t underestimate AI’s role in night photography. AI can predict the best exposure for faint star trails or reduce noise in dark frames. You’ll find features that automatically align multiple frames, enhance color, and suppress grain without obliterating details. This isn’t cheating—it’s smart help that lets you stay in the moment rather than fighting your gear.
Astrophotography Apps for Smartphones 2026
You’ll want apps that combine easy controls with deep customization. Look for one that lets you lock focus, set exposure, and shoot in RAW. A strong anti-shake feature matters because stars don’t forgive motion, and you’ll appreciate little nudges that keep foregrounds crisp too. Many apps offer stacking, which is a game-changer for faint skies.
Two apps stand out for 2026: one that provides a clean, beginner-friendly interface, and another that dives into long-exposure controls for advanced users. Both should support RAW capture and a livestream histogram so you can judge brightness before you shoot. If you want quick wins, pick the beginner-friendly one; if you crave control, go with the deeper option.
Mastering daylight-to-night transitions in these apps helps you stay efficient. You’ll set presets for different skies—Milky Way seasons, meteor showers, or light-polluted suburbs—and switch with a tap. This makes your workflow smooth, so you spend more time observing and less time fiddling.
AI Noise Reduction for Smartphone Night Sky
Noise reduction is your best friend when you’re chasing stars, but you don’t want the photo to look mushy. AI reduces grain while preserving stars, nebulae, and the Milky Way’s subtle glow. You’ll notice clearer textures in dust lanes and better color separation even in faint sections of the sky.
Choose AI that works as a gentle editor, not a blanket cover. Subtle adjustments keep the sky sharp and the foreground natural. If an app offers a real-time preview of noise reduction, use it. You’ll avoid overprocessing and keep your image feeling true to life.
Test different strength levels on a few frames from one night. You’ll find a sweet spot where the noise is tame but details stay intact. Your future self will thank you when you can share clean shots without spending an hour in post.
App Stacking and Auto Exposure
Stacking several frames is your fastest path to cleaner skies. Apps that automate stacking align each shot and combine them to boost signal while reducing noise. Auto exposure helps keep the sky balanced, so you don’t overexpose the Milky Way or underexpose faint stars.
Use stacking for consistency across multiple frames. It smooths out random noise and makes your colors pop without looking Photoshopped. If you’re new, start with a few 15–30 second frames and let the app do the heavy lifting.
Let auto exposure do the heavy lifting, then fine-tune manually. Auto exposure gives you a solid baseline; a quick manual tweak afterward keeps foregrounds and colors accurate. You’ll feel more confident when you post because the shot already looked right on your screen.
Plan Night Shots and Find Dark Skies
You’ll get the best results when you plan ahead and pick dark, clear places away from city lights. Start by researching a few dark-sky spots near you and mark them on your map. Look for areas with minimal light pollution, open horizons, and clear skies forecasted for the night you plan to shoot. Pack a small kit: a sturdy tripod, a fully charged battery, a spare battery, a wide-angle lens if you have one, and a remote or timer to avoid camera shake. If you’re using a phone, enable long exposure modes or night modes if available, and consider bringing a small travel book or app that tracks cloud cover and moon rise times. Your goal is simple: maximize darkness and minimize movement so stars pop and the night feels alive on your sensor.
As you plan, set a rough schedule. Check when the Milky Way will rise and where it will be in the sky. Decide your composition early—foreground interest like a silhouette of trees, a lake’s reflection, or a lone rock can give depth. Bring warm clothes and a snack so you don’t rush the shot and lose the moment to cold fingers or fatigue. If you’re shooting with a smartphone, decide whether you’ll attempt star trails or a single sharp shot first. Your plan should include backup options in case the sky hides behind clouds. With a good plan, you’ll cut setup time and increase your chances of capturing a clean, expansive night scene.
Before you head out, confirm the weather window. A calm, windless night helps keep your shot sharp, and low humidity usually means clearer skies. If gusts pick up, you’ll see stars smear in your long exposures. Keep an eye on the moon—bright moonlight can wash out stars, so you might want to aim for a new moon phase or shoot around the time when the moon is low or rising late. Your plan should also note where the Milky Way is projected to be in the sky and which direction you’ll face as the night deepens. With this approach, you’ll feel confident stepping into the dark and letting your camera work its magic.
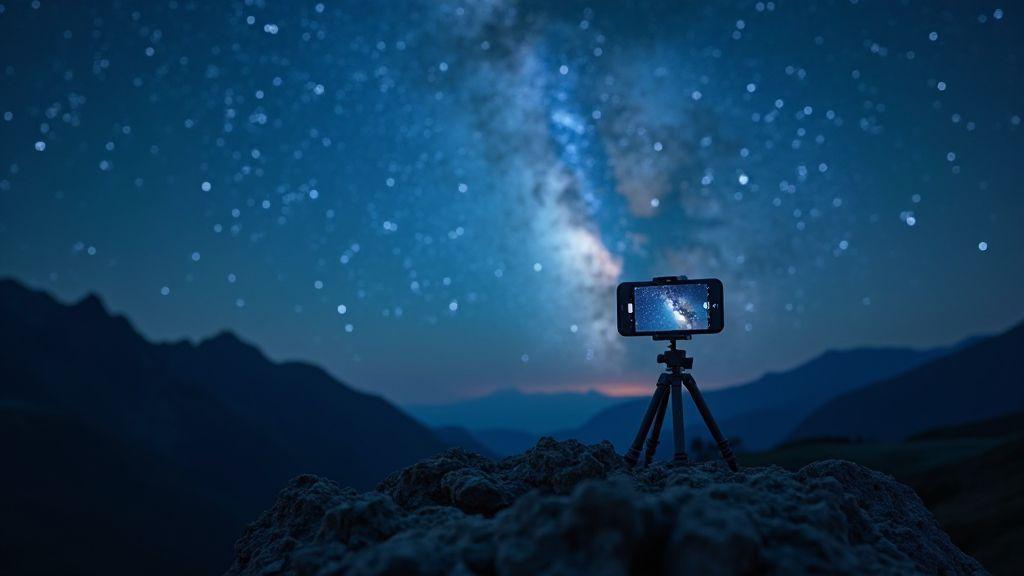
Milky Way Photography with Phone 2026
You’re not limited by gear anymore. In 2026, your phone can handle Milky Way photography if you follow a few steps. Start with a sturdy grip or a tripod to avoid any shake. Use a wide-angle lens setting if your phone supports it, and set the exposure to collect enough light without overdoing it. A typical start point is a 15–20 second exposure at high ISO, but you’ll tweak based on your scene. Use a timer or a Bluetooth shutter to prevent any touch-induced blur. If your phone has a pro mode, switch to raw capture so you can push the shadows later without noise.
Post-processing is where the magic happens. Shoot in RAW if possible and stack multiple frames to reduce noise. You’ll want to pull out stars and keep the Milky Way’s color intact. Don’t overdo contrast—the goal is detail without haloing. If you’re new to this, start with a single long exposure and gradually build up to a stack, comparing results as you go. Your phone can surprise you with the crispness of star fields when you give it the right settings and patience.
Mobile Astrophotography for Beginners Planning
For beginners, planning is your best friend. Decide on a destination with predictable clear skies and minimal light pollution. Check sunrise and sunset times, plus moon phase, so you know when the sky will be darkest. Create a simple shot list: a wide shot of the skyline, a foreground element like a rock or tree, and a Milky Way frame if it’s visible. Pack your essentials—tripod, battery bank, a lens clip for phones if you have one, and a phone stand to keep it steady.
When you arrive, test your settings in daylight or twilight to avoid surprises. Then switch to night mode and start with a conservative exposure. If your phone supports pro mode, use it to adjust ISO, shutter speed, and focus manually. Take several quick test shots to gauge noise and sharpness, then lock in your preferred setup. You’ll get better each time you shoot, especially when you review and compare your results on the drive home. Astrophotography in 2026: A Beginner’s Guide to Capturing the Cosmos with Your Smartphone is within reach when you plan and practice.
Moon Phase and Weather Timing
Moon phase and weather timing determine how dark your night can be. Pick nights near a new moon for the darkest skies. If you’re chasing star fields or the Milky Way, you’ll want as little moonlight as possible. Check the forecast for clear skies and light winds; calm air helps keep stars sharp. If clouds roll in, pause and revisit when the sky clears. Your timing should align with minimal moonlight and a stable forecast to maximize your shot quality.
Stacking and Post-Processing Techniques
Stacking and post-processing can turn a series of dark, noisy frames into clean, sharp night photos. Think of these steps as a recipe: you collect light, then blend it, then refine. The goal is to keep colors true and avoid artifacts that scream I’m processed. Start with a plan: know how many frames you’ll shoot, how long you’ll expose, and where your stars sit in the frame. When you stack, you reduce noise and boost signal, making faint stars and Milky Way bands pop without overdoing contrast.
You can approach stacking in two practical ways. First, shoot many short exposures and blend them. This minimizes star trails and keeps your background dark. Second, if your scene allows, you can stack longer exposures to pull out dim details. In both cases, you’ll want a consistent focus and stable framing. While you stack, keep your ISO modest and your exposure time predictable; that makes the math of stacking much easier and the results cleaner. After stacking, you’ll shift to post-processing to tame colors and brightness without destroying the natural look of the night sky.
The final result should feel natural, not overcooked. Maintain star color, avoid purple halos, and keep the Milky Way’s glow believable. If you see color shifts, go back to white balance and calibration steps before you crop or sharpen. Remember: the aim isn’t to chase a photo that looks artificial; it’s to reveal what you actually captured, with crisp stars and a smooth, dark background.
Stacking and Processing Smartphone Astrophotos
Your smartphone can stack and process in a few focused steps. Start with a stable tripod and a remote shutter or timer to avoid blur. Use a dedicated night mode if your phone offers one, but don’t rely on it alone. Take a handful of frames with minimal movement, then import them into an app that supports stacking. You’ll see a clearer, less noisy image come through as you blend. After stacking, adjust exposure carefully: push brightness where stars live, but keep the sky dark enough to feel like night. If you notice color shifts, adjust white balance in small increments and compare with the original frame. Finish with subtle sharpening to bring out the stars without creating halos around bright points.
Keep each step intentional. When you’re stacking, turn off any heavy digital processing in-camera that would fight the stacking result. In post-processing, use contrast and clarity sparingly; the goal is to reveal detail without turning night into day. If you shoot raw, you’ll have more latitude to fine-tune white balance and noise without crumbling the subtle gradients of the sky.
Mobile Editing Workflows for Beginners
Begin with a simple workflow you’ll actually follow: small, repeatable steps yield better results than chasing a perfect toolset. Correct basic exposure, then tame noise, and finally fine-tune color. Use a single pass to balance highlights and shadows, so you don’t overcook the sky. Save a copy before you start, so you can compare adjustments and backtrack if needed. As you grow, add one new step at a time—never juggle too many edits at once.
If you’re new to edits, start with an automatic preset that aligns with night sky colors, then tweak manually. Focus on white balance to keep stars white and avoid blue or orange casts. Adjust noise reduction only to the point where star details remain crisp. Finally, apply a light sharpen and a gentle contrast boost to make the scene pop, while preserving the calm, dark backdrop of space.
Align, Stack, and Edit
Align frames first, so the stars land in the same place in every shot. A small misalignment can ruin the stacking result, leaving fuzzy trails. Use a basic alignment tool that snaps star positions, then add a second pass if needed to lock the layers perfectly. Once aligned, stack your frames to reduce noise and bring out faint details. After stacking, edit for color, tone, and sharpness. Keep edits restrained; the goal is to enhance what you captured, not to replace it. If you see any halos around bright stars, dial back sharpening and fine-tune radius and threshold settings. With practice, this three-step cadence becomes second nature, and your night photos will consistently look cleaner and more true to life.
Attach Your Phone to Telescopes and Lenses
You’re about to unlock a new world of night images by attaching your phone to a telescope or a lens. Start simple: a basic smartphone telescope adapter can turn a handheld phone into a tiny astro-camera. This setup is a quick win if you’re curious about Milky Way bands or star trails without buying heavy gear. The key is stability—if your phone wobbles, you’ll see shaky stars. Choose a sturdy adapter that grips your phone snugly and lines up with the eyepiece. When you set it up, make sure the camera is centered on the eyepiece and the phone’s lens is as close to the eyepiece as possible without touching. A small bump in alignment can mean crisper stars and fewer blurry frames. Keep expectations realistic: you won’t replace a dedicated camera, but you’ll get surprisingly good shots with a steady hand and patient testing.
For practice, start with bright objects like the Moon or a bright planet. They’re forgiving and will help you dial in focus and exposure. Use a simple tripod for your telescope or mount to cut shake. A calm surface under your setup helps a lot. If you’re using an afocal method (you’re holding the phone at the eyepiece), try to keep a light touch on the phone. Too much pressure can misalign the lens. If you’re ready for sharper images, switch to a dedicated smartphone telescope adapter that clamps around the eyepiece and aligns the camera perfectly with the telescope’s optical axis. With the right adapter, you’ll notice that stacking several short exposures beats one long shot, giving you clearer stars and less noise.
Smartphone Telescope Adapter for Astrophotography
A smartphone telescope adapter for astrophotography is your bridge from casual snaps to real pictures. It clamps to your eyepiece and keeps your phone’s camera aligned with the telescope. Look for one that’s adjustable and compatible with your phone size. A good adapter reduces parallax and keeps the camera steady during long exposures. Start with a bright target, like the Moon, to test alignment. When you find your sweet spot, you’ll be able to snap cleaner images with less fiddling.
Pair the adapter with gentle focusing and a low ISO to control noise. After you take a few test shots, try stacking several frames to smooth out grain and bring out faint detail. This is where your phone starts doing real work, and you’ll notice faster results with practice. If you ever see vignetting or edge distortions, slide the adapter slightly or crop in post to keep the core circles crisp. Your goal is repeatable, sharp results, not perfect one-offs.
Advanced Mounts and Tracking Basics
Advanced mounts with tracking make a big difference for night shots. A motorized mount counteracts Earth’s rotation so your stars don’t smear across the frame. With tracking, you can shoot longer exposures without the sky turning into a blur. For beginners, a simple equatorial or alt-azimuth mount with a basic tracking head is enough to start learning. The trick is to balance the telescope and keep the tracking slow and smooth. If you feel the mount stutter, tighten the knobs slightly or rebalance to keep the load steady. Good tracking means you’ll capture more stars in one frame and reduce the time you spend fixing motion blur in post.
As you experiment, you’ll learn to align the mount with the celestial pole. A basic polar alignment step goes a long way, especially on longer sessions. Start with a bright star to sync the scope’s direction to the sky, then verify with another star to refine. With solid tracking, you can stack many short exposures for cleaner results, or shoot longer frames of the Milky Way with less blur. The payoff is clear: smoother skies, higher fidelity stars, and more forgiving post-processing.
Eyepiece vs Afocal Mounting
Eyepiece mounting places the phone right in line with the telescope’s eyepiece, giving you a direct path of light into your camera. Afocal mounting, by contrast, holds the phone near the eyepiece so you’re capturing the image as it exits the eyepiece, not directly through the telescope’s optics. Eyepiece mounting is typically more stable and easier to align, but afocal can be more flexible if you don’t want to swap adapters for different eyepieces. Start with eyepiece mounting for the simplest route to crisp images, then try afocal if you want to experiment with different focal lengths and field of view.
When you pick between them, think about your target. For bright targets, eyepiece mounting usually wins for sharpness. If you’re chasing wide fields or trying to include more sky in a single frame, afocal mounting can give you that looser, dramatic look. Either way, secure your setup and test with a few quick captures before you commit to a long session. The more you practice, the more natural the alignment will feel, and your results will speak for themselves.

Smartphone Night Photography Enthusiast & Founder of IncrivelX
Vinicius Sanches is a passionate smartphone photographer who has spent years proving that you don’t need an expensive camera to capture breathtaking images after dark. Born with a natural curiosity for technology and a deep love for visual storytelling, Vinicius discovered his passion for night photography almost by accident — one evening, standing on a city street, phone in hand, completely mesmerized by the way artificial lights danced across wet pavement.
That moment changed everything.
What started as a personal obsession quickly became a mission. Vinicius realized that millions of people were carrying powerful cameras in their pockets every single day, yet had no idea how to unlock their true potential after the sun went down. Blurry shots, grainy images, and washed-out colors were robbing everyday people of memories and moments that deserved to be captured beautifully.
So he decided to do something about it.
With years of hands-on experience shooting city streets, starry skies, neon-lit alleyways, and creative night portraits — all with nothing but a smartphone — Vinicius built IncrivelX as the resource he wished had existed when he was just starting out. A place with no confusing jargon, no assumptions, and no gatekeeping. Just honest, practical, beginner-friendly guidance that actually gets results.
Vinicius has tested dozens of smartphones from every major brand, explored dark sky locations across multiple states, and spent countless nights experimenting with settings, compositions, and editing techniques so that his readers don’t have to start from scratch. Every article on IncrivelX comes from real experience, real mistakes, and real lessons learned in the field.
When he’s not out shooting at midnight or writing in-depth guides for the IncrivelX community, Vinicius can be found exploring new cities with his phone always within reach, looking for the perfect shot hiding in the shadows.
His philosophy is simple: the best camera is the one you already have — you just need to learn how to use it in the dark.