Photographing Neon Reflections on Wet Streets: Complete Step-by-Step Guide
This guide walks you through gear, lenses, camera settings, composition, tripod techniques, long exposures, post-processing, safety, and practical tips for capturing neon on damp surfaces. You’ll learn to balance glow, texture, and motion to create cinematic night images.
Gear essentials for neon reflections photography
When chasing neon on damp streets, you need gear that stays steady and sharp. Your camera should handle long exposures with minimal noise, and lenses must render those glowing signs crisply. Invest in a reliable tripod and a remote or timer to avoid camera shake. Pack a sturdy bag, spare batteries, and plenty of memory cards so you stay in the moment. Include a lens hood and rain cover for drizzle; neon colors pop when the scene isn’t smeared by water spots.
Your camera settings determine how bold the neon appears. Bring fast memory cards and keep the sensor clean so shadows stay deep and highlights pop. A compact flashlight helps you compose in dark corners, and a microfiber cloth keeps rain off glass for clear reflections. In busy streets, extra protection from spray gives peace of mind so you can stay in the moment and frame for that perfect glow.
Filtration can help control glare. A small polarizer can tame reflections and boost contrast, but don’t overdo it—neon glow should feel electric, not crushed. A cheap lens wipe and silica gel packs help keep moisture away, and a rain sleeve or camera bag cover keeps you shooting when the sky opens. With the right protection, you’ll capture neon reflections as they shift with passing traffic and clouds.
Best lenses and focal lengths for Photographing Neon Reflections on Wet Streets
Your lens choice shapes the night. A wide or standard zoom (around 24-70mm) gives flexibility to frame tall neon signs and reflections without moving much. A 35mm prime provides a natural perspective and a strong sense of place in the glow. For dramatic close-ups of puddle reflections, a 50mm or 85mm isolates a sign and blurs the background into velvet night. Fast apertures (f/2.8 or wider) help gather light as cars pass and lights bloom.
Longer focal lengths (like 135mm) let you pull a single reflection from a distance. If chasing multiple reflections, a mid-range lens (50–70mm) helps you frame two or three signs in one shot. Bring lenses with sharp edges and good contrast to keep neon edges crisp. A spare lens or two in your bag lets you adapt to different angles or depths of field. Your goal is clean lines and crisp color, not smeared light.
Weatherproofing and protection
Wet streets bring spray and wind, so weatherproofing isn’t optional—it’s essential. Use weather-sealed gear when possible, and protect the camera body with a rain cover or plastic bag when storms roll in. Seal bag zippers and keep a small towel handy. If you’re shooting in drizzle, a lightweight rain jacket plus a camera rain cover helps you stay warm and focused. Wipe lenses afterward to remove raindrops that distort neon edges.
Power and data matter. Keep extra batteries charged and in a sealed pouch to prevent condensation. A waterproof memory card case protects cards and speeds selection. Wind and spray can shake your tripod, so a sturdy leg bag with a strap anchors it in place. Protecting your gear lets you stay out longer, chasing crisp neon lines and their reflections.
Pack a stable tripod
Your tripod is a backbone for neon work. It should be sturdy, level, and grip slick sidewalks firmly. A smoothly tilting head helps you align reflections precisely. For wet streets, a compact, heavy tripod minimizes wobble during long exposures. Tighten all knobs to prevent drift. A weight bag or ankle weights can anchor legs in windy corners. With everything set, you’ll shoot long exposures without blur and capture each glow in its own moment.
Camera settings for neon reflections
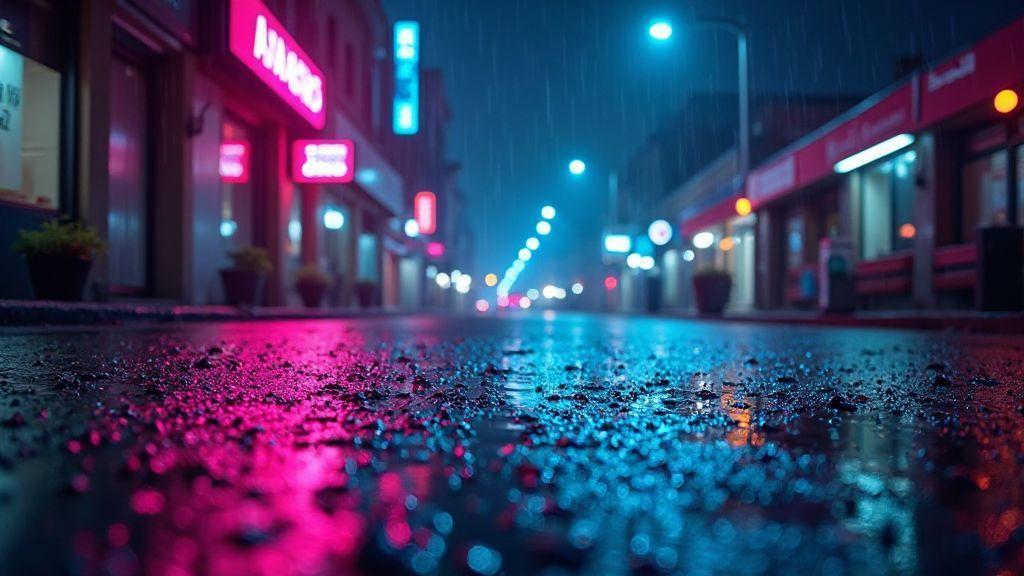
Neon reflections turn wet pavement into a mirror of color and motion. Start by deciding the mood: crisp and vivid or soft and dreamy. The core trio is shutter speed, aperture, and ISO. When balanced well, neon stays alive while textures remain visible.
Neon-heavy scenes can trick your meter, so be prepared to push the shutter to capture glow without losing street texture. Wide angles reveal more neon bursts; close-ups emphasize raindrops and puddle textures. Decide whether you want the emphasis on the bright sign or on the wet street as a painterly surface. Move around and compare angles until you find a balance between color punch and atmospheric mood.
Shutter duration matters: a longer shutter can turn glow into ribbons; a shorter one freezes motion for a still life feel. Neon on dark asphalt can blow out, so adjust accordingly. Practice by taking two shots with slightly different settings, then compare for what works best. The goal is a clean balance between neon glow and street texture.
Shutter speed, aperture, ISO basics
Shorter shutter speeds freeze glow; longer ones smear it into ribbons. Use a moderate shutter to keep the street sharp while showing some motion in car lights. Aperture controls depth of field; a mid-range (f/5.6–f/8) often provides enough depth while keeping neon crisp. ISO should stay low to reduce noise; in night scenes with neon, you’ll typically land in the ISO 100–800 range depending on brightness. The aim: clean lines and color without noise stealing the vibe.
If you want a painterly look, push shutter longer to let reflections smear. For detail in bricks and puddles, back off the shutter to preserve texture. Test two shots with slight setting differences and learn from the results. The objective is a balanced glow and street texture.
Use manual mode and RAW
Manual mode gives you control over shutter, aperture, and ISO, and you can adjust on the fly as the scene shifts. Trust the numbers over automatic metering, which can be fooled by reflections. Shooting in RAW preserves color and detail so you can recover highlights and shadows later without wrecking neon. RAW files give latitude to recover midtones that JPEGs clip.
Manual mode isn’t a burden; it’s creative control. Use exposure compensation if neon is too bright, then revert to manual as you gain scene familiarity. Keep white balance purposeful: neon can skew warm or cool, and RAW retains flexibility.
Lock exposure with spot metering
Spot metering helps lock in the bright neon you care about, keeping the rest of the street from vanishing into black. Point at a glowing sign or strong reflection, measure, and set exposure there. You’ll often underexpose slightly to preserve that electric glow rather than letting it wash out.
With exposure locked, reframe and shoot the rest without losing the anchor glow. This small habit makes a huge difference when the street changes as you move. Your photos stay true to the scene you felt when you pressed the shutter.
Composition tips for neon reflections
Chase bold foreground elements to frame the neon, and place a clear subject where reflections bounce. Let the lights become a character in the scene, not just a backdrop. If you want the water to do the heavy lifting, shoot from a low angle to exaggerate reflections and add depth. Think of the ground as a mirror; position yourself so neon washes across the frame, not just in the corner.
Layer your frame with a person or object on one side and neon lines sweeping across the opposite edge. Neon lines from signs, storefronts, or street lamps can guide the viewer toward your subject. Keep the horizon low to give space for reflections to stretch, making the glow feel bigger and more immersive. If storefronts are busy, use glow to outline shapes and create negative space around your subject.
Use leading lines and symmetry
Leverage neon bars, windows, and signboards as leading lines to draw the eye toward the subject. Symmetry works when reflections mirror architectural details. Align a vertical sign with a doorway or column so the glow forms a natural path into the frame. Wet streets double the lines, amplifying depth. Check edges for any elements that disrupt symmetry and adjust your stance, zoom, or angle until the reflections echo along the frame’s rhythm. A little patience yields a clean, balanced image where the neon feels intentional.
neon reflections photography tips
Practice with longer exposures to soften motion and let neon glow linger. A tripod helps keep the frame sharp; if you don’t have one, brace on a steady surface and shoot at a higher shutter speed. Use a small aperture to keep more of the scene in focus, balancing with ISO to avoid grain. Pay attention to white balance; neon often leans blue or magenta, and a warm touch can make colors pop without overpowering skin tones. Shoot in RAW to fine-tune later, and consider bracketing to capture both the brightest reflection and the ambient mood. Don’t neglect atmosphere—drizzle and wet streets amplify color; near a neon puddle, get close enough to reflect a strong glow in your frame. Patience pays off with a cinematic mood.
Keep horizons straight
Keeping the horizon straight anchors the image and preserves the neon glow. Check level, use the grid, and adjust so the line feels balanced. A slight tilt can add drama without sacrificing alignment.
Tripod techniques for wet street photography
In wet street photography, your tripod is your best ally. It stabilizes shots, helps you control reflections, and enables longer exposures for glow and color.
With a tripod, lock in composition and wait for the right moment. Use slower shutter speeds to blur moving cars or pedestrians just enough to show motion while keeping your main subject crisp. If you’re using a compact camera or phone with a mini-tripod, stabilize for a steady base and stillness in drizzle.
A stable base lets you shoot at dusk or after dark, balancing storefront lights and neon. The result is a cinematic look that highlights contrasts between light and shadow on slick pavement.
Stabilize and reduce shake
Place your tripod on a flat, dry spot if possible, extend legs evenly, and level the top frame. A level shot is essential for clean lines and straight reflections. Use a low ISO to keep noise down, and keep the shutter speed slow enough to let light trails from moving cars or pedestrians appear without turning your subject into blur. If your camera has image stabilization, turn it off on a tripod to avoid fighting the tripod’s movement with lens shake. Gentle breathing and a steady release help prevent micro-movements.
Check for vibrations from wind or passing traffic. In windy conditions, anchor the tripod with a weight bag or lower the center column for stability. The goal is to render crisp edges on signs and puddles, with neon staying bold.
Use remote release or timer
A remote release or timer eliminates the small jolt from pressing the shutter, keeping reflections clean. Set a short delay (2 seconds) or use a wireless remote to fire after you’ve composed. This is especially helpful in low light where you’d otherwise bump exposure to see details.
With a timer, compose, breathe, and wait for pedestrians to clear the frame. A long exposure can capture several frames in sequence to choose the best balance of motion blur and glow. If you don’t have a remote, use the camera’s timer and brace yourself to minimize shake. A stable stance makes a big difference.
Long exposure neon street photography
Long exposure places you in a sleepless-night mood, where lights smear into colorful trails. Start on a busy street corner with bright signage and puddles that act as mirrors. The aim is to fuse glow with motion, turning the scene into a painted photograph rather than a snapshot. Plan where neon will hit the wet pavement and how passing cars or pedestrians will blur into light chapters.
Set your camera for long exposure: 1/4 to 2 seconds works well on damp nights, but adjust to traffic levels. If the lens fogs, wipe gently with a microfiber cloth and keep hands steady. Use manual focus to prevent bright signs from shifting out of frame when you press the shutter. Think of the street as alive with liquid color.
Consider a sequence instead of a single frame. Take a few seconds of exposure, then a longer one, and compare. The reflections change as rain settles and traffic flows, giving you a richer set to choose from. Review shots to pick the one that feels most dreamlike.
Create smooth reflections with long shutter
For glass-like reflections, use a long shutter to smooth water on the street. A rock-solid tripod is non-negotiable. Frame so lights align with the wet surface, creating a full-bleed mirror. With the shutter released, the reflections become a soft river of color rather than jagged edges. Keep ISO low and aperture around f/8 to preserve neon crispness while background movement blurs.
If rain stops, the reflection fades; shoot during or just after showers for best effect. Look for leading lines to guide the eye toward the reflection and frame shadows to enhance the glow without overpowering it. If the water’s too calm, consider a quick passerby to add subtle motion.
Manage motion blur from people and cars
Motion blur can be a weapon or a nuisance. Set shutter speed to match the motion you want: longer exposures for trails, shorter for sharper pedestrians. Use the tripod to keep the scene crisp while motion happens in the background. Try multiple timing variations and crop later for a deliberate look. In busy squares, a faster shutter (1/60s or higher) can keep people clearer while neon glow remains dominant.
Review to see how movement guides the eye. If a car blurs too much, adjust exposure or crop. Read the street like a map of light, letting movement become part of the composition.
Use ND filters when needed
If the scene is too bright for long shutters, an ND filter lets you keep the shutter open longer without overexposing neon. Keep ISO low and aperture around f/8 so lights stay sharp. Attach the filter securely and check for vignetting at the corners. The goal is to darken the scene enough to bend time while preserving color.
Capturing neon reflections with smartphone
Smartphones can deliver bold neon reflections when used with a plan. Choose a scene where neon colors bounce off puddles or a slick road. Look for storefronts, bars, or arcade entrances with strong lights. Reflections shift as you move, so compare angles. Frame so the brightest neon sits near the bottom third to give the reflection room to breathe.
Set up for a clean, dramatic look. A slightly telephoto feel helps isolate the reflection from clutter. Turn on Night Mode if available; it stacks frames to brighten shadows without blowing highlights. If you have Pro controls, lower ISO to reduce grain and adjust shutter to keep lights from smearing. You want sharp neon edges with a softly glowing reflection.
Use night mode and Pro controls
Night mode stacks frames to reduce noise and improve detail in dark scenes, keeping neon crisp. With Pro controls, lower ISO and lengthen the shutter to gather more light from neon glows. Fine-tune white balance to keep blues from turning purple and greens from looking off. Start with a moderate shutter and adjust until reflections pop without halos.
Experiment with exposure and focus. Lock focus on the neon sign, then recompose so the brightest area sits where you want. If noise appears, switch to Pro mode and adjust exposure to keep lights bright while preserving shadows. Brighter reflections mean shorter exposures; deeper shadows require a steadier hand or longer exposure.
Stabilize with a mini tripod
A mini tripod provides steadiness for low-light phone shots, helping you frame where the neon lands in the reflection. Place on a dry patch away from splashes, use a low angle to bring the reflection up, and lock focus to prevent tiny shifts from blurring edges. With a tripod, you can attempt longer exposures to intensify the glow.
Position matters: point the camera to include both the sign and its mirror image. Often, placing the neon off-center lets the reflection lead the eye. If you don’t have a full tripod, brace elbows on a ledge or curb and use a timer to avoid shake.
Post processing neon reflections
Post-processing is your main tool after the shoot. Neon reflections are vivid, but you want to preserve glow without overdoing the contrast. Outline where the neon lives, then adjust to enhance mood while keeping street texture. Load RAW files to preserve detail, and check the histogram for clipped highlights or crushed shadows. Neon signs push extremes, so finesse both ends without sacrificing overall contrast. Keep reflections legible and true to the scene.
Edit RAW to recover highlights and shadows
Your RAW files preserve the most data. Lift shadows to recover detail without washing neon, then pull back highlights to avoid blown highlights on wet pavement or glass. Adjust white balance to keep the scene believable; neon can cast colored light on surroundings, so cooler tones can help separate street from signs. Don’t over-edit; preserve texture and glow.
Apply lens corrections and noise reduction if you shot at higher ISO. Wet streets can emphasize grain, which can suit a gritty vibe or ruin a clean look. Find a balance where noise is minimized without killing sharpness. You’ll end up with a clean base to work on.
Boost contrast and color selectively
Contrast helps neon stand out. Increase midtone contrast to keep street detail while neon pops. Use selective adjustments to boost neon areas, preserving skin tones and dark textures. For color, saturate blues and magentas while pulling back greens and yellows that clutter the pavement. A gentle vibrance tweak can help—avoid oversaturation that makes glow look fake. If a reflection is muddy, brighten it to reclaim brightness.
Apply a subtle local clarity or texture to the damp street to reveal fine lines and ripples, giving the image a tactile feel that makes the neon glow cling to the surface.
Remove glare and sensor spots
Glare from bright signs can blow out parts of the image. Use targeted suppression to manage hot spots while preserving neon halos. Inspect for sensor spots and dust; zoom in and clone them out for a clean final image. Don’t over-edit; keep the glow natural.
Timing and light for shooting neon reflections at night
Neon reflections glow brightest when you match shooting time with calm night conditions and ambient balance. If you go too late, the sky can dull colors; too early, neon may not yet be vivid. The glow is punchier when you’re not fighting daylight, but you still need enough light to reveal details.
Set your camera to capture neon without clipping highlights. Use moderate ISO to avoid noise in dark areas. A slight exposure push can bring out color in reflections without blowing out bright spots. If hand-holding, brace yourself and choose a shutter speed that preserves motion you want—cars, pedestrians, or drifting clouds add life. Your eye for color matters: look for combinations that create depth between neon and wet street.
Practice frames at slightly different white balances; neon hues can skew cool or warm quickly, and wet streets add glare. Learn to pick the balance that makes reflections pop without washing the background. Look for lines and shapes in reflections—curbs, puddle rims, and storefronts—to guide composition toward something compelling.
Best hours after sunset and before midnight
After sunset is your window for rich, moody tones that neon loves. The best window is roughly 30–60 minutes after sunset and continuing until before midnight when crowds thin and reflections stay sharp. Blues, pinks, and greens look more dramatic than washed-out.
Weather often matters more than temperature. A light rain or damp night makes reflections vivid, while heavy rain demands more careful focus and exposure to keep neon legible on slick surfaces.
Low light neon reflection photography tips
In low light, rely on a steady setup and a plan for the frame. A tripod or stable surface lets you capture longer exposures. When close to signage, a longer exposure helps glow bloom, but avoid halos around every light. Try a sequence of shots with varying depths of field to keep reflections sharp while preserving neon vibe. Check the frame edges for a strong leading line.
Carry a quick-clean lens cloth to keep reflections clean. If using a wide-angle lens, watch for edge distortion where neon can warp your scene. Bracketing shots helps you blend color and detail later. Neon often looks best when you combine wet pavement texture with glow.
Aim for light rain or just after rain
Rain returns the city to a reflective surface, doubling the neon’s impact. Light rain or post-rain conditions yield glossy surfaces that print neon vividly. Reflections stretch and ripple with each drop, adding movement to a still frame. Time your shot so water still moves a bit, not completely still. Focus on puddles and shallow streams to emphasize color and avoid muddy reflections. Use a lower angle to maximize reflection surface area and push neon against street texture. If you want rainfall in the frame, add droplets in the foreground for dynamic depth, but keep the main reflection sharp. After rain, slower shutter speeds can capture traffic or wind-driven reflections, adding depth.
Safety, etiquette, and prep for wet street shoots
Prep is key for safety and great shots. Check the forecast, pack a weatherproof bag with a towel, microfiber cloth, spare lens or battery, and keep your tripod test-covered on slick surfaces. Use a simple, repeatable mode and practice on a dry patch to prevent slips. Plan routes that won’t block pedestrians or emergency lanes. This prep keeps you focused on neon reflections without risking gear or people.
Be aware of your surroundings. Look for puddles that could splash your lens and choose angles that keep gear dry while preserving drama. If near traffic, give yourself room to breathe; don’t stand directly in the path of speeding vehicles. Carry a compact rain cover and microfiber cloth to wipe droplets. Respect private property and pedestrians: ask permission when crossing into private spaces, and move if asked. A calm, quiet setup helps you capture candid scenes without disturbing others.
Stay visible and watch traffic
Wear bright, reflective clothing and bring a small light to stay visible, especially when headlights cut through rain. Keep your camera in front of you so others can read your intent. Position yourself to give cars space to pass and to avoid splashes. Watch traffic flow before shooting; time your shot for moments when reflections align with passing vehicles or glowing storefronts, not during peak activity.
Respect private property and pedestrians
Many striking shots sit at the edge of public space. If you must cross into private areas, ask permission; otherwise adjust your angle to stay in public space. People walking by should feel safe—give them space and avoid blocking crosswalks or entrances. If someone asks you to move, respond politely and adjust. A calm, transparent approach builds goodwill and may grant better viewpoints in the future.
Wear grippy shoes and a rain jacket
Slick sidewalks demand grippy footwear, and a windproof rain jacket helps you stay dry and agile. Rubber soles with good tread keep you balanced as you move between reflections. A bright or reflective jacket improves visibility. Layer your rain gear for quick changes, and stay dry enough to move confidently for the right shot.
This completes your practical, step-by-step guide to Photographing Neon Reflections on Wet Streets: Complete Step-by-Step Guide. Use these techniques to craft bold, cinematic night images that celebrate the glow and texture of neon on rain-wet pavement.

Smartphone Night Photography Enthusiast & Founder of IncrivelX
Vinicius Sanches is a passionate smartphone photographer who has spent years proving that you don’t need an expensive camera to capture breathtaking images after dark. Born with a natural curiosity for technology and a deep love for visual storytelling, Vinicius discovered his passion for night photography almost by accident — one evening, standing on a city street, phone in hand, completely mesmerized by the way artificial lights danced across wet pavement.
That moment changed everything.
What started as a personal obsession quickly became a mission. Vinicius realized that millions of people were carrying powerful cameras in their pockets every single day, yet had no idea how to unlock their true potential after the sun went down. Blurry shots, grainy images, and washed-out colors were robbing everyday people of memories and moments that deserved to be captured beautifully.
So he decided to do something about it.
With years of hands-on experience shooting city streets, starry skies, neon-lit alleyways, and creative night portraits — all with nothing but a smartphone — Vinicius built IncrivelX as the resource he wished had existed when he was just starting out. A place with no confusing jargon, no assumptions, and no gatekeeping. Just honest, practical, beginner-friendly guidance that actually gets results.
Vinicius has tested dozens of smartphones from every major brand, explored dark sky locations across multiple states, and spent countless nights experimenting with settings, compositions, and editing techniques so that his readers don’t have to start from scratch. Every article on IncrivelX comes from real experience, real mistakes, and real lessons learned in the field.
When he’s not out shooting at midnight or writing in-depth guides for the IncrivelX community, Vinicius can be found exploring new cities with his phone always within reach, looking for the perfect shot hiding in the shadows.
His philosophy is simple: the best camera is the one you already have — you just need to learn how to use it in the dark.