Long exposure basics
Long exposure means letting light stay on the sensor longer, using a slower shutter to blur motion intentionally—think silky water or light trails. The goal is to control brightness and motion to create a mood while keeping important details sharp. With a steady camera, longer shutter speeds yield a dramatic, clear scene rather than a muddy one.
In practice, you’ll use a tripod or stable surface, a timer, and sometimes a remote to avoid shake. Balance light and motion by choosing more time for brightness or less for blur. It’s simple, but it changes how your photos feel.
Planning is key: decide the motion you want, set the shutter, and keep the camera still. If you tweak the setup, the image can go soft or noisy. Start with small changes—short exposures first—then extend as you gain confidence. Your aim is clean focus where it matters and smooth motion where it doesn’t. This Step-by-Step: How to Shoot Long Exposure Photos on iPhone 17 Pro Max will guide you through the process.
What long exposure does on iPhone 17 Pro Max
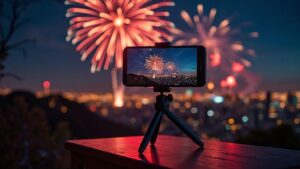
On the iPhone 17 Pro Max, long exposure smooths moving subjects—water becomes glassy, light trails appear, and crowds blur into gentle backgrounds. You’ll notice less abrupt detail in motion and a soft ambient glow around bright spots, yielding a calm, dreamlike scene. Built-in stabilization and smart algorithms help, but a stable surface or tripod still delivers the best results. If you want to freeze a moment, choose a shorter exposure; if you want motion to tell the story, go longer. This is exactly the kind of result highlighted in Step-by-Step: How to Shoot Long Exposure Photos on iPhone 17 Pro Max.
Try a practical test: point at a bustling street at dusk, set a longer shutter, and watch the lights blur into ribbons. You’ll see how motion reads differently with longer exposures. You can adjust later, but a steady start helps a lot.
When to use long exposure photos
Long exposure shines when motion helps tell the story. Use it for silky waterfalls or waves, star trails, or city lights trailing after dark. It also works well for crowds at night, giving a soft glow rather than crisp, busy details. If you want a dreamy mood instead of a sharp snapshot, long exposure is your friend.
There are times to avoid it, too. If you want to freeze a moving subject or you’re shooting in bright daylight where highlights would blow out, skip long exposure. In those cases, a faster shutter keeps details crisp. If your hands shake or you lack a stable setup, you’ll get blur. Choose the moment that fits the mood and technique.
A quick practice tip: pick a scene with known motion—the ocean, cars, or people walking—and compare two shots: one longer exposure for blur, one short exposure for detail. You’ll feel where the balance sits for your style. This aligns with the Step-by-Step guidance found in Step-by-Step: How to Shoot Long Exposure Photos on iPhone 17 Pro Max.
Key terms to know
Shutter speed is how long the sensor is exposed to light. A slower number means more motion blur. Tripod keeps your camera steady for long exposures. ISO is the sensor’s sensitivity to light; lower ISO reduces noise. Noise looks like grain; keep ISO low when you can. Long exposure noise reduction helps clean up after the shot but adds time.
Conclusion
Manual exposure controls
In this section, you’ll learn how to take control of light with manual exposure. You’ll discover why adjusting exposure matters, and how small tweaks can change the mood of your shot. You’ll feel more confident because you’ll stop guessing and start dialing in the look you want. This approach dovetails with Step-by-Step: How to Shoot Long Exposure Photos on iPhone 17 Pro Max for practical application.
Manual exposure gives you control over how bright or dark your photo is, no matter the scene. You’re not stuck with what the camera thinks; you’re telling it how to see the world. This control is especially helpful in tricky lighting, like backlit sunsets or a bright window behind your subject. With practice, you’ll quickly see your photos improve, because you’re dialing in the exact exposure you want.
Think of exposure like sunglasses for your photo. If it’s too bright, everything looks washed out; if it’s too dark, details vanish. By managing exposure, you keep the important parts visible—the face, the texture, the color. You’ll be surprised how a small adjustment here and there can make a big difference.
Using manual exposure iPhone camera app
When you switch to the manual exposure mode, you gain precision. You’ll notice a slider or a dial you can drag to fine-tune brightness. Your goal is to keep important details visible without burning highlights or crushing shadows. As you practice, you’ll learn to set exposure before you tap the shutter, so you don’t waste frames.
With the iPhone camera app, you usually tap to focus and then slide the exposure control up or down. You’ll see a small sun icon that nudges brighter or darker as you move. Use this to keep your subject well lit while the background stays balanced. If the scene is high-contrast, you might start a touch darker to protect the highlights and then adjust as needed.
Try a quick exercise: point at a bright window, tap to focus, and drag the exposure just enough so the window isn’t blown out. Then reframe your shot. This habit trains your eye to recognize when exposure is off and how to fix it fast. You’ll start getting consistent results without losing important details.
Adjust ISO and exposure compensation
ISO is your camera’s sensitivity to light. In manual mode, higher ISO makes the image brighter but adds grain. Lower ISO keeps detail smooth but needs more light. You’re balancing brightness with noise, so aim for the lowest ISO that still gives you a clean image. You’ll notice crisper results when ISO stays in check.
Exposure compensation is a quick way to push brightness up or down without changing other settings. If your scene looks too dark, nudge exposure up; if it looks blown out, push it down. It’s like adjusting light in a dim room. This fast tool helps fix tricky lighting without rethinking the whole setup.
A practical tip: in mixed-light scenes, start with a low ISO and neutral exposure. If your subject seems too dark, use exposure compensation to brighten only that area without blowing out the sky or background. You’ll preserve detail across the frame and reduce muddy shadows.
How exposure affects motion
Exposure directly affects motion in your photo. A longer exposure can blur moving subjects, creating a sense of motion. A shorter exposure freezes action, making motion crisp. You’re choosing how to describe movement in your picture.
If you’re filming fast action, like a cyclist, you’ll want a short exposure to freeze the ride. For a dreamy river, stretch the exposure to blur the water. Adjusting ISO and exposure together helps you dial in the motion look without losing detail in highlights or shadows.
Shutter speed and slow shutter
When capturing motion, shutter speed is your best friend. It’s how long the sensor breathes to collect light. A fast shutter freezes action; a slow shutter lets movement blur into a smooth stream. You’ll feel the difference the moment you press the shutter. For sharp portraits or cars, use a fast shutter. For light trails or silky water, use a slow shutter. Match the scene to your intended mood and practice to build your intuition.
With a slow shutter, you let more light in and give the sensor time to record motion. Long exposure results appear as soft water or light trails. The iPhone 17 Pro Max handles this well in bright daylight with neutral density filters or by adjusting exposure timing in Pro mode. Longer shutters increase motion and brightness; balance highlights and shadows to keep details intact. It’s a dance: longer shutter, brighter scene, more blur.
When experimenting, you’ll notice ISO and shutter work as a team. If the scene becomes too bright with a long shutter, lower ISO to reduce noise. If you want stronger motion blur, lengthen the shutter and accept some sharpness loss. Practice in safe spots—golden hour or a quiet park—so you can learn how tweaks feel without rushing. You’ll recognize a rhythm: slow shutter for mood, fast shutter for freeze-frame clarity, guided by your final look.
Slow shutter iPhone 17 Pro Max explained
Your iPhone 17 Pro Max handles slow shutters through manual modes and Pro settings. Switching to slow shutter tells the sensor to stay open longer, producing dreamy blur in waterfalls or moving traffic. A steady hand or tripod is essential to keep stationary parts crisp; handholding often yields softness. Set longer exposure times—like 1/4 second or longer—and watch lights and water talk. The camera’s processing helps, but control is strongest with a stable setup. Slow shutter is about flow, not just light.
Pick shutter times for light trails or smooth water
For light trails, use a longer shutter—several seconds can turn headlights into bright curves. Start around 1–2 seconds and adjust. In busy night streets, 4–10 seconds may be needed for longer arcs. For smoother water, similar long times work, often with a neutral density filter or tripod to avoid overexposure. Take multiple shots at different durations to learn which gives the river’s texture you crave. If the subject is still but the lights move, a shorter shutter preserves color and mood without washing out the scene. The Step-by-Step guidance in Step-by-Step: How to Shoot Long Exposure Photos on iPhone 17 Pro Max can help you experiment with time and exposure to achieve the look you want.
Balance shutter and ISO
When you lengthen the shutter, you’ll usually lower ISO to prevent grain. If you can’t avoid higher ISO, you’ll get noise that mars the image. The goal is to keep ISO as low as possible while still getting enough brightness with your chosen shutter. In dusk lighting, you may need a higher ISO, but avoid extremes. The right balance keeps your image crisp with smooth motion, not speckled with grain.
Tripod and stabilization
Stability is your best friend when chasing sharp photos or smooth long exposures. A solid tripod minimizes tiny hand shakes and keeps your frame where you want it. Start with a lightweight tripod, then upgrade as your shots get more ambitious. You’ll notice the difference in low light and night scenes where every millisecond counts.
Your phone’s weight can still cause a little bounce if you bump the tripod, so use a weight on the center column or a heavier base in windy spots. A stable setup reduces blur and gives consistency across frames—especially for long exposure sequences.
Think of stabilization as armor for your photos. It may not be flashy, but it protects your work from tremors. A sturdy tripod is the foundation you’ll lean on when dialing in settings or stacking exposure layers. Keep it simple and solid, and your results will thank you.
Tripod techniques iPhone long exposure
Using a tripod for iPhone long exposure helps you capture light trails, silky water, and ghostly city lights without blur. Set the tripod on a flat surface and lock the legs. Frame your shot and switch to a tripod-friendly mode; consider Night mode after you’ve fixed composition to avoid wasted time.
Manually control exposure by tapping to focus, then sliding the exposure dial down to prevent blown highlights. If you can lock exposure, use it to keep the light from creeping into your frame as you adjust composition. For longer exposures, a neutral density filter helps you keep the shutter open longer without overexposing, especially in bright scenes.
Finally, keep movements minimal. Tiny tripod tweaks ripple through the frame. If you need to adjust, do it in tiny, deliberate steps and reassess. With a steady base, your long exposures reveal motion smoothly rather than smeared.
Use a timer or remote to avoid shake
A timer or remote is your extra set of steady hands. Pressing the shutter can introduce small movements. A 2- or 5-second delay lets you settle before the shot. A Bluetooth remote provides the same benefit with zero contact at shutter time. Either option helps you lock in focus and composition without blur.
Use a timer or remote to steady your breath too. A calm, slow breath before the shot helps your hand–eye coordination stay clean and your frame true to plan. Small habits yield big results in long exposure work.
Mount and level your phone
Mounting and leveling your phone makes every shot feel intentional. Secure the mount so it won’t wiggle. Check the built-in horizon line or use a bubble level app to level the frame. A level frame keeps verticals straight and the composition balanced.
Do a quick handheld check before shooting. If something seems tilted, adjust the mount or tripod legs. A tiny tilt can change the feel of architectural or landscape shots. Once the phone is level and snug, you’re ready to press the shutter with confidence.
Best apps for long exposure
Long exposure photography benefits from apps that offer real control and high image quality. This section highlights options that balance ease of use with deep control, including timer, focus lock, and RAW saving. If you’re starting out, choose an app that guides you but also offers full manual when you’re ready. For iPhone 17 Pro Max users, look for apps that support the big sensor and Pro features, including native lens controls, RAW processing, and natural color profiles. This helps you maintain consistency and quality when you bring shots into editing.
Apps with manual shutter and ISO control
Several apps give full control over shutter speed and ISO. Look for a clean interface to dial exact values and lock them in. A precise shutter duration is essential for long exposures. A RAW save option is valuable for editing flexibility, and some apps offer exposure bracketing to try multiple shutter speeds in one session. If you chase light trails or star trails, precise shutter and RAW support save you headaches.
Test apps with a simple scene first, like a moving fountain or cars at night. Set a 1–5 second shutter and observe how water smooths or tail lights streak. If the app handles ISO well without excessive noise, you’ll see the difference in color and texture. Manual control is where casual shots become deliberate compositions.
Compare app features for long exposure iPhone 17 Pro Max
When comparing features, prioritize consistency over flashy tools. A good app should keep exposure stable across long sessions, even as light changes. Check if it locks exposure and focus to prevent drift between frames. For river scenes at dusk, stability matters more than extra features.
Examine timer options, interval shooting, and frame rates. A good timer or interval setting helps you build a sequence without switching screens. For long exposures, RAW support and in-app editing are time-savers. Try simulating moving clouds to see which app delivers the cleanest, least-noisy result.
On the iPhone 17 Pro Max, test apps that leverage Pro camera features. Look for native lens controls, RAW processing, and color profiles that look natural straight from the camera. If you can shoot in ProRAW or export desktop-ready files, you’re in a strong position. Compare how each app preserves detail in bright highlights and deep shadows as you push the shutter length. This exploration works well with Step-by-Step: How to Shoot Long Exposure Photos on iPhone 17 Pro Max for best results.
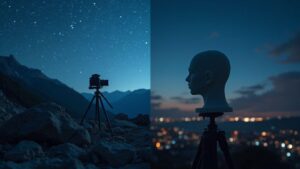
Night photography tips
You’ll get crisper shots with planning in low light. Consider light sources and how they shift as night evolves. Use a sturdy surface or a tripod, because small shakes show up in long exposures. If you lack a tripod, prop your phone on something solid and use the timer to avoid jostling when you press the shutter. Keeping your frame tight on a clear subject—like a lit storefront, street lamps, or moving cars—helps your eye focus on details rather than a muddy background. Plan ahead to see the difference you can make.
Night photography iPhone 17 Pro Max basics
In low light, the iPhone 17 Pro Max uses longer exposure on its main camera to gather more light, which can create smooth textures but also noise if there’s movement. Turn off digital zoom to avoid grainy crops and move closer or crop later. If the scene is steady, Night mode can work automatically, but you can shoot in RAW with a manual app for precise exposure and white balance. Tap the brightest part of the frame to anchor exposure while protecting highlights from clipping.
Reduce noise and keep highlights under control
Noise comes from pulling up shadows too much. Use the shortest practical exposure and lock in exposure to stop the camera from shifting between frames. Keep highlights safe by avoiding hottest lights. In post, you can reduce noise and recover texture, but avoid overdoing it. If your scene blends bright lights with deep shadows, shoot several frames at different exposures and blend later for balance. Your goal is clean shadows with just enough detail in bright areas.
Use Night mode or manual apps wisely
Night mode can be your ally or your foe depending on the scene. If you have a stable frame and want shadow detail, let Night mode run and adjust in post. For motion blur from moving lights or people, switch to a manual app and set shorter exposure with a low ISO. Always review your histogram if available to avoid clipping highlights. With practice, you’ll know when to rely on Night mode and when to switch to manual for the look you want.
Night photography tips
Shoot with planned foregrounds and allow the background to play a supporting role. On a night street, seek leading lines that pull the eye toward a subject. If you want a person in the frame, ask them to stay still for a moment while you hold the exposure. Keep the scene readable: brighten the subject without blowing out highlights, and let the rest fade softly. Reflections on water can add drama; keep exposure balanced to preserve glow without overexposing the surface. Deliberate choices beat luck in the dark any day, and Step-by-Step: How to Shoot Long Exposure Photos on iPhone 17 Pro Max offers practical steps you can apply.
Night photography iPhone 17 Pro Max basics
How you hold your phone changes the results. If possible, use a tripod or stable surface and enable the timer to avoid tiny shakes. Night mode may choose longer exposure automatically, but you can override in settings for more control. Switch between 1x and 3x (or your available focal lengths) instead of zooming, which softens. White balance matters less in some scenes, but when mixing streetlights with moonlight, adjust to keep colors true. A quick burst of frames with slight exposure tweaks often yields the best night photo.
Reduce noise and keep highlights under control
In dark scenes, keep ISO low and let exposure time do the work. If you raise ISO, you’ll introduce grain; reserve it for urgent moments. Avoid brightest lamps and reflections; you can adjust in post if needed. If you’re using manual apps, bracket shots and blend later for balanced glow in neon signs while preserving shadows.
Use Night mode or manual apps wisely
Night mode can be a friend or foe depending on the scene. If you have a stable frame and want shadow detail, let Night mode run and tweak later. If you want motion blur from moving lights or people, switch to a manual app with shorter exposure and low ISO. Always review your histogram after shots to ensure you’re not clipping highlights. With practice, you’ll know when to rely on Night mode and when to switch to manual for the look you want.
Capture light trails and motion
You’re about to learn how to turn dusk into dynamic stories. Long exposure lets lights blur into silky trails, and moving subjects become ghostly or crisply dramatic depending on your settings. Balance shutter speed, ISO, and focus to avoid overexposure or excessive blur. A tiny change in shutter speed can shift mood from crisp to dreamlike. When you nail this, your photos feel cinematic without heavy gear.
Long exposure is less about perfect weather and more about seizing the right moment. In a busy street, headlights become guiding lines. By a river or track, motion becomes a smooth ribbon. Choose a steady light source, a clear motion, and a stable stance. Use a tripod or solid surface to avoid shakes. A calm stance matters as much as timer settings.
You’ll gain confidence with small steps. Start with a 1–2 second shutter to see light trails form, then extend as you improve. Your RAW files will help you push shadows in post, so don’t fear nudging brightness slightly for stronger trails. Adjusting ISO and exposure helps you control trails without losing detail. Review often and iterate to refine your look. The Step-by-Step: How to Shoot Long Exposure Photos on iPhone 17 Pro Max is a handy companion as you experiment.
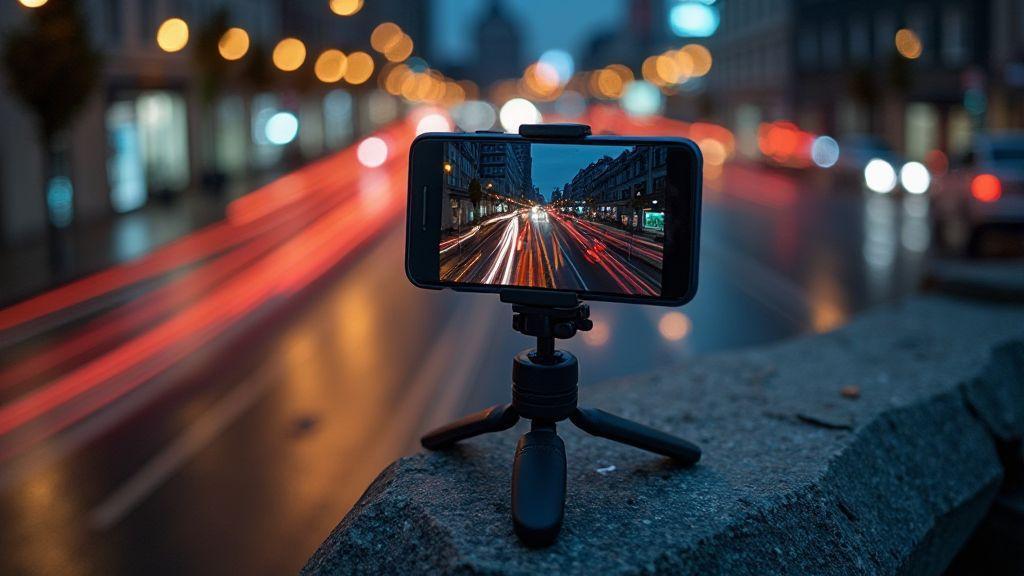
Capture light trails iPhone 17 Pro Max steps
Begin by choosing a busy scene with moving lights, like a street at dusk or a bridge with cars. Set your iPhone 17 Pro Max to Pro or Night mode depending on your goal, and lock focus on a bright spot to avoid front-to-back blur. Use a tripod or stable surface so your phone won’t shake during longer exposures. Start with a 2-second shutter to see how trails appear, then adjust to taste.
Next, switch to a longer exposure using apps that expose longer than stock Night mode, or enable the phone’s exposure controls if available. If your environment has high contrast, lower ISO helps prevent blown lights. For bolder trails, push exposure slightly while keeping ISO modest. You’ll often find a balance by testing a few frames and comparing brightness and trail length. Your aim is clean trails, not overbright blobs washing out the line.
Compose for moving lights and traffic
Use the rule of thirds to place lights along lines that lead into the frame. Position your camera so moving cars or boats create lines from one third to another, guiding the viewer’s eye. Keep the horizon level; a tilt distracts from the trails. Leave enough foreground and background space so trails read clearly rather than crowding the scene. Foreground interest helps anchor the image, and a slightly lower angle can exaggerate trail length for drama.
Try shooting from a slightly lower angle to elongate light trails, or straight on for a cleaner, graphic set of lines. If near water, a low angle can mirror trails in the reflection for extra drama.
Choose time, angle, and exposure
Time of day matters: blue hour yields cool tones that let trails pop without harsh highlights. Later hours can yield brighter trails but risk clipping highlights; test both. Angle matters: a slight tilt can stretch trails across the frame or compress them for a tighter look. Low angles lengthen lines; higher angles flatten them for a simpler pattern.
Exposure is your control knob: shorter exposures yield crisp, short trails; longer exposures create longer, silky lines but may wash lights out. Start with a medium exposure and adjust up or down based on the preview. A stable setup and thoughtful settings beat chasing perfect moments alone. This Step-by-Step guide—Step-by-Step: How to Shoot Long Exposure Photos on iPhone 17 Pro Max—offers practical cues for time, angle, and exposure.
Post-processing and RAW
Shoot RAW for cleaner results and greater editing latitude. RAW files preserve more data than JPEG, helping you recover shadows and highlights with less banding or clipping. In post, you can adjust white balance, exposure, and texture with less degradation, starting from a higher-quality file.
RAW keeps the image flexible, especially for moving scenes where light changes across the frame. It helps you maintain color fidelity and detail when stacking or blending exposures. Think of RAW as your digital negative—your workflow should keep RAW files organized, backed up, and ready for editing. This approach aligns with the Step-by-Step: How to Shoot Long Exposure Photos on iPhone 17 Pro Max for best results.
Why shoot RAW for long exposure iPhone
Shooting RAW for long exposure on the iPhone 17 Pro Max gives you more latitude to balance trails and stationary details. The longer shutter opens more light, which can overwhelm color and highlights. With RAW, you capture more tonal range, so you won’t burn out bright trails or lose texture in dark areas. RAW provides smoother gradients in light trails and keeps details intact for large-screen viewing and prints.
Your RAW files retain sensor information after exposure and white balance adjustments. You can recover highlights in bright areas without introducing loud noise or color shifts, which is especially useful when trails combine bright lights and deep shadows. RAW also helps when you want a consistent look across multiple shots, making composites feel cohesive.
Edit exposure, highlights, and noise reduction
When editing exposure, start with careful brightness adjustments to keep trails glowing without washing out the sky or foreground. Small exposure tweaks can recover highlights while preserving detail. In RAW, you’ll notice the most impact because you’re editing data rather than baked-in processing.
Highlights are crucial for long exposure: manage bright lamps and reflections to preserve color while keeping the glow of trails. If you overdo it, trails can look flat—back off slightly and reassess. Noise reduction is most effective in RAW, allowing targeted reductions without sacrificing edges. Zoom in to target noisy areas and apply precise adjustments rather than broad filters.
Step-by-step shooting workflow
You start with a plan: choose your scene, decide motion blur versus sharp trails, and set a rough exposure. Test shots come next, followed by refinement. This workflow helps you stay in control in the moment. Lock focus, frame, and choose a shutter speed that matches your vision. Check your histogram and watch highlights to avoid blown lights. With practice, this workflow becomes second nature, letting you react quickly while staying on target.
Next, dial in camera controls. On the iPhone 17 Pro Max, switch to Manual, adjust ISO, and set a precise shutter speed. Use RAW when you want maximum editing latitude. If you’re near water or traffic, plan for wind or vibration and stabilize with a tripod or solid stance. Review the shot, note tweaks, and repeat with small adjustments until you’re happy with the motion trails or silky water. This approach aligns with the Step-by-Step guidance found in Step-by-Step: How to Shoot Long Exposure Photos on iPhone 17 Pro Max.
Finally, establish a quick, repeatable routine: set the tripod, frame, lock focus, and use a timer or remote to avoid shake. Keep your finger off the shutter until you’re ready, review exposure after a short test, and adjust shutter or ISO to get the look you want. Save a few variations to compare later when you’re back at your desk. This routine echoes the Step-by-Step: How to Shoot Long Exposure Photos on iPhone 17 Pro Max for consistency and quality.
iPhone 17 Pro Max long exposure tutorial steps
You’ll start with Long Exposure or Night mode on a tripod. Enable ProRAW for editing later, and set a longer shutter speed to capture motion blur. Keep ISO low to avoid grain, and consider a Neutral Density filter to prevent overexposure in bright light. Then position your phone, lock focus on your subject, and begin exposure. A quick timer helps you avoid camera shake, and you’ll review the result to decide if you need a longer or shorter shutter. This workflow aligns with Step-by-Step: How to Shoot Long Exposure Photos on iPhone 17 Pro Max.
Next, fine-tune the setup. If water or light trails are too bright, shorten the exposure; if the scene feels dim, nudge ISO up slightly or lengthen the shutter. Adjust white balance to keep colors accurate in mixed lighting. Shoot in RAW for flexibility, and keep your phone steady to avoid accidental blur. Repeat with small changes until the effect feels right. This iterative approach is a practical extension of Step-by-Step: How to Shoot Long Exposure Photos on iPhone 17 Pro Max.
Long exposure photography tips iPhone for sharper shots
You’ll use a sturdy tripod or solid surface to prevent shake, enable a timer or remote, shoot in RAW, and keep ISO as low as possible. Test shutter speeds to balance motion blur and brightness, and shield the phone from wind when possible. Plan your composition with leading lines to guide the eye, and watch for bright highlights to avoid clipping. Review side-by-side frames to see which preserves detail in both shadows and highlights. This practical approach is reinforced by Step-by-Step: How to Shoot Long Exposure Photos on iPhone 17 Pro Max.
Quick checklist before you shoot
- Tripod setup solid and stable, with your phone snugly mounted.
- Focus locked on your subject, using a single tap and hold if needed.
- Shutter speed chosen for the look you want (motion blur or clean trails).
- ISO kept low to avoid noise; raise only if needed for exposure.
- RAW capture enabled for best editing flexibility.
- Remote or timer used to avoid camera shake.
- Composition checked: rule of thirds, leading lines, and clean background.
- Histogram check to avoid blown highlights or underexposure.
- Battery and storage ready; long exposures can eat both.
- Weather protection considered if you’re outdoors in wind or spray.

Smartphone Night Photography Enthusiast & Founder of IncrivelX
Vinicius Sanches is a passionate smartphone photographer who has spent years proving that you don’t need an expensive camera to capture breathtaking images after dark. Born with a natural curiosity for technology and a deep love for visual storytelling, Vinicius discovered his passion for night photography almost by accident — one evening, standing on a city street, phone in hand, completely mesmerized by the way artificial lights danced across wet pavement.
That moment changed everything.
What started as a personal obsession quickly became a mission. Vinicius realized that millions of people were carrying powerful cameras in their pockets every single day, yet had no idea how to unlock their true potential after the sun went down. Blurry shots, grainy images, and washed-out colors were robbing everyday people of memories and moments that deserved to be captured beautifully.
So he decided to do something about it.
With years of hands-on experience shooting city streets, starry skies, neon-lit alleyways, and creative night portraits — all with nothing but a smartphone — Vinicius built IncrivelX as the resource he wished had existed when he was just starting out. A place with no confusing jargon, no assumptions, and no gatekeeping. Just honest, practical, beginner-friendly guidance that actually gets results.
Vinicius has tested dozens of smartphones from every major brand, explored dark sky locations across multiple states, and spent countless nights experimenting with settings, compositions, and editing techniques so that his readers don’t have to start from scratch. Every article on IncrivelX comes from real experience, real mistakes, and real lessons learned in the field.
When he’s not out shooting at midnight or writing in-depth guides for the IncrivelX community, Vinicius can be found exploring new cities with his phone always within reach, looking for the perfect shot hiding in the shadows.
His philosophy is simple: the best camera is the one you already have — you just need to learn how to use it in the dark.