How shutter speed controls light
Your shutter speed is how fast the camera opens and closes to let light in. Faster speeds mean the door closes quicker, letting in less light. Slower speeds stay open longer, letting in more light. When you’re shooting at night, you’ll want longer openings to brighten your photo, but you must balance this with motion. If people or cars move, a long shutter can blur them. If you’re steady, a longer shutter turns your scene from dark to clear. Think of it like blinking: the longer you keep your eye open, the more you see, but you also risk foggy vision if things move.
In practical terms, you’ll adjust shutter speed to control brightness and motion. A fast speed, like 1/1000, freezes action and keeps shadows tight. A slow speed, like 1/8, lets in a lot of light and can blur movement for a dreamy look. Your goal is to pick a speed that makes your scene readable: enough light to see details, but not so slow that movement ruins the shot. You’ll often start with a quick check: is the scene underexposed or overexposed? Then you tweak the speed until the exposure line up with what you want to show. Your camera won’t lie—shutter speed is telling you exactly how your light behaves.
When you shoot night scenes, you’ll feel the power of shutter speed. You can push a bit longer to capture stars, tail lights, or neon signs. If your hands shake, use a tripod or lean on something solid. A steady base lets you use slower speeds without blur. You may also enable a feature like image stabilization, but don’t rely on it alone; you still need to pick a good speed for the scene. Remember, every second of exposure adds brightness and motion possibilities, so choose wisely and test a couple of options to see what looks best.
Mastering light control smartphone night shots basics
Night shots demand you think about light in simple steps. First, set a baseline exposure so your subject is visible. If your subject is bright, you might need a faster shutter to avoid blowing out highlights. If your subject is dim, a slower shutter helps bring out details, but you risk blur. Your hands will thank you for a stable stance or tripod. Second, experiment with small changes in shutter speed to see how light and motion change. A small adjustment can bring your night sky into view or keep moving cars crisp.
You’ll also learn to balance shutter speed with ISO and aperture. A higher ISO makes the sensor more sensitive, which helps in low light but adds noise. A wider aperture lets in more light, but it narrows your depth of field. Your goal is to keep the shutter speed in a range that preserves detail. If you’re hand-holding, a speed around 1/60 to 1/125 is a good starting point; use longer only with a stable setup. Practice with different scenes—street lights, reflections, night skies—so you know what speed works when light patterns change. The trick is to keep your eye on the light and your finger ready to adjust quickly.
Find 2026 smartphone shutter speed settings on your phone
Your phone stores shutter speed in the camera app, but where it sits depends on your model. Open your camera and switch to Manual or Pro mode to see shutter speed options. You’ll often see a slider labeled with fractions of a second (like 1/60, 1/30, 1/4) or a range in seconds (like 0.03s, 0.5s). If you don’t see it, look for an S or M toggle to unlock the manual control. On some phones, night mode automatically adjusts exposure, but you can still set a preferred shutter speed in Pro mode. If you’re new, start with 1/60 or 1/125 to get a sense of how light behaves on your device, then push toward slower speeds for more light or faster speeds for sharpness.
When you’re exploring 2026 settings, save a couple of presets you like. For example, one preset for street nights with moving cars and a brighter baseline, another for quiet reflections with longer exposure. Remember to check your exposure indicator as you adjust. If your image looks washed out, tighten the shutter; if it looks too dark, slow it down a notch. Your phone is a tool, and with a few tweaks you’ll capture scenes that once looked out of reach.
Use the exposure triangle to balance shots
Mastering the exposure triangle is your first step to great photos. You’ll learn how shutter speed, ISO, and aperture work together so you can decide quickly what to adjust in the moment. Think of it like a kitchen recipe: if you tweak one ingredient, you’ll often need to change the others to keep the dish balanced. You’ll feel more confident when you can predict how a change in light will affect your final image. With practice, you’ll stop relying on Auto and start controlling the light you capture.
When you’re out shooting, start by observing the scene and choosing your main goal for the shot. Do you want motion blur to show speed, or a sharp, crisp moment? Your choice will guide which part of the triangle you push first. If you’re in dim light and need a brighter image, you might raise ISO a bit, but you’ll watch for noise. If you want a clean low-noise shot, you’ll favor a larger aperture and slower shutter if the light allows. The triangle isn’t about chasing one perfect setting; it’s about balancing all three to fit your scene.
If you’re working with a smartphone, you’ll still feel the triangle’s pull. Your phone can semi-override some limits, but you’ll still decide whether to clamp exposure, set a higher ISO, or adjust aperture where available. As you practice, you’ll notice how small changes create big differences: a tiny ISO bump can keep grain away in dusk shots, while a faster shutter can freeze and exaggerate motion. Practice makes you more precise, and your photos will look more intentional than auto-exposed.
Exposure triangle smartphone photography 2026 explained
You’ll see three levers in your phone camera: shutter speed, ISO, and aperture (where available). In 2026, phones give you more control than ever, but you still balance them the same way. If you want sharp subjects in a busy scene, you’ll increase shutter speed and possibly raise ISO slightly to keep exposure reasonable. If you want smooth motion blur, you’ll lower shutter speed and either lower ISO or open the lens a bit to capture enough light. Your goal is a clean, readable image where the subject stands out against the background.
A practical tip: use exposure compensation if your phone offers it. It helps you nudge brightness without changing ISO or shutter too much. You’ll also learn to read the histogram on many smartphones; a balanced histogram means you’re not clipping shadows or highlights too aggressively. In low light, you might accept a bit more noise to keep details, and in bright scenes, you’ll protect highlights by dropping exposure. Your phone’s RAW mode is your best friend when you want to push or recover detail later.
Remember, you don’t need to master every setting at once. Start with adjusting shutter for motion, then dial in ISO for brightness, and finally tweak aperture if your camera allows. The more you practice, the more your shots will reflect your intent rather than the camera’s guess. Your night photos will improve as you become comfortable balancing the triangle, even on a pocket-sized camera.
How ISO and aperture change your shutter choices
When you raise ISO, you get brighter images with more grain. You’ll notice that in dim streets, a higher ISO can save a shot you’d otherwise miss, but you’ll trade noise for light. If you’re chasing a clean, quiet image, you’ll keep ISO low and accept slower shutter speeds to gather light. In practice, you’ll often set a baseline ISO and adjust shutter to freeze or blur motion as needed, keeping noise under control.
Opening the aperture lets more light in, so you can use a faster shutter while keeping exposure. If your subject is still and you want a shallow depth of field, a wider aperture helps separate your subject from the background. On a phone, you may have limited aperture options, but any available selective focus or portrait mode mimics this effect. Your shutter will respond by becoming faster to keep motion from blurring, or slower if you want more light and a softer look.
Balancing ISO and aperture with your shutter is a dance. If you open the aperture, you can lower ISO or speed up the shutter. If you close the aperture, you’ll need higher ISO or a longer shutter. Each choice affects not just brightness but the texture and feel of your image. Your goal is a shot that reveals your scene clearly, with the mood you want, whether it’s crisp and cool or warm and dreamy.
Balance shutter, ISO, and aperture
You’ll balance by asking what matters most in the shot: motion, detail, or depth of field. If you want a sharp, fast-moving subject, throw your shutter to a high speed and accept a bit more ISO or a brighter environment. If motion is not your concern and you want texture and grain to add character, you’ll push for a slower shutter and moderate ISO while appreciating some noise as part of the look. If you want a clean background with a sharp subject, you’ll widen the aperture slightly and pick a shutter that avoids blur, keeping ISO as low as your light allows.
When you’re out there, practice a simple rule: choose your target first (sharp subject, motion blur, or shallow depth), then adjust the other two to fit. Look at your screen and think about what each change does to brightness and noise. Before you know it, you’ll be able to read light like a map and pick settings faster than you can blink. Your photos will feel deliberate, and your night shots will finally show the light you want.
Freeze action or blur it on purpose
You have the power to control motion with your shutter. If you want crisp, frozen moments, you’ll push the shutter faster. If you’re chasing a dreamy, painterly blur, you’ll slow it way down. Your choice changes the story of every shot. Practice with simple subjects: a running dog, a passing car, or droplets of water. Faster shutters lock detail; slower shutters reveal motion and energy. Remember, light and subject speed push you toward a different balance each time.
Your camera isn’t just about capricious creativity—it’s a tool. When you aim to freeze action, you’ll start with a high shutter speed and steady your hand or use a tripod. For intentional blur, you’ll set a longer exposure and perhaps pan with the subject. Your goal is to match the shutter to how you want the moment to feel. If you’re indoors with dim light, you’ll need more sensitivity or a brighter scene to keep the image sharp while you freeze motion. Keep experimenting until you pin down the look you want.
Your technique improves as you observe light, subject speed, and your own comfort with the camera’s controls. Use a higher shutter speed for sharp action and a lower one to show movement. You’ll notice that the right shutter speed isn’t a single number—it’s a choice that fits the mood you’re after. Keep notes of your settings for different scenes so you can reproduce the effect next time.
Reduce motion blur low light smartphone with faster shutters
In low light, motion blur can steal the moment you want. A faster shutter helps you lock in details, even when the scene isn’t bright. You’ll see better results if you raise the shutter speed to stop the blur, then compensate with more light or ISO if needed. Your goal is to maintain enough light without turning the image noisy or grainy. You’ll notice sharp edges on moving subjects, and the scene will feel more alive as you capture it with less smear.
You’ll need to balance speed with available light. If the phone can’t pull enough light at high shutter speeds, you’ll push ISO a bit or use a small amount of stabilization. A little movement from your hands can still blur an image at very fast speeds, so use quick breathing and a steady stance. Your chances of success rise when you shoot in bursts, selecting the frames where motion looks cleanest.
Managed correctly, faster shutters in low light give you cleaner portraits of moving people, sports shots, or fast action in dark settings. You’ll enjoy sharper eye detail and clearer textures, even if you aren’t using a fancy camera rig. It’s a simple switch: reduce motion blur by speeding up the shutter, then tweak light via ISO or exposure compensation. Your night shots will feel more intentional and less forgiving of handheld shake.
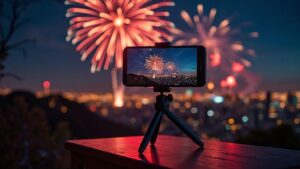
When smartphone night photography shutter speed should be faster
When night falls, your first instinct might be to slow down for more light. But in many cases, you want a faster shutter to capture crisp motion or prevent back-and-flood of neon glow from smearing. If there’s moving traffic, people, or a scene with bright neon, a faster shutter helps you keep the shapes intact. You’ll see cleaner edges and less smear on lights. Your night shots stop looking mushy and start showing real detail.
If you’re juggling moving subjects, a quicker shutter gives you a chance to catch the moment before it slides away. The trick is to find a balance: a faster shutter reduces light, so you’ll push the ISO or use a wider aperture if your phone allows. Some smartphones offer night modes that intelligently adjust, but you still benefit from knowing when to use a faster shutter to preserve motion clarity. Your nightography becomes more predictable when you decide to speed up the shutter for key moments.
Your hands-on test will teach you which scenes need speed. For city nights with buses and people, faster shutter helps you freeze action while enjoying the ambient glow. For still night scenes with long exposure trails, you’ll purposely slow down later in the chain. The key is to know when a faster shutter serves the moment and when it deprives you of the atmosphere you want.
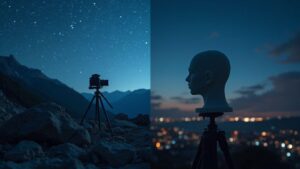
Shoot long exposures handheld in 2026 phones
Long exposures on a phone can feel magical, but you need to respect the limits of your device. You’ll get the best results by choosing a speed that matches the scene and your steadiness. On many 2026 phones, you’ll find options like Night mode, Pro mode, or a dedicated Long Exposure setting. When you’re handholding, you’ll want a shutter speed fast enough to prevent blur, yet slow enough to capture motion like stars, light trails, or silky water. Your goal is to balance light intake with your hand’s steadiness. If you keep practice, you’ll start noticing how small changes in speed change the feel of your shot. Try starting around 1/15s for light trails, then adjust to 1/8s or 1/4s if the image is too dark.
You’ll also rely on your phone’s software to help. Some phones lock exposure and ISO in manual modes, others layer in stabilization to smooth the shake. In practice, you’ll want to keep ISO as low as possible to avoid grain, and you’ll push shutter speed just enough to get a clear shape of movement. If you’re shooting water or clouds, a slightly longer exposure can smooth motion. If you’re after star trails, you’ll need much longer times, which means a tripod or clever technique. Your phone’s processor will stack frames in Night mode to brighten shadows without blowing highlights, but you’ll still need a handhold that won’t wobble too much.
Long exposures aren’t just about tech; they’re about patience. You’ll notice the light changing as you hold your phone, so you’ll want to shoot a few frames, check, then adjust. Sometimes you’ll capture the scene, and then you’ll realize you could have aligned the horizon or moved a subject slightly for stronger composition. Keep a steady stance, and don’t be afraid to try different angles. The more you practice, the closer you get to that rare, clean look you see in magazine shots.
Long exposure handheld smartphone 2026 tips
You’ll start with a solid base: pick a scene with movement you want to reveal. A park fountain at dusk, moving cars, or stars over a quiet street all work. Set your phone to Pro or Night mode, keep ISO low, and choose a starting shutter speed like 1/15s or 1/8s. If your shot looks underexposed, raise the shutter speed slightly or bump ISO a touch, but watch for grain. Your goal is smooth motion without overpowering light. You’ll know you’re on the right track when the movement appears as a soft streak rather than a blur.
Another tip is to shoot in bursts and pick the best frame. Your 2026 phone can stack several frames to reduce noise and keep brightness even. If you see shake in every frame, you’ll want to stabilize more. Use a stable stance, hold your breath briefly while shooting, and avoid twisting your body mid-shot. If you don’t have a tripod, lean against a wall or prop your elbow on your knee. The goal is to minimize any wobble that would ruin the long exposure effect.
Image stabilization and shutter speed smartphone features to trust
Your phone’s image stabilization is your ally, but you’ll still need the right shutter speed. On modern devices, optical or sensor-shift stabilization helps a lot, especially at slower speeds. You’ll notice that when you enable stabilizing features, you can safely drop to around 1/8s or 1/4s in brighter scenes. In darker scenes, stabilization can only do so much, and you’ll benefit from bracketing or stacking several shorter exposures. Trust the on-screen guidance; your phone often suggests the best shutter speed for a given scene.
When you’re using stabilization, you’ll still feel the tug of motion if your hand shakes hard. If you’re unsure, set a conservative speed like 1/20s and shoot a quick test frame. If you get a clear result, keep that setting. If not, adjust up or down. Your camera’s HDR or Night modes can help fill shadows, but don’t rely on them to fix a bad shutter choice. You can also use a tiny tripod or a makeshift stand to keep your phone steadier for the longer exposures you want.
Support or steady your phone to cut shake
You’ll want a solid base for long exposures. Use both hands, elbows tucked in, and press gently to steady your arms. If you don’t have a stand, lean your phone on a steady surface like a stone wall or a railing. You can even pull your sleeves tight to create a soft support. The steadier your frame, the sharper your long exposure looks. If you’re shooting low light, consider a small travel tripod or a flexible mount you can wrap around a pole. Every little bit of support helps you drop shake and keep the motion smooth.
Night mode vs manual shutter: when to switch
In low light, you’re deciding between Night mode and a manual shutter. Night mode uses software tricks to brighten scenes, often keeping ISO low and letting the camera pick a longer exposure. A manual shutter lets you set the exact speed, so you control how long light hits the sensor. If you want quick, usable photos without a lot of fuss, Night mode is your friend. If you want creative control over motion blur or freezing action, a manual shutter gives you the edge. Think of Night mode as auto-pilot with a soft landing, and manual shutter as hands-on piloting for every shot. For the best results, switch to Night mode when you’re indoors with steady light from lamps or windows. Switch to manual shutter when there’s movement you want to freeze, or when you want to push the exposure to match a specific look.
Night mode often shines in dim rooms, stairwells, or candlelit tables. It smooths noise and brightens shadows without you touching much. But it can flatten texture and blur moving objects a bit more than you expect. Manual shutter shines when you have a tripod or stable surface, so you can hold a longer exposure without shake. It also helps when you’re aiming for a crisp starry sky or a light trail. In short, use Night mode for easy, clean night snaps. Reach for manual shutter when you crave precise control over light and motion.
Combine these modes when you want the best of both. Start with Night mode to set a friendly baseline, then switch to manual shutter for specific frames where you need exact exposure. If your scene changes quickly, consider leaving Night mode on and nudging the shutter speed in a few steps to fine-tune the balance between brightness and noise. You’ll find the sweet spot by testing, comparing, and noting how each option affects texture and blur.
When night mode outperforms manual shutter smartphone auto
Night mode often beats auto shutter when light is scarce or when you want a brighter scene without raising noise. It uses longer exposure times and intelligent processing to pull in detail from shadows, giving you usable photos in dim corners. If you’re on a busy street at night or in a dim cafe, Night mode tends to produce clearer images with less grain than straight auto. It’s like letting the camera do the heavy lifting while you stand back and compose.
When you need speed and reliability, Night mode outperforms auto shutter because it’s designed for low-light chemistry, not just a quick snap. It preserves color and avoids the muddy look you sometimes get with auto at high ISO. If your subject is stationary, Night mode will usually deliver a cleaner, more natural result than plain auto.
When manual shutter gives you full control at night
Manual shutter gives you full command over exposure, which matters when light is tricky or you want motion effects. If you’re photographing neon signs, moving traffic, or people dancing, you can freeze or blur motion by choosing a fast or slow shutter. With a tripod or steady surface, a longer shutter can reveal ambient light that auto modes miss, like star trails or water silky-smooth. You can also keep ISO low to limit noise, then adjust the shutter to brighten or darken the scene until it looks just right.
If you’re aiming for a specific mood—say, a photo with light trails or a graffiti wall with motion blur—manual shutter is essential. It puts you in charge of the exact light amount hitting the sensor, so you don’t rely on the camera’s automatic interpretation. Practice with a few shutter speeds and see how the street noises or lights change from frame to frame.
Combine modes to get cleaner night shots
Combine Night mode with a manual shutter to clean up night photos. Start in Night mode to capture a bright baseline, then switch to a slower shutter to grab more texture in shadows without blowing highlights. If your phone lets you lock exposure, do it while you dial in a shutter speed that preserves detail. This approach helps reduce noise while keeping color accurate. It’s like layering light: Night mode gives you the glow, while the manual shutter shapes the final exposure and motion.
Experiment by taking the same scene with Night mode, then with a manual shutter, and compare. You’ll notice the texture in brick walls or fabric comes out crisper when you tweak the shutter and keep ISO controlled. The goal is to find a balance where your photo feels natural, not digitally polished.
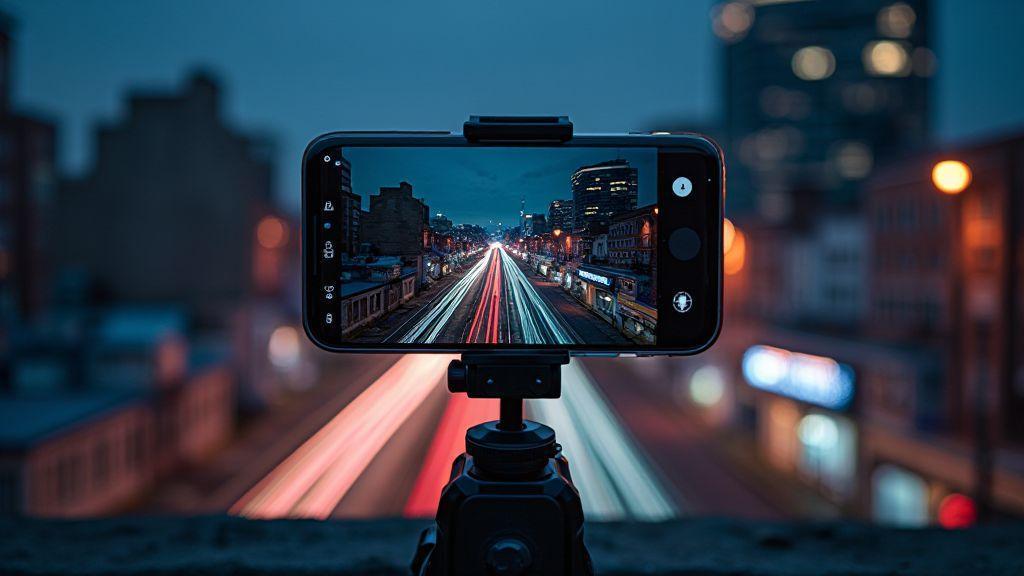
Capture light trails and stack frames for low noise
You’ll love how light trails come alive when you control time and exposure. The trick is to plan your shot, lock in a steady base, and let the camera do the heavy lifting with multiple frames. If you’re chasing bold car lights, starry skies, or city neon, you’ll see cleaner results when you combine frames rather than hoping for a perfect single shot. Your goal is to keep ISO low, minimize noise, and let motion create the effect you want. Think of it as layering energy: each frame adds brightness where you need it and tames grain where you don’t.
When you shoot light trails, start with a safe baseline. Pick a location with stable ground and plenty of lights. Set your phone to a manual or pro mode if you have it, and plan for a longer shutter. You’ll want to shoot many frames over several seconds to minutes depending on the path the lights take. If your phone supports RAW, enable it so you can refine levels later. Remember to keep your fingers off the screen during the exposure to avoid tiny shakes that ruin the trail’s smoothness. Your final image comes from stacking those frames, not from one perfect frame.
If you’re stacking, you’re already ahead. Stacking reduces noise and smooths out flicker from streetlights. You’ll combine the clear bits from each frame into one clean trail image. Use simple stacking apps or built-in features, and compare the results with and without alignment. A little trial and error goes a long way, but you’ll quickly learn what works best for your scene and your phone.
Best shutter speed for light trails smartphone settings
Your shutter speed is the heartbeat of light trails. Start with a longer exposure, like 1 to 5 seconds, to capture a strong line of light without washing out color. If your trails feel choppy, slow down the shutter or add more frames to keep the line continuous. For star trails, you’ll need much longer total time, but you can still stack to tame noise. If you see digital noise at longer exposures, drop the ISO first and rely on stacking to preserve brightness.
Preferably, shoot in a low-contrast scene so the trails stay bright without blowing out highlights. Use manual focus, set white balance to a fixed value, and avoid auto adjustments during the sequence. If your device has a long exposure or night mode option, test it against your regular shutter settings. You want consistent results across frames to make stacking easy and clean. With practice, you’ll predict how the trail grows and how noise behaves at each shutter setting.
Multi-frame stacking low light smartphone 2026 to reduce noise
Stacking is your best friend in 2026 for low-light storytelling. You’ll take many frames with the same framing, then merge them to boost signal and suppress noise. Choose a stable tripod grip or a solid surface, because even minor shifts ruin alignment. Use an app that supports alignment and averaging, or try a dedicated night stacking tool. The idea is to keep the trail bright while letting random noise fade away in the blend.
When you stack, you’ll often blend a base exposure with several lighter frames. This gives you crisp lines and smooth gradients. If you notice banding or strange glow, tweak the stacking method—average or median blends can change the feel of the final image. Remember to shoot RAW if possible; it preserves maximum detail for post-stack fine-tuning. With consistent frames, your light trails will look smooth, vibrant, and almost painterly.
Use a tripod and stacking apps for sharp trails
Set your phone on a stable tripod, or lean it securely on a solid surface. A steady base is the difference between a skim of light and a bold, crisp trail. Then open a stacking app that can align frames automatically. You’ll want an option that lets you lock exposure and white balance across the sequence, so nothing drifts while you shoot. As you compose, think about the path the lights will take and how many frames you’ll need to build the trail you want. Short on time? Start with a quick stack of 10–20 frames and see how it feels before you commit to a longer session.
Conclusion
Wrap-up: Shutter Speed Explained for 2026 Smartphone Night Shots
Shutter speed is the core of light control. In 2026 smartphones, combine shutter speed with ISO and aperture to shape exposure, motion, and mood. Use Night mode for bright baseline results and switch to manual shutter when you want precise control over motion or trails. Long exposures can be handheld with stabilization and stacking to reduce noise, or achieved with a tripod for the cleanest lines. Practice with scenes—street lights, reflections, stars—to internalize how light behaves. Shutter Speed Explained: Mastering Light Control for 2026 Smartphone Night Shots anchors your approach to mastering light, motion, and texture in every night shot.

Smartphone Night Photography Enthusiast & Founder of IncrivelX
Vinicius Sanches is a passionate smartphone photographer who has spent years proving that you don’t need an expensive camera to capture breathtaking images after dark. Born with a natural curiosity for technology and a deep love for visual storytelling, Vinicius discovered his passion for night photography almost by accident — one evening, standing on a city street, phone in hand, completely mesmerized by the way artificial lights danced across wet pavement.
That moment changed everything.
What started as a personal obsession quickly became a mission. Vinicius realized that millions of people were carrying powerful cameras in their pockets every single day, yet had no idea how to unlock their true potential after the sun went down. Blurry shots, grainy images, and washed-out colors were robbing everyday people of memories and moments that deserved to be captured beautifully.
So he decided to do something about it.
With years of hands-on experience shooting city streets, starry skies, neon-lit alleyways, and creative night portraits — all with nothing but a smartphone — Vinicius built IncrivelX as the resource he wished had existed when he was just starting out. A place with no confusing jargon, no assumptions, and no gatekeeping. Just honest, practical, beginner-friendly guidance that actually gets results.
Vinicius has tested dozens of smartphones from every major brand, explored dark sky locations across multiple states, and spent countless nights experimenting with settings, compositions, and editing techniques so that his readers don’t have to start from scratch. Every article on IncrivelX comes from real experience, real mistakes, and real lessons learned in the field.
When he’s not out shooting at midnight or writing in-depth guides for the IncrivelX community, Vinicius can be found exploring new cities with his phone always within reach, looking for the perfect shot hiding in the shadows.
His philosophy is simple: the best camera is the one you already have — you just need to learn how to use it in the dark.