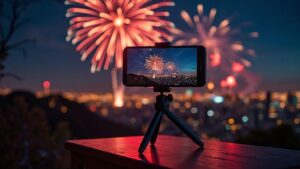
ISO on iPhone 17 & Galaxy S25: A Beginner’s Guide to Night Photography Settings
Learn how ISO affects night photos on the iPhone 17 and Galaxy S25, with practical steps to balance exposure, noise, and stability.
Night ISO basics: night photography ISO smartphone
You’re aiming for brighter, clearer night photos, and ISO is your first switch to tweak. ISO is the sensor’s light sensitivity. Raising ISO brightens dark scenes but introduces noise. A lower ISO keeps things smooth but may require longer exposures or steadier hands. The key effects are brightness and noise: higher ISO boosts brightness for handheld shots but adds grain; lower ISO preserves detail but risks underexposure in very dim scenes. The trick is to raise ISO just enough to capture the moment without excessive grain.
Key ISO terms to know
- ISO range: Baseline ISO plus higher values (e.g., 100, 200, 400, up to 3200 on some devices). Start low and increase only as needed.
- Noise: Grain in dark areas that grows with ISO.
- Exposure: Overall image brightness influenced by ISO, shutter speed, and aperture.
- Grain vs. detail: Some grain can feel cinematic, but too much hides texture and edges.
- ISO invariance: Some phones preserve detail better by editing exposure later; many phones don’t, so plan exposure in real time.
What ISO does for your photos
A higher ISO makes the sensor more sensitive to light, yielding brighter images when you can’t use a long shutter. This helps in quick city neon moments or a street performance, but at the cost of more noise. Keep ISO as low as possible and raise it only when necessary to preserve sharp lines and textures. Balance ISO with shutter speed and aperture, and stabilize the shot to prevent drift.
How ISO affects light and noise
- Lower ISO gathers less brightness but keeps noise low, giving cleaner tones, especially in shadows and textures. It’s ideal for quiet streets or dim cafés, though it may require a longer shutter or a tripod.
- Higher ISO adds brightness in low light but introduces grain and color specks. It’s useful for quick moments or handheld shots when you can’t set up, but expect added texture in dark areas.
Night ISO basics: night photography ISO smartphone — In-Depth Tips
- Start with the lowest ISO that yields a usable exposure.
- If you see noise, try a slower shutter or stabilize the phone to reduce ISO needs.
- For handheld night scenes, you may accept a bit more noise to keep motion in check.
- Use a tripod or stable surface to push ISO down and still capture enough light.
Set ISO on your iPhone 17: iPhone 17 ISO settings
You want clear night photos, not grainy mess. In iPhone 17, ISO is tucked into Pro controls or third‑party apps. Auto mode adjusts ISO automatically; manual or Pro mode lets you lock ISO to a steady value. Think of ISO as the volume knob: lower for sharp daytime-like clarity, higher for dim interiors. Low ISO yields clean textures; high ISO brightens but adds grain.
When you dial ISO yourself, set a lower ISO for living room portraits with soft light and push higher if the subject moves in a dim club. If your app supports it, pin a target ISO to prevent drift. For dusk landscapes, a moderate ISO with a tripod can prevent blur. The goal is to balance ISO with shutter and aperture for crisp detail. Lock ISO once you find a sweet spot to keep lighting consistent across frames. Quick tests help you calibrate exposure before you shoot.
Find manual controls and Pro apps: adjust ISO iPhone 17 camera
In manual controls, ISO sliders appear as sensitivity or gain. Pro apps show numeric ISO values. Start with ISO 100–400 for daylight, 800–1600 for indoor scenes with light. Higher ISOs bring more noise, so practice to learn the trade-off. RAW capture preserves more data for later denoising; if available, shoot RAW when adjusting ISO manually. Watch the histogram to avoid clipping highlights and crushed blacks. For cinematic looks, pair a lower ISO with a wider aperture and longer tripod exposure.
Lock exposure to stop flicker and blur
Locking exposure maintains brightness and prevents flicker from indoor lighting. Tap and hold on the subject to lock exposure in most apps, or use AE/AF lock. Locking exposure prevents ISO from bouncing as you recompose, giving consistent results. For video or sequences, enable exposure lock for steadier frames when moving between shadows and bright windows. Use a tripod or steady surface for sharpness.
iPhone 17 ISO settings quick tip
If you’re in a pinch, switch to Pro mode, set a low ISO for daylight, and raise it only if you lose shadow detail. A little extra shutter speed can compensate for higher ISO when handheld. Check the histogram afterward to avoid clipping highlights.
Set ISO on your Galaxy S25: Galaxy S25 ISO settings
Your Galaxy S25 uses ISO to control brightness and grain. A higher ISO works in low light but adds noise; a lower ISO keeps colors true but may need more light or a longer exposure. Adjust ISO deliberately to suit lighting and motion, and test with quick frames to gauge noise before committing.
In practice, start with a low ISO in bright areas, then raise as light fades or subjects move. For fast action, a higher ISO helps freeze motion at the expense of grain. For still scenes, keep ISO low to preserve sharpness and color. Shooting a quick test frame helps you foresee noise levels. With practice, you’ll see crisper results across changing lighting.
Use Pro mode to set ISO: manual ISO Galaxy S25
In Pro mode, you control ISO directly. Start at ISO 100–200 in daylight, then raise to 800–1600 as light diminishes. If grain is unwanted, back off ISO and compensate with longer exposure or a wider aperture, if available. Pro mode provides a feedback loop: adjust ISO, review, and refine. For mixed lighting, aim to preserve highlights while avoiding heavy shadows. In night or indoor scenes, start around ISO 800–1600, then adjust based on results. Keep other settings stable so you can compare ISO’s impact.
Change ISO fast when you can’t use a tripod
On the move, quick ISO tweaks matter. In Pro mode, glance at the live histogram and raise ISO just enough to prevent blur from camera shake. For slower subjects, ISO around 400–800 can work with a steadier stance; for low-light action, push to 1600 or higher and manage noise in post. Practice rapid ISO adjustments to avoid missing moments.
Galaxy S25 ISO settings quick tip
Watch for grain. If dim light shows heavy speckling, lower ISO a notch and try a longer exposure or additional light.
Best ISO for night shots: best ISO for night iPhone 17 and best ISO for night Galaxy S25
For clean, sharp night photos, start with a low ISO and only raise it as needed to freeze motion and avoid blur. iPhone 17 and Galaxy S25 handle low-light noise differently, but the rule remains: start low, raise only when necessary.
- With a tripod, stay at lower ISO and lengthen exposure for brightness.
- Handheld, a modest ISO rise may be required; test for acceptable noise.
- Pick clean versions of shadows and colors by keeping ISO within practical ranges.
Pick low ISO for cleaner images
In very dark scenes, begin around ISO 100–400 on both devices and adjust. Night mode may auto-boost ISO; keep it as low as possible while maintaining exposure. Steady hands or a grip on a stable surface helps reduce the need for higher ISO.
Raise ISO only when you need more light
Raise ISO to brighten scenes when the shutter would otherwise be too slow. If subjects move, a faster shutter is helpful, which may require a higher ISO. For static subjects, a lower ISO with longer exposure works best. The aim is a balance between brightness and grain.
Recommended ISO ranges
- Static scenes or tripod shots: ISO 100–400
- Dim streets with movement: ISO 400–800
- Slightly brighter scenes or faster action: ISO 800–1600
If the light is very low and the subject is still, you can push to 1600–3200, but expect grain. Always test a couple of frames to judge noise.
Reduce noise and keep detail: ISO noise reduction smartphone
ISO noise reduction helps, but use it wisely. Higher ISO brings brightness and grain; too much reduction can blur textures. Often keep ISO low for the bright areas and denoise in post for shadows. If editing, shooting RAW gives more latitude to denoise without sacrificing edge detail. Night mode stacks frames to smooth noise while preserving edges; use it with a tripod for best results. Lighting matters: adding a soft light source reduces the need for high ISO, resulting in crisper images.
When to use night mode and RAW files
Night mode is a quick path to brighter, cleaner shots by stacking frames. Use it handheld in dim settings. If you want maximum control over noise and shadows, shoot RAW and denoise later. Your choice affects how much noise you can remove without dulling texture.
Compare iPhone 17 low light ISO and Galaxy S25 low light ISO
In low light, iPhone 17 often preserves color and skin tones with less purple noise, keeping edges sharp while smoothing other areas. Galaxy S25 tends to brighten scenes and may show a touch more grain in dark areas, offering a more cinematic look. Test both in your usual night spots and compare Night mode versus RAW to decide which feel you prefer. Your choice will depend on whether you want cleaner shadows or more texture in mid-tones.
Noise reduction settings to try
Tweak noise reduction in small steps. Start with light denoise in editing, then compare. If shooting RAW, denoise in post without losing edge detail. In Night mode, avoid over-smoothing to prevent flat photos. Consider RAW plus Night mode on a tripod to blend a clean base with stacked exposures.
Combine ISO with shutter and stabilization
Balancing ISO, shutter speed, and stabilization yields sharper night images. High ISO adds grain; too slow a shutter causes blur. A modest ISO with a steady shot and sensible shutter keeps noise low and detail high. Practice tests to learn which combination works best for your scenes.
Use a tripod and slow shutter for low ISO
For clean night shots, use a tripod and a slow shutter. Start with ISO 100–200 and shutter 1/4 to 2 seconds for still scenes. If the subject moves, adjust shutter slightly but keep the camera steadier to maintain low ISO and good detail.
If a tripod isn’t available, lean on a stable surface and use a timer or remote to avoid touch blur. The goal is to prevent motion blur while keeping ISO low.
Try bracketing, burst, and steady hands with manual ISO Galaxy S25
Bracketing lets you shoot multiple exposures; burst mode offers quick options; manual ISO on the Galaxy S25 helps you decide how much noise you’ll tolerate. Start with underexposed, balanced, and overexposed frames. Use burst for rapid selections, and keep a steady grip to ensure consistent exposure during trials.
Practical steps to steady night shots
- Secure a solid base: tripod or stable surface.
- Use a timer or remote to avoid touch blur.
- Start with ISO 100–200 and shutter 1/4–1/2 second for still scenes.
- Check the histogram to prevent highlight clipping.
- If subjects move, raise shutter speed or use bracketing.

Smartphone Night Photography Enthusiast & Founder of IncrivelX
Vinicius Sanches is a passionate smartphone photographer who has spent years proving that you don’t need an expensive camera to capture breathtaking images after dark. Born with a natural curiosity for technology and a deep love for visual storytelling, Vinicius discovered his passion for night photography almost by accident — one evening, standing on a city street, phone in hand, completely mesmerized by the way artificial lights danced across wet pavement.
That moment changed everything.
What started as a personal obsession quickly became a mission. Vinicius realized that millions of people were carrying powerful cameras in their pockets every single day, yet had no idea how to unlock their true potential after the sun went down. Blurry shots, grainy images, and washed-out colors were robbing everyday people of memories and moments that deserved to be captured beautifully.
So he decided to do something about it.
With years of hands-on experience shooting city streets, starry skies, neon-lit alleyways, and creative night portraits — all with nothing but a smartphone — Vinicius built IncrivelX as the resource he wished had existed when he was just starting out. A place with no confusing jargon, no assumptions, and no gatekeeping. Just honest, practical, beginner-friendly guidance that actually gets results.
Vinicius has tested dozens of smartphones from every major brand, explored dark sky locations across multiple states, and spent countless nights experimenting with settings, compositions, and editing techniques so that his readers don’t have to start from scratch. Every article on IncrivelX comes from real experience, real mistakes, and real lessons learned in the field.
When he’s not out shooting at midnight or writing in-depth guides for the IncrivelX community, Vinicius can be found exploring new cities with his phone always within reach, looking for the perfect shot hiding in the shadows.
His philosophy is simple: the best camera is the one you already have — you just need to learn how to use it in the dark.