Hand Shake at Night: Why It Ruins Photos and How AI Stabilization Eliminates It
Night shots blur when light is scarce. Long shutter times, sensor processing, and tiny hand tremors combine to smear edges. Even a steady hand can fall prey to motion when the lamp-lit street is dark enough. AI stabilization now helps fix these issues in real time, letting you shoot handheld with confidence.
Why your night shots blur
Low light forces the camera to work harder: longer shutter speeds, higher ISO, and stronger processing can leave you with softer edges and grain. The subtle tremor you don’t notice while shooting becomes a noticeable blur on the screen. A brief button press can turn into a long exposure, and tiny movements—your breath, steps, and heartbeat—show up as smear. Processing helps, but it can’t fully fix what happened during capture, so night images often look soft rather than sharp.
How hand shake night photography causes camera shake blur
When you press the shutter, your hand’s tremor transfers to the phone. In low light, the shutter stays open longer to gather light, extending the window for movement to blur the frame. Two-handed grip helps but isn’t perfect. A quick tap reduces some motion, but the best fix is to steady yourself—lean on a stable surface or use a timer. Small tricks like tucking your elbows in close to your body can significantly cut shake.
In bright-enough scenes, you might still see shake if you relax your grip or press too hard. If you’re in a crowd or shooting a bustling street, consider waiting for a moment with less motion or using stabilization features to minimize blur.
Why long exposure camera shake makes low light motion blur worse
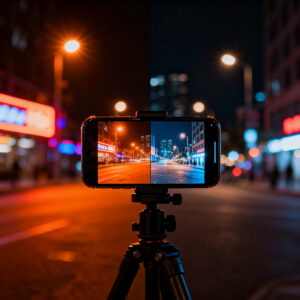
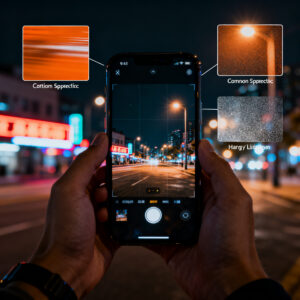
Long exposures accumulate motion, so even slight hand movement becomes visible as streaks, especially around bright points like streetlights and headlights. While tempting for more light, long exposure magnifies shake and wind gusts. In scenes with low contrast, the result can look painterly or smeared. Shorter exposures with a touch more ISO can yield crisper results, or stabilize with a tripod to capture the glow without motion smear.
Spot the blur fast
Check the preview after you shoot. If you notice smear, adjust your stance, tighten your grip, or shorten the exposure. Quick tweaks beat reshooting later.
How your sensor limits night sharpness
Your phone’s sensor is the gatekeeper of night sharpness. In low light, limited photons and sensor size create noise and soften details. Smaller sensors with dense pixel packing collect fewer photons per pixel, causing grain and softness, while larger sensors keep more tonal detail in shadows.
The sensor’s processing—noise reduction, sharpening, and smoothing—also shapes the final image. Aggressive noise reduction can soften edges; gentle processing preserves texture but may leave more grain. Understanding these limits helps you adjust technique and settings to maximize what you do have.
Sensor size and noise you should know
A larger sensor generally captures more light per pixel, producing cleaner night images. More pixels on a small sensor can lead to crowded data per pixel, making noise more noticeable in shadows. Processing aims to reduce noise, but over-smoothing can blur textures. Balancing exposure, stabilization, and processing yields the most natural night shots.
Processing also plays a role: noise reduction and edge smoothing can soften details. The trade-off is clean shadows versus sharp textures. Knowing this boundary helps you decide when to push exposure and when to rely on stabilization to keep lines crisp.
ISO and exposure trade-offs for your shots
ISO is how loudly the sensor asks for light. Raise ISO for a brighter shot but invite more noise; lower ISO keeps things clean but requires longer exposure or wider aperture. The goal is a balance: just enough ISO to maintain a fast enough shutter without introducing heavy noise.
Exposure gathers light over time. Longer exposures reveal more detail but also magnify motion blur. Shorter exposures stay sharp but darken the scene. The trick is to find a middle ground where detail is visible and motion is minimized. Processing can help, but you’re better off not pushing it to the limit if you want crisp night photos.
Remember: you’re trading ISO for exposure time. Higher ISO shortens the shutter but adds noise; longer exposure brightens the scene but risks blur and noise suppression. Choose the pain you’re willing to live with—the grainy look or the blur.
Choose sensor-aware settings
Use a mode that gives you control over shutter speed and ISO. Start with a faster shutter to cut blur, then raise ISO just enough to brighten without creating heavy noise. If available, Night mode can help, but review results—shorter exposure with moderate ISO can be cleaner than a long automated pass.
Stabilize your shot when possible. A tripod or sturdy surface enables longer exposures with less shake. Tuck elbows close to your torso and keep the phone steady to maximize light intake without increasing blur.
Post-processing helps, but avoid over-sharpening or aggressive noise reduction. Aim for natural sharpness and texture so images feel real, not processed.
Optical vs electronic image stabilization
Your night shots hinge on the right stabilization. Optical Image Stabilization (OIS) uses physical lens or sensor movement to counteract shake in real time, helping keep photos and longer exposures crisper by reducing motion before capture.
Electronic Image Stabilization (EIS) crops or shifts frames after capture to reduce perceived motion. Great for video and some stills, but it can sacrifice detail or introduce artifacts in tricky lighting. For stills in low light, OIS typically delivers the more reliable sharpness.
When choosing, consider your typical night routine. For stills with the least blur, prioritize OIS. For video in dim light, EIS can stabilize motion, but don’t expect it to replace true optical steadiness for photos.
How OIS reduces hand shake night photography
OIS detects tiny camera movements and compensates in real time with lens or sensor shifts. This keeps the scene steadier during the exposure, enabling slower shutter speeds without introducing blur. You’ll notice crisper colors and textures, especially in dusk or dim interiors, with less need to crank up ISO.
How EIS and computational image stabilization differ
EIS works post-capture by cropping or aligning frames to reduce motion, often sacrificing some resolution. Computational stabilization blends multiple exposures to reconstruct a steadier image, which can improve detail in low light but relies on rapid capture and can introduce ghosting if motion is erratic.
In practice, EIS is handy for video and quick fixes; computational methods can squeeze more light from a frame but may not beat native OIS for stills in deep night conditions.
Pick the best stabilizer for you
For crisp stills, prioritize strong Optical Image Stabilization on your main camera. For video in dim light, good EIS helps, but balance the trade-offs for stills. If budget is tight, emphasize OIS, stabilize with a tripod when possible, and rely on careful handholding when you can. Post-processing can supplement stabilization when needed.
How AI photo stabilization helps your images
You want crisper photos in低 light. AI stabilization uses smart software to smooth micro-movements in real time, improving edges, detail, and color cohesion. It’s not magic, but it’s powerful math that helps the phone keep up with your hands, especially during longer exposures in the dark.
With AI stabilization, you don’t have to hold your breath for a perfect shot. The phone analyzes motion across frames and nudges pixels toward a steadier frame, resulting in a more consistent look across sequences. It’s a big leap over post-processing alone, helping keep faces recognizable and textures intact even in dim rooms.
In low light, AI stabilization shines by compensating micro-movements that are easy to miss in real time. The outcome is cleaner color, less motion blur, and a more natural image that matches what you remember seeing with your eyes. It’s not a cure-all, but it’s a significant improvement for handheld night photography.
Deep learning shake reduction basics
Deep learning models study patterns from many scenes to learn what a steady image looks like. When you shoot, the model predicts how pixels moved and reconstructs the frame to reduce blur. The result is sharper edges, less ghosting, and more usable night shots. It’s like a tireless editor that understands hand tremor and corrects it frame by frame.
The approach combines motion estimation and frame reconstruction. On modern devices, these algorithms are fast enough to feel instant, so minor shakes are corrected without delaying capture. The more data the model trains on, the better it becomes at distinguishing real motion from subject movement.
How Hand Shake at Night: Why It Ruins Photos and How AI Stabilization Eliminates It Applies to Phones
Your hand shake at night often shows up as soft edges and halos around bright lights. Longer shutter times make motion blur more obvious, while AI stabilization targets these issues by actively reducing motion artifacts during capture. The result is closer-to-life colors, better shadow detail, and nighttime scenes that feel more like what you saw.
In practice, you’ll see more consistent results with handheld night photography. AI stabilization doesn’t erase all motion, but it minimizes the most noticeable shake, letting you shoot in dim rooms or on dark sidewalks without a tripod. The phone uses learned patterns from similar scenes to keep the image steady.
Trust AI, but check results. If something looks too smooth or off, switch settings or use a faster shutter. Your eyes are the final judge, and AI is a helpful assistant in the background.
Trust AI but check results
AI stabilization is powerful, but you should still review your photos. Open a few shots, zoom in, and inspect edges. If you spot odd artifacts, try a different setting or lighting. AI improves with updates, and practice with it pays off.
How your night mode uses computational tricks
Night mode uses computational tricks to boost brightness, reduce noise, and preserve natural colors. It gathers clues from lighting, how you hold the phone, and subject motion, then blends multiple tiny cues into a single strong image. The result is brighter photos with less grain and more accurate tones, even when light is scarce.
Night mode relies on multi-frame information and alignment to improve detail. The better the phone understands the scene, the sharper the result. It’s hardware plus software working in harmony to produce more life-like images, especially in challenging lighting.
Night mode is a collaboration between hardware and software: more information captured, smarter processing, and a balanced final image that looks like real life rather than a filtered shot.
Multi-frame stacking and alignment you can use
Steadying your phone or using a stable surface allows the camera to stack several frames for a brighter, cleaner image with less noise. Alignment is key—frames must line up so the scene matches across shots. A steady hand helps a lot, but a tripod makes it easier to maximize detail and reduce halos around bright lights.
Wait for the stacking to finish. Don’t rush to capture a second shot; let the camera refine and blend for the best result.
Motion blur removal algorithms in night mode
Night-mode algorithms detect motion and separate it from static background. They can sharpen moving subjects while keeping other areas stable, so night selfies or street photos look clearer despite slower shutter speeds. If you’re aiming to capture fast movement at night, keep movements minimal for optimum results, as steady subjects still win.
Simple tips: steady the base, minimize movement, and let the algorithms work their magic on structure and edges for sharper results.
Simple ways you can steady your phone
Better stability comes from small adjustments. Tuck your elbows in, keep the phone close to your chest, and use both hands. Stand with feet shoulder-width apart and plant one foot forward to create a solid base. Light breathing—inhale, hold, exhale as you press—helps synchronize body motion with the shot. If possible, brace against a wall or railing and place the phone on a stable surface when you can. Stabilization features on your device should be enabled for the best results.
Stance, grip, and breathing tips you can try
Adopt a relaxed, balanced stance. Bring the phone to eye level, elbows in, and grip firmly without tensing. Breathe steadily: inhale, hold, then gently press the shutter while exhaling to synchronize your motion with the shot. If you’re in a very dark scene, brace against a wall or rest the phone on a stable surface to minimize tremor. A calm body translates into crisper night photos.
If you’re in a pinch, press your chest against the phone and rest your forearms on your ribs to turn your body into a stabilizing frame. When you feel shake, pause, reset your stance, and try again. Small breaks can save a blurry photo later.
When to use a tripod or stable surface
A tripod or stable surface is invaluable in truly dark settings. Place the phone on a table or wall, or use a compact tripod to keep the shot steady for longer exposures. A tripod reduces blur from movement and allows you to capture city glow with minimal motion. If you don’t have a tripod, a stable object like a backpack or a stack of books can serve as a solid substitute.
In the field, build a stable base and rely on stabilization features when you can. A steady setup makes longer exposures feasible and reduces the need for aggressive post-processing.
Settings you should change to cut blur
Blur is the enemy of night photography. Use settings that favor sharpness and stability: higher shutter speeds to curb blur, controlled ISO to balance brightness and noise, and focus locking to prevent hunting in low light. If available, try Night mode but review results, as sometimes a shorter exposure with a modest ISO is cleaner than a long automatic pass.
Stability improves with a tripod or solid surface, and sharpening in post should be used sparingly to avoid artificial edges. Neutral color presets help retain natural edges rather than heavy filtering.
Lower ISO and faster shutter choices for you
Lower ISO reduces noise and preserves detail. Pair a lower ISO with a faster shutter to keep motion blur at bay while maintaining brightness. Try ISO around 400 or lower in moderately lit scenes, then increase shutter speed to freeze motion (e.g., 1/60s to 1/125s for people or cars). If lighting is very dim, Night mode can help brighten scenes without pushing ISO too high. This yields clearer memories with less smear.
Lock focus and exposure to avoid shifts
Locking focus and exposure prevents drift as you frame and reframe. Tap and hold on the subject to lock focus; use AE/AF lock if available to fix exposure. Recompose only if necessary, not to reset exposure or focus each shot. This keeps essential details visible—eyes, faces, and key lights—without flickering brightness across shots.
Adjust settings for sharp nights
Enable night or long-exposure modes where comfortable, and stabilize using a wall or railing if you lack a tripod. Turn off aggressive processing that softens edges, and choose neutral color presets to preserve natural edges. Bracketing exposures can help capture contrast in bright lights and deep shadows. Small adjustments add up to crisper night images that stay true to the scene.
What AI stabilization costs your phone
AI stabilization uses extra processing power, which can slow screen responsiveness and extend shutter-to-photo time, especially on older devices. It increases CPU/GPU load, which can raise device temperature and drain battery more quickly. In practice, stabilization can slow you just enough to affect the moment, but the trade-off is smoother, more reliable night images.
Battery life and heat matter: sustained stabilization can drain power and trigger thermal throttling. If you’re far from a charger, balance how long you shoot with how much stability you need.
How you can test stabilization on your phone
Test stabilization by comparing shots with stabilization on and off in fixed lighting. Hold the phone steady, take multiple frames, and note where edges stay sharp. In low light, compare results to see if stabilization reduces blur and noise. Test across modes (OIS, EIS, AI) to identify which gives the best balance for your style.
Then try moving subjects—a person walking, a car passing—under similar lighting. Observe which mode preserves motion without introducing artifacts. A good stabilization setup should keep details readable and edges well-defined without heavy halos or smearing.
Simple night test shots you should take
Take a well-lit storefront from 10–15 feet, with stabilization off and then on. Compare edge sharpness and legibility of letters. Next, photograph a moving subject under a streetlight with a short exposure to see how well motion is frozen. Try a night portrait without flash, then a short video of a city street to judge how stable the sequence remains. A good stabilizer keeps scenes readable and lights clean, not smeared.
Compare optical vs AI stabilization side-by-side
First, shoot a static scene with optical stabilization enabled. Then switch to AI stabilization for the same shot. OIS tends to preserve lines and edges, while AI stabilizes texture and reduces grain. For text-heavy scenes, OIS often wins for crisp edges; for a smoother overall look, AI can be preferable. Repeat with a handheld video to see the differences in motion and detail.
Measure results with clear metrics
Evaluate sharpness by examining high-contrast edges; compare noise levels in shadows; assess motion by how well moving subjects hold form. For video, note whether frames feel steady without rolling or wobble. The goal is consistent improvement: stabilization should reduce blur, minimize noise, and maintain smooth motion across tests.

Smartphone Night Photography Enthusiast & Founder of IncrivelX
Vinicius Sanches is a passionate smartphone photographer who has spent years proving that you don’t need an expensive camera to capture breathtaking images after dark. Born with a natural curiosity for technology and a deep love for visual storytelling, Vinicius discovered his passion for night photography almost by accident — one evening, standing on a city street, phone in hand, completely mesmerized by the way artificial lights danced across wet pavement.
That moment changed everything.
What started as a personal obsession quickly became a mission. Vinicius realized that millions of people were carrying powerful cameras in their pockets every single day, yet had no idea how to unlock their true potential after the sun went down. Blurry shots, grainy images, and washed-out colors were robbing everyday people of memories and moments that deserved to be captured beautifully.
So he decided to do something about it.
With years of hands-on experience shooting city streets, starry skies, neon-lit alleyways, and creative night portraits — all with nothing but a smartphone — Vinicius built IncrivelX as the resource he wished had existed when he was just starting out. A place with no confusing jargon, no assumptions, and no gatekeeping. Just honest, practical, beginner-friendly guidance that actually gets results.
Vinicius has tested dozens of smartphones from every major brand, explored dark sky locations across multiple states, and spent countless nights experimenting with settings, compositions, and editing techniques so that his readers don’t have to start from scratch. Every article on IncrivelX comes from real experience, real mistakes, and real lessons learned in the field.
When he’s not out shooting at midnight or writing in-depth guides for the IncrivelX community, Vinicius can be found exploring new cities with his phone always within reach, looking for the perfect shot hiding in the shadows.
His philosophy is simple: the best camera is the one you already have — you just need to learn how to use it in the dark.