How shutter speed works in low light
You’ll notice night photos change when you adjust shutter speed. The shutter is a tiny door that opens to let light in. In low light, you decide how long that door stays open. A longer opening brings in more light; a shorter one keeps more darkness in. Phone sensors are small, so door timing matters even more. Adjusting shutter speed balances brightness with how still you are. Move, and a long exposure can blur the scene. So in dark scenes, longer shutter speeds brighten things up but risk blur if you’re not steady.
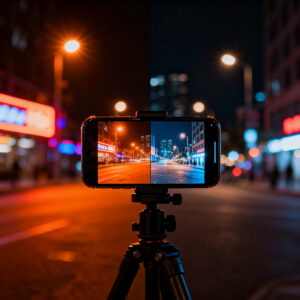
Shutter speed also changes motion in the shot. A fast door time keeps you crisp; a slow one can turn moving cars and people into light trails. Your phone tries to find a balance, but you’ll get better results if you understand how long you’re letting light in. Longer times are more forgiving for darkness but tougher when you’re not still. Shorter times keep you sharp but may require more light sources or higher ISO. This is why people use a tripod or brace their phone for longer exposures. You’re not helpless—you just need to pick the right door time for what you want to capture.
Understanding shutter speed helps you plan shots. A longer shutter can capture light trails on a busy street, with a steady hand or a stasis moment. Indoors, a shorter shutter can freeze a friend waving a glow wand. Practice with a simple scene (a tree near a streetlamp) and compare 1/30, 1/60, and 1/125 to see how brightness and blur change. Your phone guides you, but your choice tells the story.
What shutter speed means for your photos
A longer shutter means the camera stays open longer, letting in more light so the photo is brighter. Still subjects will be clearer if they’re not moving. In night scenes, this brightens shadows without cranking software brightness. A fast shutter blocks quick motion and yields sharp details, but can leave the scene too dark in low light. You’ll likely need a higher ISO or a brighter light, which can introduce noise or glare. So your choice boils down to brightness with some noise risk, or sharpness with less light.
Shutter speed also shapes the night’s mood. Longer shutter times can turn moving cars into light trails—some styles adore that. Short times keep motion crisp but may miss the night’s atmosphere. You’re painting with time, and the door you choose influences the vibe—soft glow, crisp edges, or dramatic motion. Decide what the photo should convey and pick the shutter accordingly. Practice to understand how each choice changes the scene.
Why slow shutter brings more light
A slow shutter keeps the door open longer, collecting more light. This helps brighten night shots without cranking ISO too far. You’re letting the camera soak up light from lamps, windows, or streetlights, revealing brighter shadows and more detail in dark corners. The trade-off is motion blur: anything moving during that exposure will smear.
A slow shutter also creates motion effects—cars become trails, water looks silky, neon signs wash with color. It’s a creative tool for nightlife or rainy street scenes, but keep the device steady with a tripod or a solid surface to keep stationary details sharp.
Slow shutter equals more motion blur
With a slower shutter, anything moving will blur. Figures walking or bikes passing by appear as streaks along their path. This blur isn’t a mistake—it signals motion. If you want less blur, shorten the shutter or brace the camera so you stay still. For more blur, keep the door open longer and let trails grow. You control how much life the night shows.
Why your phone picks slow shutter at night
Your phone often chooses a slow shutter to capture clearer images in dim scenes. A longer exposure lets in more photons, producing a brighter, usable shot. Movement—yours, the subject’s, or camera shake—shows up as blur, but the trade-off is better light.
Night modes can automatically extend exposure to balance detail and noise. A longer shutter reveals colors and outlines you’d miss with a quick snap, but moving subjects or subject movement will blur. Noise reduction may smooth grain, which can soften edges. If you’re after sharp lines, slow shutter can hurt more than it helps, so learn when to rely on it and when to adjust manual controls.
Sensor size and light limits affect you
Your camera’s sensor is the engine behind every shot. A bigger sensor gathers more light, allowing shorter shutter times while still bright. Small phone sensors often need longer exposures, which can brighten the scene but increase blur if you move. Noise becomes a factor as the shutter stays open longer. Light sensitivity (ISO) ties to sensor size too: smaller sensors require higher ISO, which adds grain. When blur appears, think about sensor size, light, and how long the shutter stays open.
Auto mode extends exposure to brighten shots
Auto mode tries to guess the best exposure, often extending the shutter to pull in light in dim scenes. You get brighter images but more blur if your hands shake or the subject moves. Auto mode may blend multiple frames to reduce noise, smoothing the image but sometimes creating motion trails or ghosting if something moved between frames. If you want sharp details in still scenes, switch to manual control for a true brightness-clarity balance.
Phones trade time for light in low conditions
In low light, phones trade shutter time for light by lowering shutter speed. You’ll get brighter night photos with a bit of shake, so brace your elbows, lean on a stable surface, or use a small tripod. If subjects move, a faster shutter helps preserve detail, with the option to brighten later in post.
Difference between motion blur and camera shake
When shooting at night, you’ll notice two blur types: motion blur and camera shake. Motion blur comes from moving subjects during the exposure; camera shake comes from your hand or grip. Motion blur shows movement trails; camera shake softens the entire frame. Identify which blur you’re dealing with to apply the right fix: faster shutter or steadier grip for camera shake, or a shorter shutter and possibly a moving subject’s pause for motion blur.
Moving subjects cause motion blur you see
Moving subjects blur with long exposures—neon signs or traffic trails stretch over the frame. To preserve moving details, shorten the shutter or ask the subject to pause briefly. You can also raise ISO to keep exposure, but watch for grain. Practice on a busy street to learn when to snap quickly or wait for a moment of pause.
Hand shake creates different streaks and soft photos
Hand shake smears the entire frame, especially in low light. Stabilize by holding steady, bracing against a surface, or enabling OIS. A timer or remote shutter helps reduce finger movement at the moment of capture. Small habits—steady grip, gentle press, and a calm breath—pay off in crisper night images.
How ISO and shutter speed trade off on phones
You’ll learn how phone cameras balance light when the world goes dark. Raising ISO increases light sensitivity but adds digital grain. A longer shutter lets in more light but also captures more motion and blur. Tiny sensors react quickly, so you’ll often need a balance: a faster shutter with slightly higher ISO or stabilization to keep scenes readable without excessive noise.
This balance changes by scene. Static cityscapes tolerate a slower shutter with a modest ISO; moving crowds benefit from a faster shutter and a careful ISO cap. The control lever is your finger: start with ISO to brighten, then adjust shutter to keep movement crisp. If you see noise in shadows, lower ISO and accept a longer shutter. If you see edge blur, raise ISO and shorten the shutter. With practice, you’ll sense the rhythm of clean night photos.
You can raise ISO to shorten shutter time
Raising ISO lets you shorten the shutter, which helps handheld shots or fast-moving subjects. You’ll notice a brighter image with less motion blur, but grain increases. Aim for a practical ISO range (800–3200 on many phones) and test how each model handles it. When the subject is steady or you’re on a tripod, you can push ISO higher with less penalty.
Higher ISO adds noise you may notice
The more you push ISO, the more sensor amplification shows as grain, especially in shadows. If you see noise, drop ISO and lengthen the shutter a little, or use stabilization to keep exposure without pushing ISO too far. Some noise reduction helps, but it can soften fine detail. You’ll often reach a middle ground where the image looks clean and sharp, not artificially smooth.
Balance ISO vs shutter for clearer night photos
The goal is a balance where ISO and shutter complement each other. Start with moderate ISO, then adjust shutter to control motion. If motion blur appears, shorten the shutter and raise ISO enough to keep exposure. If noise dominates, lower ISO and lengthen the exposure on a stable surface. The sweet spot varies by scene; practice helps you find it quickly.
Shutter Speed at Night: Why Slow Shutter Causes Blur on Your Phone (And How to Fix It) is about not letting either extreme ruin your shot. Keep a light touch on ISO, use a tripod when possible, and rely on faster shutter only when needed.
You can use higher ISO to shorten shutter time (revisited)
For handheld shots or quick-moving subjects, pushing ISO can give you a usable shutter speed. This is a trade-off: more noise for less blur. Test your phone’s high-ISO performance and pair it with stabilization to keep edges crisp.
Long exposure apps let you try smartphone long exposure tips
Long exposure apps unlock control beyond the native camera app: lock exposure, stack frames, and preview how blur builds. Use them to test what if questions—extend the shutter, lower ISO, or adjust lighting. A tripod or stable surface helps maximize the benefit. Think of long exposure as painting with light: hold the shutter, reveal trails, and learn how much motion you’re willing to tolerate.
Post-processing and multi-frame techniques
Smart edits plus multiple frames can yield cleaner night photos. Stacking and merging frames reduces noise and blur in dark scenes. Align frames carefully if there’s any movement, and consider burst mode to capture several options.
Stacking and merging frames reduce noise and blur
Stacking combines several quick shots to reduce grain and color shifts. Use a steady stance, a small tripod, or a timer to minimize blur. In busy scenes, burst mode can help you pick the sharpest frame later. Merging frames isn’t magic—it’s a math trick that yields a cleaner final image.
Sharpening and deblur tools can rescue some photos
Sharpening boosts edge contrast, helping lines pop again. Deblur tools attempt to reverse tiny shakes or motion. Avoid overdoing these edits; excessive sharpening creates halos and fake edges. Some motion blur may still show, but careful adjustments can salvage a usable result.
Combine frames and edits to fix night blur
Blend the sharpest parts from multiple frames and adjust for color consistency. Use masks to protect details you want to keep and let better parts shine through. The aim is a clean, natural look that reflects the scene.
Image stabilization limits on smartphones
Stabilization helps, but it has limits in the dark. It can’t create light where there isn’t any. When you shoot at night, you often balance steadiness, shorter shutter times, and extra light. Stabilization is a aid, not a cure for all blur.
What OIS and EIS do to help your shots
Optical Image Stabilization (OIS) moves the lens or sensor to counteract small shakes, giving steadier frames, especially for still subjects and shorter exposures. Electronic Image Stabilization (EIS) analyzes frames after capture to reduce blur and smooth video. They often work together, especially on night streets. For the cleanest stills, pair stabilization with a solid grip or tripod.
Stabilizers can’t stop all blur in long exposures
Long exposures magnify even tiny shakes, and stabilization can’t freeze moving elements in the scene. Plan to use the shortest shutter feasible or add light with a brighter scene, tripod, or stable surface. For static subjects, stabilization helps; for moving subjects, you’ll still need a faster shutter or different technique. Stabilization reduces shake, but it won’t fix slow shutter blur.
Stabilization helps but won’t fix slow shutter blur
Slow shutter blur comes from actual motion in the scene, not just hand shake. Prop your phone on a stable surface, shorten the exposure, or add light to reduce the need for a long shutter. If possible, switch to a mode that prioritizes faster shutter speeds while keeping brightness. Practice helps you know when you can rely on stabilization and when you need a faster shutter.
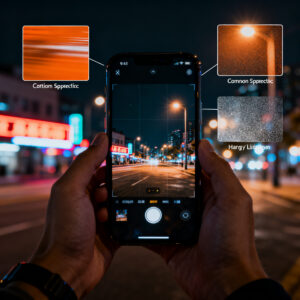
Handheld night photography tips for your phone
You’ll learn practical moves to grab sharper night pics with your phone. Small changes—like how you hold the camera or when you tap the shutter—make a big difference. Stability matters more than you think; a steady grip and controlled breathing reduce blur. Use your phone’s auto settings wisely, then fine-tune for balance between highlights and shadows.
- Stability: brace elbows, plant feet, and lean on a solid surface.
- Light balance: treat each light as a clue; adjust exposure so highlights don’t blow out while preserving shadows.
- Auto and manual: start with auto, then switch to manual to control exposure and shutter.
How to hold your phone steady for longer exposures
Adopt a solid stance, tuck elbows, and press the shutter gently. A slow, controlled breathing rhythm helps you stay still. If available, use a longer exposure setting or night mode on a fixed capture. Locking your pose before capture improves results over several frames.
Use breathing, elbows, and burst mode to reduce blur
Breathing, tight elbows, and burst mode help you capture a sharp moment. Burst frames give you several chances to pick the cleanest shot. If burst isn’t available, shooting a few rapid taps can yield a sharp frame.
Small hacks cut shake and improve sharpness
Enable grid lines to align with light sources, turn on anti-shake if available, and use a timer to avoid finger movement. Cushion your phone against a stable object and adjust lighting so glare doesn’t overpower the scene.
When to use a tripod and other accessories
Accessories sharpen night photos: a tripod provides a solid base, a clamp or small stand helps on uneven surfaces, and remote shutters or timers cut shake after pressing the shutter. With the right setup, you’ll notice less shake and more detail, even in dim lighting.
A tripod stops camera shake for long exposures
Long exposures reveal the scene’s light but also every tremor in your hands. A tripod fixes that, letting you shoot for several seconds or longer and keeping lights crisp. If you don’t have a real tripod, improvise with a railing or table edge. A lightweight smartphone tripod is a worthwhile investment for noticeably sharper night shots.
Remote shutter and clamps reduce touch blur
A remote shutter keeps your finger from transferring shake to the sensor. Combine with a clamp to secure the phone and minimize movement after pressing the shutter. If you don’t have a remote, use a timer. Clamps help on uneven surfaces or low angles. Together, they produce sharper night images.
Using manual mode and long exposure apps
Manual mode and long exposure apps give you control to reduce blur and craft intentional night photos. You’ll learn how to read light and how your camera behaves in dark scenes. Manual control lets you choose shutter speed, ISO, and sometimes white balance, while long exposure apps let you stack frames and preview motion.
Set shutter and ISO in manual mode to control blur
In manual mode, pick a shutter speed that suits the scene, then choose ISO. A higher shutter speed freezes motion but may darken the image; a higher ISO brightens but adds grain. Find a middle ground to minimize blur while keeping noise manageable. Practice with different scenes to discover your go-to settings.
Long exposure apps let you try smartphone long exposure tips
Long exposure apps enable exposure locking, frame stacking, and live previews of blur. Use them to experiment with longer shutters while maintaining stability. A tripod or solid surface helps you maximize results. Treat long exposure as an opportunity to reveal light trails and subtle movement with a steady hand.
Postprocessing and multi-frame techniques (revisited)
Stacking and multi-frame edits can dramatically improve night images. Combine frames to reduce noise, sharpen edges, and blend the best parts for a crisper result.
- Stacking and merging frames reduce noise and blur.
- Sharpening and deblur tools can rescue some photos, but use them sparingly.
- Combine frames and edits to fix night blur with careful masking and color consistency.
Final note
Shutter Speed at Night: Why Slow Shutter Causes Blur on Your Phone (And How to Fix It) remains a guiding concept: balance light and motion, know when to stabilize, and practice with real-world scenes. With the right approach—manual control, stabilization, and thoughtful post-processing—you can produce sharp, natural-looking night photos that reflect what you actually saw.

Smartphone Night Photography Enthusiast & Founder of IncrivelX
Vinicius Sanches is a passionate smartphone photographer who has spent years proving that you don’t need an expensive camera to capture breathtaking images after dark. Born with a natural curiosity for technology and a deep love for visual storytelling, Vinicius discovered his passion for night photography almost by accident — one evening, standing on a city street, phone in hand, completely mesmerized by the way artificial lights danced across wet pavement.
That moment changed everything.
What started as a personal obsession quickly became a mission. Vinicius realized that millions of people were carrying powerful cameras in their pockets every single day, yet had no idea how to unlock their true potential after the sun went down. Blurry shots, grainy images, and washed-out colors were robbing everyday people of memories and moments that deserved to be captured beautifully.
So he decided to do something about it.
With years of hands-on experience shooting city streets, starry skies, neon-lit alleyways, and creative night portraits — all with nothing but a smartphone — Vinicius built IncrivelX as the resource he wished had existed when he was just starting out. A place with no confusing jargon, no assumptions, and no gatekeeping. Just honest, practical, beginner-friendly guidance that actually gets results.
Vinicius has tested dozens of smartphones from every major brand, explored dark sky locations across multiple states, and spent countless nights experimenting with settings, compositions, and editing techniques so that his readers don’t have to start from scratch. Every article on IncrivelX comes from real experience, real mistakes, and real lessons learned in the field.
When he’s not out shooting at midnight or writing in-depth guides for the IncrivelX community, Vinicius can be found exploring new cities with his phone always within reach, looking for the perfect shot hiding in the shadows.
His philosophy is simple: the best camera is the one you already have — you just need to learn how to use it in the dark.