Night Mode vs Regular Mode Basics
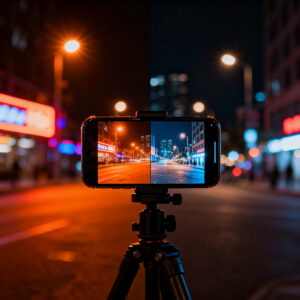
Night Mode vs Regular Mode: Side-by-Side Comparison for Beginners. When you point your phone at a dark scene, Night Mode uses software tricks to brighten the image while preserving believable colors. It often slows shutter speed and blends multiple frames to reduce blur, resulting in brighter shadows, more texture, and less grain. In a dim room or street at dusk, Night Mode helps you capture what you saw rather than a flat quick snap.
Regular Mode sticks to a single shot, relying on the sensor and ISO. It can brighten the scene but tends to introduce more grain and color wash in low light. It’s fast and simple, ideal for quick moments, but often lacking the depth and texture you get with Night Mode. Choose Regular Mode for speed; Night Mode for mood and detail in low light.
Pick based on your goal. For a quick, true-to-life moment, use Regular Mode. For depth, richer color, and clearer shadows, try Night Mode. You can compare side-by-side to decide what feels right for your scene. Night Mode vs Regular Mode: Side-by-Side Comparison for Beginners is a handy search phrase as you learn.
What Night Mode Does for Your Camera
Night Mode brightens dark scenes using software and multiple-frame blending to reduce blur and noise. It’s intelligent about exposure and contrast, preserving shadows and keeping highlights in check. The result is a natural look that’s closer to what you saw, even in low light.
It shines when there’s motion or mixed lighting, helping moving subjects stay clearer and colors stay nuanced. In cafes or parties, Night Mode preserves mood and texture, bringing out details you’d miss with a quick shot. Tap a dark corner and watch how texture emerges with Night Mode.
How Regular Mode Handles Low Light
Regular Mode brightens with ISO and faster shutter speeds, which can keep things sharp but may increase noise and color shifts. In a dark room, you might get clear outlines but grain or wash in darker areas. It’s fast and avoids processing delays, but the result can feel flat or oversimplified in low light.
If someone moves, Regular Mode can blur faces and miss detail. It’s great for quick action where you can’t wait for processing, but it won’t deliver the quiet, detailed look of Night Mode. In bright spots, highlights can clip, and overall contrast may feel harsh.
Visual Overview
Night Mode typically yields smoother gradients, less noise, and better shadow detail, while Regular Mode offers a brighter scene with more grain and potential color muddiness. Night Mode preserves depth in shadows; Regular Mode can flatten contrast. Night Mode often looks more true to life, while Regular Mode feels brighter but thinner.
Image Quality at Night (Night Mode vs Regular Mode)
When you point your phone at a dark scene, Night Mode brightens the scene while keeping colors true; Regular Mode stays simple but can look flat or noisy. Night Mode often reveals details your eye might miss, like streetlamp glow or reflections on wet pavement. Regular Mode works when there’s enough light for a clean shot without extra processing. Experiment with side-by-side comparisons to learn when to switch.
Night Mode usually reduces grain and preserves texture in shadows, while highlights stay controlled. Regular Mode can exaggerate contrast or push shadows too dark, losing detail. Night Mode broadens dynamic range, preventing highlights from blowing out while keeping shadow detail. Try scenes you care about and note which mode keeps the balance you want. Newer phones handle Night Mode more smoothly; on older devices, you may see more smoothing or artifacts.
Noise, Detail, and Dynamic Range
Night Mode reduces noise by stacking frames, delivering smoother shadows and crisper textures. Regular Mode can show more grain in shadows and may clip highlights. Night Mode often sharpens a touch through stacking, helping readability of signs and faces in low light, but over-sharpening can look artificial. Dynamic range improves with Night Mode, capturing both bright lights and dark areas more evenly. Test scenes like storefronts at night to learn which mode keeps the mood you want.
How Stacking and Exposure Improve Shots
Stacking layers several frames to reduce noise and improve detail. Longer exposure in Night Mode gathers more light without blowing highlights, while Regular Mode uses shorter exposure, which can freeze motion but add noise in shadows. Effective stacking reveals night textures—brick, wet pavement, or foliage—with minimal grain. Exposure management lets you balance brightness and mood.
Key Quality Factors
- Light source balance: bright enough without washing highlights
- Noise control: Night Mode reduces noise via stacking; Regular Mode may show more grain
- Detail preservation: Night Mode preserves textures and edges better in low light
- Color accuracy: Night Mode maintains natural hues in mixed lighting; Regular Mode can shift colors under neon or tungsten
- Motion handling: Night Mode can blur moving subjects less cleanly with long exposure; Regular Mode freezes motion but with more noise
Night Mode Battery Savings
Night photos require more processing, longer exposure, and sometimes a brighter screen, which drains battery. Night Mode opens the shutter longer and runs heavier processing, especially on older devices. To stretch life, reduce screen brightness, shorten screen-on time, and use Night Mode only when it adds real value. A quick side-by-side comparison of Night Mode vs Regular Mode helps you gauge the battery trade-off for your scenes.
How OLED and LCD Affect Battery Use
OLED displays waste less power with darker images, so Night Mode can save some screen power on OLED screens. LCD screens backlight always uses power, so Night Mode saves less on the display. Camera processing still uses power, so balancing exposure and screen use remains important. If battery is a concern, switch to Regular Mode to conserve energy on long shoots.
Processing vs Screen Power for Your Phone
Night Mode relies more on the processor (stacking frames, noise reduction) than the screen. Lower screen brightness and shorter screen-on time can reduce drain. The blend of processing and display settings determines overall energy use.
Practical Battery Tips
- Use Night Mode for essential shots; switch to Regular Mode when light is plentiful
- Short Night Mode bursts are gentler on the battery
- Dim the screen and enable auto-brightness
- Use a charger or power bank on long shoots
- Compare Night Mode vs Regular Mode: Side-by-Side Comparison for Beginners to gauge trade-offs
Dark Mode Eye Strain Reduction and Readability in Dark Mode
Dark mode reduces glare and creates a softer reading environment, helping you stay longer on camera settings, reviews, and controls. It lowers overall brightness and smooths color transitions, making menus easier to scan in low light. However, too much darkness can hide details in shadows, so adjust brightness and contrast to keep labels readable.
A balanced approach works best: set a comfortable mid-brightness level and rely on high-contrast text versus background for quick readability. Dark mode helps your night workflow feel smoother, allowing more focus on capturing great night photos.
Why Dark Mode Can Ease Eye Strain for You
Dark mode reduces bright light exposure at night, easing fatigue when switching apps or scrolling menus. It can help you review more shots in one sitting without eye strain. If text is too small or icons are hard to read, you may need a slightly lighter theme or higher contrast.
When Readability Improves or Worsens
Readability improves with clear, bold text and high contrast. Large, chunky fonts on shutter controls are easier to read. Readability worsens when contrast is too low or text sits on busy backgrounds. Adjust font size, bold text, or switch to a high-contrast theme if needed.
Accessibility Dark Mode Benefits
Dark mode reduces glare and fatigue, enabling a smoother workflow for low-light shooting, faster menu navigation, and easier exposure tweaks. It’s especially helpful for users who are sensitive to bright screens or use accessibility features.
How Dark Mode Helps Low-Vision Users
High contrast and bold labels improve control readability, enabling quicker ISO, shutter speed, and white-balance adjustments. A cleaner layout helps you scan menus and prompts faster, making night photography more approachable.
Color Contrast and Font Options for You
Opt for bold text, crisp color contrast, and adjustable font sizes. High-contrast themes with bright accents on key controls (like the shutter button) improve legibility in the dark.
Make It Accessible
Enable system-wide dark mode, adjust font size and contrast, and verify labels remain readable with screen readers or magnification. A reliable, comfortable workflow is the goal: expose, lock focus, snap, and review without eye strain.
When to Use Night Mode
Night Mode is your ally when light is scarce. It reveals details hidden in the dark and preserves color and texture that would otherwise be lost. Use Night Mode in dim streets, nightlife atmospheres, kitchens with soft lighting, and storefronts at night. The longer exposure gathers more photons, brightening the scene without washing highlights.
Be mindful of motion: Night Mode can slow you down or blur moving subjects. For moving people or fast action, Regular Mode’s shorter exposure can prevent blur. For still subjects in low light, Night Mode often shines.
Low-light Scenes Where You Should Switch
Dim restaurants, quiet parks at night, and rooms with lamps benefit from Night Mode, which brightens shadows and preserves texture. Night Mode provides natural skin tones and a warmer feel indoors, often without a flash.
Times to Stick with Regular Mode to Avoid Blur
Moving subjects or changing light conditions benefit from Regular Mode’s faster shutter. Night Mode is less ideal for fast action unless you’re willing to trade motion for detail in the still portions of the scene. For handheld landscapes with a tripod, Regular Mode can still capture sharp detail in certain conditions.
Best Moments to Switch
Turn to Night Mode when you want true color and texture with less glare. In dim cafes or candlelit settings, Night Mode preserves ambiance and reduces harsh shadows. For neon-lit city scenes or busy streets with action, Regular Mode can help minimize blur while maintaining a natural look. When mood and depth matter more than brightness, Night Mode is your friend.
How to Enable Night Mode
Night Mode is a smart helper that adds exposure and processing to keep scenes natural. It uses longer exposure and stacking to preserve detail in shadows while keeping highlights controlled. Practice in familiar places to learn how distance, lighting, and motion affect results. Once comfortable, you’ll know where Night Mode makes the biggest difference—streets, concerts, or candlelit dinners.
How You Enable Night Mode on iPhone and Android
- iPhone: Open Camera, look for the yellow moon icon. Tap to switch on Night Mode or let Auto enable in low light. There’s an exposure slider for brighter images when you’re steady on a tripod.
- Android: Camera app > Photo mode > Night/Low Light option. Enable Night Mode or Auto. Some devices place it in the More or Pro/Advanced menus. If available, use stabilization for longer exposures.
For both platforms, you can lock exposure by pressing and holding the shutter for a moment. If motion appears, switch to a shorter exposure or brace against a solid surface.
Auto vs Manual Night Mode Toggles Explained
Auto Night Mode lets the camera decide when it helps, great for quick shots. Manual Night Mode gives you control over exposure, ISO, and focus for consistency across shots. Start with Auto to learn, then try Manual on scenes you shoot often to develop a signature look.
Night Mode Settings for Beginners
Night Mode helps you capture low-light scenes with depth, color, and detail. Start with a stable stance, longer shutter, and a measured brightness to avoid overexposure. Practice with familiar scenes to learn when Night Mode shines versus Regular Mode. Aim for clean, natural-looking results.
Starter Exposure, Timer, and HDR Tips
- Let the camera set a longer exposure automatically for more light without fiddling with every slider.
- Use a 2–3 second timer to reduce shake if shooting handheld.
- HDR helps balance bright highlights and shadow detail near lamps or storefronts.
- A tripod or solid surface improves sharpness in longer exposures.
When to Use Tripod or Image Stabilization
A tripod is ideal for ultra-stable night shots, long exposures, and cityscapes. If you don’t have one, brace yourself—elbows in, feet planted, and a gentle shutter press. Image stabilization helps, but a steady base remains essential for long exposures.
Starter Settings
- Night Mode: Enable; let the camera decide exposure
- Timer: 2–3 seconds
- HDR: On for strong contrasts
- Tripod: Use for long exposures or cityscapes
- Stabilization: On for handheld shots
Device Compatibility and Dark Mode vs Light Mode Labels
Device compatibility matters because not every phone supports true Night Mode. Some phones offer Night Mode, Low Light, or Night Selfie as labels. Labels map to actions, so knowing what your device calls the feature speeds up shooting.
Which Phones Support Night Mode and Features
Many modern phones offer robust night modes with longer exposure and noise reduction. Look for larger sensors, better ISO control, and multi-frame stacking. If you own a phone, check for Night/Low Light/Night Sight options to see how the feature behaves. Brand differences include how stacking works, stabilization, and scene detection. When shopping, prioritize a camera app that clearly explains Night Mode benefits like longer exposure, better dynamic range, and reduced noise.
Different Mode Names and What They Mean for You
Night Mode shows up under many names: Night, Night Sight, Low Light, or Starry Night. Some presets are tied to Portrait, full-stack Night, or scene-specific optimizations. The goal is to map labels to actions quickly so you can switch confidently. If you see Night within Portrait, expect background blur with sharp faces in dim light. If you see Night alone, expect a balanced brightness with natural colors. Test different labels in your typical environments to learn which look you prefer.
Check Your Model
Confirm your exact model to find the right Night Mode guidance. Open the camera app, test Night, compare shots with Night Mode on and off, and note brightness, detail, and color accuracy. This hands-on approach helps you understand your device’s behavior in real conditions.
Which Phones Support Night Mode and Features (Recap)
- Look for larger sensors and better ISO control
- Multi-frame stacking for reduced noise
- Scene detection and adaptive exposure
- Consistent dark-mode UI to quickly identify shooting options
Final Note: Night Mode vs Regular Mode: Side-by-Side Comparison for Beginners
If you’re learning photography with a focus on nightlife or low light, Night Mode vs Regular Mode: Side-by-Side Comparison for Beginners is your guiding phrase. Use Night Mode when you want texture, color, and depth in shadows; switch to Regular Mode for fast, bright shots or moving subjects. Practice with side-by-side comparisons to develop your intuition, and remember: the best setting often depends on the scene, motion, and how you want your memory to look in the photo.

Smartphone Night Photography Enthusiast & Founder of IncrivelX
Vinicius Sanches is a passionate smartphone photographer who has spent years proving that you don’t need an expensive camera to capture breathtaking images after dark. Born with a natural curiosity for technology and a deep love for visual storytelling, Vinicius discovered his passion for night photography almost by accident — one evening, standing on a city street, phone in hand, completely mesmerized by the way artificial lights danced across wet pavement.
That moment changed everything.
What started as a personal obsession quickly became a mission. Vinicius realized that millions of people were carrying powerful cameras in their pockets every single day, yet had no idea how to unlock their true potential after the sun went down. Blurry shots, grainy images, and washed-out colors were robbing everyday people of memories and moments that deserved to be captured beautifully.
So he decided to do something about it.
With years of hands-on experience shooting city streets, starry skies, neon-lit alleyways, and creative night portraits — all with nothing but a smartphone — Vinicius built IncrivelX as the resource he wished had existed when he was just starting out. A place with no confusing jargon, no assumptions, and no gatekeeping. Just honest, practical, beginner-friendly guidance that actually gets results.
Vinicius has tested dozens of smartphones from every major brand, explored dark sky locations across multiple states, and spent countless nights experimenting with settings, compositions, and editing techniques so that his readers don’t have to start from scratch. Every article on IncrivelX comes from real experience, real mistakes, and real lessons learned in the field.
When he’s not out shooting at midnight or writing in-depth guides for the IncrivelX community, Vinicius can be found exploring new cities with his phone always within reach, looking for the perfect shot hiding in the shadows.
His philosophy is simple: the best camera is the one you already have — you just need to learn how to use it in the dark.